
The Warp tool in Cricut Design Space is OK for the basics, but it doesn’t have sophisticated options that let you create pro-looking designs. I created this tutorial to teach you how to warp text in ways that aren’t possible in Cricut Design Space, using a free online tool. I will show you how to make the retro wavy stacked text design that is super popular right now, plus how to warp and manipulate text in a ton of different ways!
Let me teach you how to use an easy “advanced” technique to make perfect stacked wavy text that is straight on the top and bottom. To make it as easy as possible, I have even included a template for you to use!
Update July 2024: I have added an update to this technique to make it easier to save your designs as SVG files and added an updated, step by step video tutorial
Update March 2024: I have 4 new templates for wide format, circular and bigger designs!
Video: How to Make Stacked Wavy Text in a box (updated and improved!)
Text Warp in Design Space = Good but not great
Cricut released the Warp tool in Spring 2023. It is only available to Cricut Access subscribers (ie. not a free tool). After an initial rush of excitement, enthusiasm seems to have cooled for this feature, especially because you can’t use it to make the most popular kind of stacked wavy text.

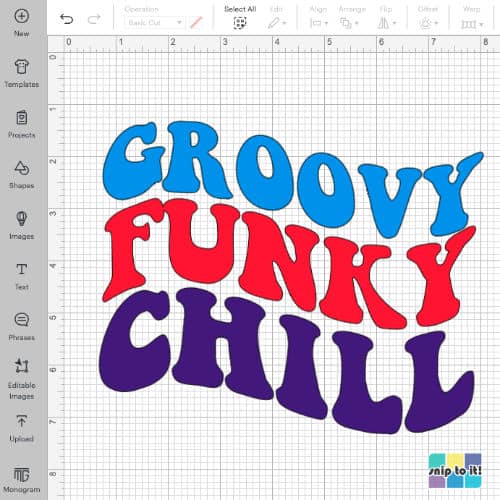
Let’s just take a quick look at wavy text in Design Space versus the wavy text in a square that we want. No matter how much I use the Cricut Warp Tool, I’ll never be able to get the wave text in a box design.

Free tool for simple or advanced text warping: Photopea
I’m going to use a website called PhotoPea in this tutorial. You may have read about it before; I’ve recommended it for converting photos to vectors and converting a PNG file into a multi-layer SVG.
In a nutshell, PhotoPea is an online image editor. It works like a free version of Adobe Photoshop, but it’s got tools to help with vector projects as well. I’ve been using it for years and for me it’s an indispensable toolbox for helping me design graphics for my Cricut projects.
I want to emphasize this is a 100% free method. It will work for people who don’t subscribe to Cricut Access, and even for people who don’t use Cricut at all!
How to make wavy Stacked text designs using Photopea
I’m going to focus on creating a three-line wave inside a square. After you try it, you’ll be able to adapt the technique a number of ways: two lines, four lines or more.
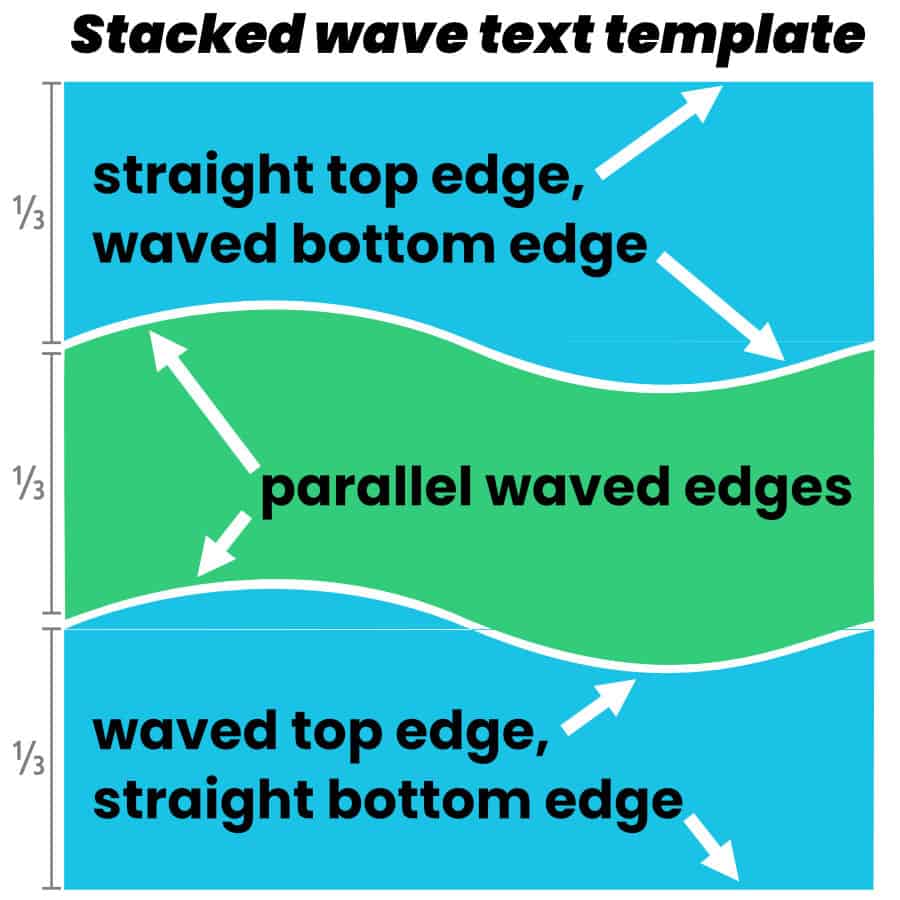
The principle is simple: the middle line of text is warped like a flag waving (curving high, then low). The top and bottom layers follow the contour of the wave on the inside edge and maintain a straight line on the outside edge.
Photopea does have a warp tool with pre-set options similar to Design Space, but they have the same problem DS does (can only make flag-wave text) for this particular purpose. I’m going to show you how to use better tools to make the warped designs you want.
Wavy Stacked text design template
You can try to do this technique freehand, or you can use my template to make wavy text clean and easy!
I made this template that you can use as a guide for warping your text to make sure you keep the top edges straight and the wavy lines parallel. It’s in PNG format. I’ll explain how to use it in the steps below.
Join the Snip to it community to get the PNG template files!
3 line template

wide ratio template

circular template

4 line template

5 line template

How to use the Free Transform and Mesh tools to wave text in PhotoPea
These tools might sound intimidating, but they’re not tough to use. My first word of advice is to give yourself time to practice the technique. It’s not an automatic wavy stacked text generator, but it’s still pretty easy for someone who understands the basics of a design program like Cricut Design Space or Silhouette Studio.
1. Open the template PNG file in Photopea.com
Start by opening the stacked wave text template PNG in PhotoPea. From the home screen, click Open from Computer. If you are not on the home screen, go to the top toolbar and open the File menu. Select “Open” and choose the template from wherever you’ve saved it on your computer.
Once the file is open, locate the graphic in the Layers sidebar (on the right side of the screen). Click the padlock icon to lock this layer. This means you can see it but you can’t accidentally move or edit the template.
If you want the template to wave in the opposite direction, click the Edit Menu, select Transform and click Flip horizontally.

2. Add type in separate text layers
Next, add your text. Click the Type tool in the left sidebar and add your text. Instead of creating a single block with multiple lines of text, create a separate text block for each line of text.
Then, in the top tool bar, open the Font pulldown menu. You can browse the fonts included with PhotoPea, or you can check the “Local Fonts” box and see the system fonts installed on your computer. (It will take a moment for your system fonts to load). Select a font and type your phrase on the blank canvas.
If you are having troubles getting your local fonts to load, you can click the Load Font button. You will be prompted to select your preferred font from your computer to upload into PhotoPea. This font will remain available to you in future sessions.
For this demo, I am using Keep on Truckin’. It’s free for personal projects and is perfect for retro wavy text.
For a wider selection of typefaces, check out my list of 20 tested groovy fonts for wavy stacked text.

You can use the Move tool (the arrow tool at the top of the left-hand toolbar) to resize each line of text. Make sure they are the same width and they all fit inside the template box. Note: this will mean that the font size of each word is going to be different.
To resize the text using the Move tool:
Make sure to check the “Transform Controls” box in the top menu bar. This will make anchor points visible on the corners/sides of the text box. Drag and resize using these control boxes.
If you want to stretch text to make it wider without making it proportionately taller, press the Shift key and then click and drag one of the side anchor control boxes.

3. Change the text layers to Shape (ie. convert to vector)
For the next step you are going to right click on your text in the layers menu in the right-hand sidebar. Select the Convert to Shape option. (You can also find this option in the Layers menu in the top toolbar. Select Layers > Text > Convert to Shape) This will change your text to a vector. It also means you can’t edit the text to fix a spelling mistake or change the font. If you need to correct something, it’s super easy to just re-type the word on a fresh layer.

4. Open the Free Transform tool to use the Mesh Warp tool
After doing a lot of these designs, I have refined this technique to get better results.
We will warp the text using the Mesh tool. Click Edit menu, and the open the Free Transform option. The top menu bar will show a button labelled Warp. Click it, and now your text layer will have a 3 x 3 mesh grid overlay.
Now, click inside the grid. This will activate the control handles. You will see active corners (white squares) and handles (blue circles).

After you click the warp button and add the mesh overlay on the text block, select the Vertical split option from the top left corner of the menu bar. When you mouse over the text you will see a blue line tracking the pointer. Click in the middle of the text. This will create a 6 x 3 mesh over the text, and more importantly, it will create another set of handles in the middle of the block you can use to create a perfect fit inside the template.

- Click and drag the white corners to stretch them to the outer corners/edges of the template.
- Use the blue handles to stretch and warp the top and bottom edges of the letters. Click and drag the handles until the shape of the mesh matches the shape of the template.
- Click and drag the mesh inside the grid to adjust the wave of the text to match the template.

Repeat these steps for every layer and you will be able to create the perfect stacked text wave box.
5. Export the design as SVG
Before you finish the graphic and save it as a vector, you must delete the template layer. In the right-hand Layers menu, highlight the template layer. Click the small trash can icon at the bottom of the Layers menu.

Now your stacked wavy text box is complete and you can export it as an SVG file. Open the File Menu and select Export As, then select SVG from the options listed. Another dialogue box will open, allowing you the change the file name, file dimensions (width and height). There are also check boxes for adding raster graphics, adding hidden layers, vectorizing text, etc. You can leave all of these boxes unchecked and click Save.

Your SVG is finished and is ready to be imported into Design Space (or cutting program of your choice)!
Note to Silhouette Studio Basic users: PhotoPea has an Export As > DXF option. Under the Export As submenu, select “More” at the bottom of the column, then select DXF from the next list of format options. You can use this graphic in the free version of Silhouette Studio.
Use the Mesh tool for more advanced text warping projects
The mesh warp tool in PhotoPea is great for making stacked wavy text. But you can also use it to make much more complex and interesting warp effects.
- Add text to your canvas and rasterize it following the directions in the previous section of the tutorial. Open the Free Transform tool and click the Warp button in the top menu bar. For this example, I’m using Caslon Antique.
- The mesh overlay will appear on top of your layer. But this time, select one of the three options labeled “Split” – Crosswise, Vertically or Horizontally.

- Move your cursor over the mesh layer and you’ll see a preview of a new set of grid lines. When you click to add a split in the mesh, you will be adding more lines to your grid. Each new set of lines on the grid will have new white anchor points and new blue handles.
Now you can wildly warp, distort, bend and glitch your text. This is a fun toy to play with! The possibilities are endless and your designs will be one of a kind!

- When you’re finished, click the checkmark in the top menubar to commit your warp changes. (If you don’t like what you’ve done and want to try again, click the X to discard the changes.) Then follow the steps from the previous section to vectorize your layers and save your design as an SVG!
Here’s how some antique text looks after it gets some manipulation with the mesh warp tool in PhotoPea. This looks spooky, psychedelic and whimsical all at once!

Final thoughts
Warping fonts to make stacked wavy text is a cool way to make in-demand projects using an easy technique. It’s a shame that you can’t do this well in Cricut Design Space, but if you can use Design Space, you can use PhotoPea.
PhotoPea’s basic tools for warping text are really helpful to make all kinds of wavy text projects that you can use for Cricut or other cutting platforms. But if you use the Free Transform tool’s mesh warping feature and the template provided in this tutorial, you can make perfect wavy stacked text in a box for perfect projects.
And with a bit of practice, you can use the mesh warping feature to make all kinds of cool distortion effects to your text. This free, simple tool is a great way to make customized, one of a kind SVGs!
Before you go, you might like to check out our other stacked warped text projects and SVGs:


