
This article is part of our Design Space Mastery hub. It is one of the tutorials focused on Design Space setup and file management.
One of the great benefits of owning a Cricut, and using Cricut Design Space, is being able to make projects from start to finish without having to design them from scratch. That’s right, Cricut users can make ready-made projects designed by Cricut or other Cricut users, taking a fraction of the time it takes to design from scratch.
With Cricut, you’re never on your own staring at a blank screen wondering what to make. The wealth of pre-made projects is not only a great source of inspiration, it also provides a roadmap to how tons of popular projects are made. Instead of tediously re-inventing the wheel designing a project, you can take a shortcut and focus on personal touches!
In this short article, I’ll show you how to find pre-designed projects in Design Space (DS), how to make them, and finally, how to share your own projects with the community.
This article is part of Snip to It’s Design Space for Beginners series of articles. To browse through the full series, start with our overview of Design Space.
What is a Project in Design Space?
Simply put, anything labeled a “Project” is a finished design for a card, t-shirt, decal, etc. that you can make. Cutting and assembly instructions tell you what materials to use and how to assemble the finished design. You can make these projects as-is, or you can make modifications or add personal touches to reflect your own style.
A big part of the appeal of owning a Cricut is having an entire library of projects accessible; all of the trial and error has already been done so when you make it, there won’t be any surprises. Photos show you what each finished project looks like.
The >135,000 projects in Design Space come from 2 sources: Cricut, and the Cricut user community. Here’s how to browse, load and make these projects.
Where to find Cricut Projects
Finding a project to make in Design Space is pretty straightforward. After you log in and open the Home screen, Design space will show you new, trending and seasonal projects in multiple categories.

You can also look for specific projects in the search bar at the top of the home page. When you click on the search bar, enter your search term and you can search specifically within projects (or projects made by the Cricut community, or images.)
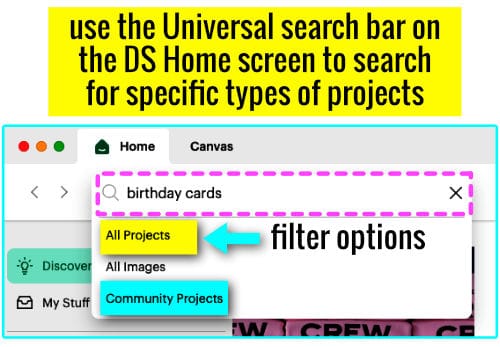
You can also browse projects from the DS canvas screen. In the Design panel (the vertical menu on the left), click the Projects icon and Design Space will open the full project library. You can search within the library and use the pulldown category menu to filter your results.

Free vs Cricut Access projects
Most of the projects available in Design Space are free with a Cricut Access subscription. If you are not a subscriber, you will be directed to a checkout before you can make the project.
What makes a project free for everyone vs subscriber only? Free projects use only images, fonts and shapes that are free to everyone. Subscriber projects use at least one element (font, image, shape, etc.) that is available only to Access members.
Cricut Access projects are flagged with a green banner so you can recognize their accessibility. (as are Access member images, fonts, etc.)

What are Cricut Community projects?
If you have a Cricut Design Space account, you are a Cricut community member. Welcome, Community member! Any project that a community member makes using Design Space images, fonts and shapes can be shared with the greater community.
Some of these projects will be Access subscriber-only because they use elements available only to subscribers, but some of them will be free for anyone to make.

For example, if you followed along with our introduction to Design Space, the practice project that we made is now available as a Cricut Community project.
How to load a project to the Design Space canvas
When you have located a project that you’d like to try in the library, click the thumbnail and you’ll open a window containing the project details. I found a cute bookmark under Free projects called “Personalized Tiger Bookmark“

This project (marked as Beginner difficulty), features a preview image, a brief description and a list of the materials and tools required. If you keep scrolling down the project description on the right side of the window, you will also get step by step instructions on how to assemble the pieces to make the finished project.
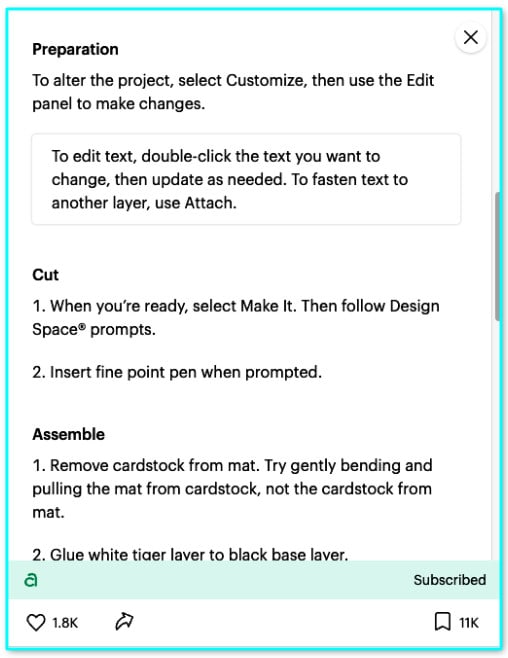
(Projects provided by Cricut will include assembly instruction and a list of materials and tools needed. Community projects will not necessarily have as much included information)
To open this project on the canvas, click the Customize button. This will let you change the text to personalize this project, or edit it in other ways.
When you have finished customizing on the canvas, you can click the Make button and send this project to the Mat preview and Set, Load and Go screen like any other project. Follow the preparation instructions and cut the project, then assemble the pieces and you’re done!
Tips for using ready to make projects on the canvas
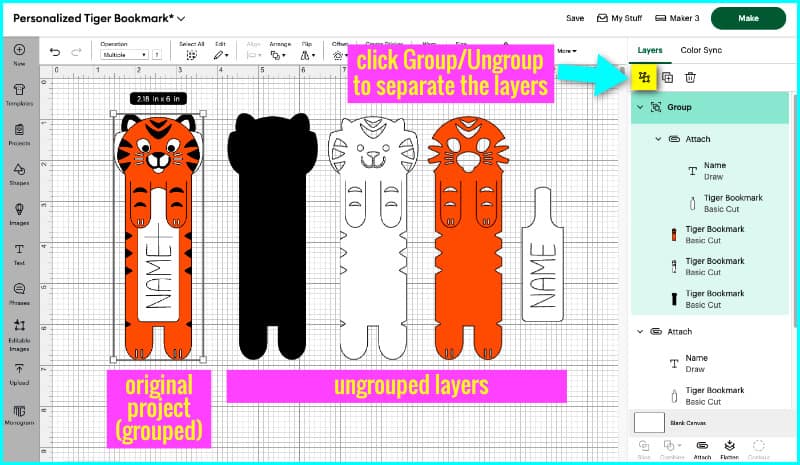
Ungroup: when you open a project on the canvas, it may look like it’s fully assembled, and you can’t click it to personalize it or make changes. It’s common that all of the layers are grouped so they all move together on the canvas. To make each layer editable, click the design to highlight it, then click the Group/Ungroup icon at the top of the Layers panel. You can then separate the layers and make edits to the project.
Detach: For the same reasons as above, you may have to detach text set to Pen > Draw from another object. You will need to do this before you can change written names, dates, etc. Simply select the Attached objects, then click the Detach icon at the bottom of the layers panel.
(Make sure you use the Attach function after you have edited your text!)
Save As: When you open someone else’s project on the canvas and make edits, instead of the basic Save function, you will get the Save As option. You will need to modify the file name, but it will be saved to your collection of projects (i.e. “My stuff”).
Sharing your own projects
The Cricut community is huge – over 8 million users – and one of the biggest benefits of being part of that community is that you can share your creations with others the same way they share with you.
To share one of your projects, navigate to the “My Stuff” screen and you’ll see all of your projects, including originals you’ve made and copies of other people’s projects you’ve personalized. Below each preview image there will be a share icon (a curved arrow).
Click this icon and then follow the prompts to add at least one photo of the finished project (required) and then add a description, instructions and other notes. When you’re finished, click the Share it icon again and your project will be public to the wider Cricut community.
(You can also make public project private again if you wish.)
Where to go from here?
If you’re starting to get comfortable with your Cricut and Design Space, you may want to try your hand at uploading your own images for custom projects.
Are you interested in adding your own fonts to Design Space? Our tutorial will show you how to download and install fonts on Windows and Mac computers.