
Design Space is the software you use to create projects and plan precise instructions for your Cricut cutting machine. This Beginner Series guides you through navigating the workspace to completing your first project, from the first click to the first cut. The series is part of our Mastering Cricut Design Space learning path.
So you’ve downloaded and installed Cricut Design Space for the first time – now what? Before we jump into buttons and tools, it helps to understand what this software actually does.
Design Space isn’t just where you make designs, it’s the software that tells your Cricut machine exactly what to do. Every project follows the same basic path: you create or upload a design, prepare it for cutting, and then Design Space sends instructions to your cutting machine.
This article will take you through what Design Space does and the basic workflow you will follow to make every project.
Whether you’re making a simple vinyl decal or a layered cardstock shadowbox, the workflow stays the same.
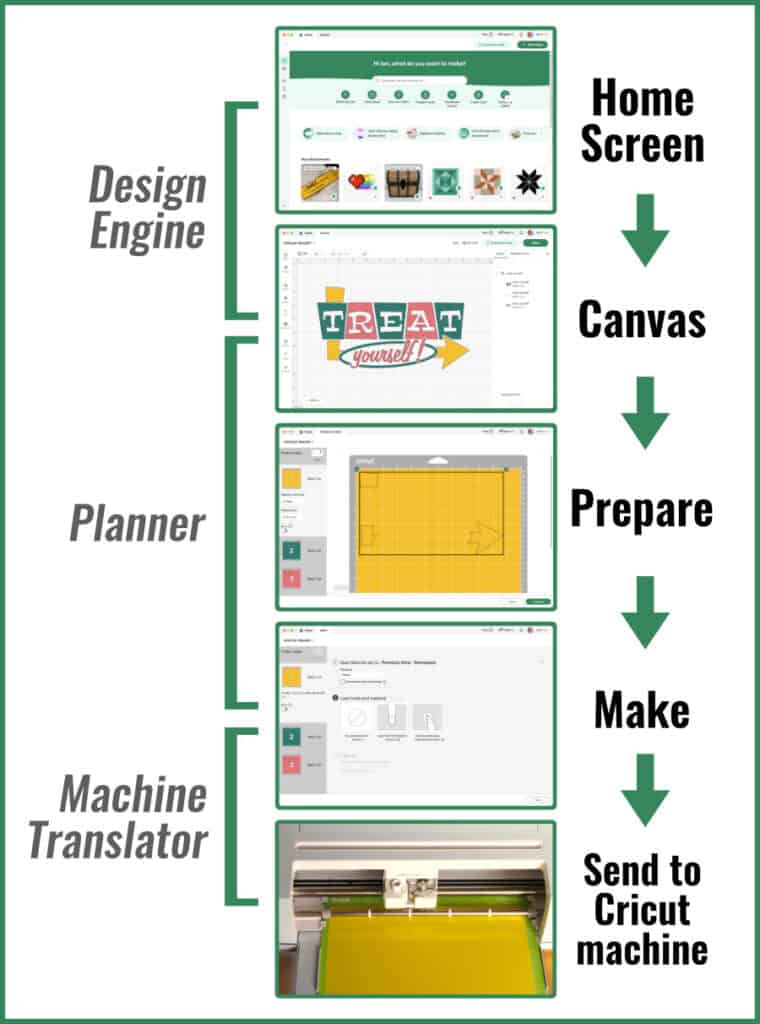
Design Space is three programs in one
Despite the name, Design Space isn’t primarily design software, it is a program that translates designs into instructions for your Cricut machine.
Like sending a document to your printer from MS Word, you will send projects from the Design Space Canvas to your Cricut machine to be cut, drawn, foiled, engraved, etc. Design Space is a mandatory part of using your Cricut cutter. Even if you want to use a cut file you got from Etsy, you will still have to bring that file into Design Space in order to use your machine to cut.
1. The Design Engine
Create or import designs
Design Space allows you to create designs using shapes, text, and images. You can edit, resize, and arrange your designs on the Design Space Canvas, which is the main workspace where every Cricut project begins.
You can build your own designs from scratch or upload projects from other sources (like Etsy or Creative Fabrica). This is the part of Design Space that most makers focus on – it’s the Canvas on which you create birthday cards, personalize t-shirts, or prep a sheet of stickers.
But this is only part of the story…
2. The Planner
Organize Operations and cutting order
As part of the design process on the Canvas, you will assign Operations like Cut, Draw, or Score to shapes, text, and images. You will use Attach to fix object positions, and colors will be assigned. These aren’t design tools, they are all part of the planning process for Design Space to give instructions to your Cricut machine.
As you move through the Design Space workflow you will make even more planning decisions: final positions of objects on mats (Prepare screen), tool and material settings (Make screen).
All these instructions will tell the Cricut machine what to cut, what to draw, and in what order.
3. The Machine Translator
Converts everything into instructions your machine understands
This is the part where you don’t have any input. Once the design and plan are finished, Design Space creates precise instructions translating all of that into language the Cricut cutter can understand. The result is that the machine knows exactly where the blade or tool needs to move, when to lift, the pressure and speed to apply, etc.
The Design Space Workflow
There are 4 main areas you will navigate as you proceed through the Design Space workflow:
- The Home screen where Cricut shows you new and curated projects/images/fonts for trends and occasions, sales, Access benefits, etc.
- The Canvas where you will actually design/import/personalize your project
- The Prepare screen where you see the different parts of your project laid out as they will be cut
- The Make screen where you choose material settings and tools before your machine actually begins drawing/cutting/foiling, or whatever else
The design is then cut piece by piece by your Cricut machine. Here’s what that looks like:
Getting started on the Home screen
When you open Design Space, you see the Home screen before you see anything else. The Home screen is, most importantly, a portal to the Canvas. The Home screen is also where Cricut promotes projects and products, but you’re not required to use any of it.
At the very top, there is a search bar to search projects or images, and there are a series of shortcuts to either a blank Canvas or various project templates (vinyl decal, iron-on t-shirt, etc.).
Below that, there are quick links to Cricut’s shop options like sales (which take you to their webpage), how-tos, etc. A list of your own recently bookmarked images and projects follows, then below that are tons of curated collections of projects and images related to trends, occasions, and various other themes to scroll through.
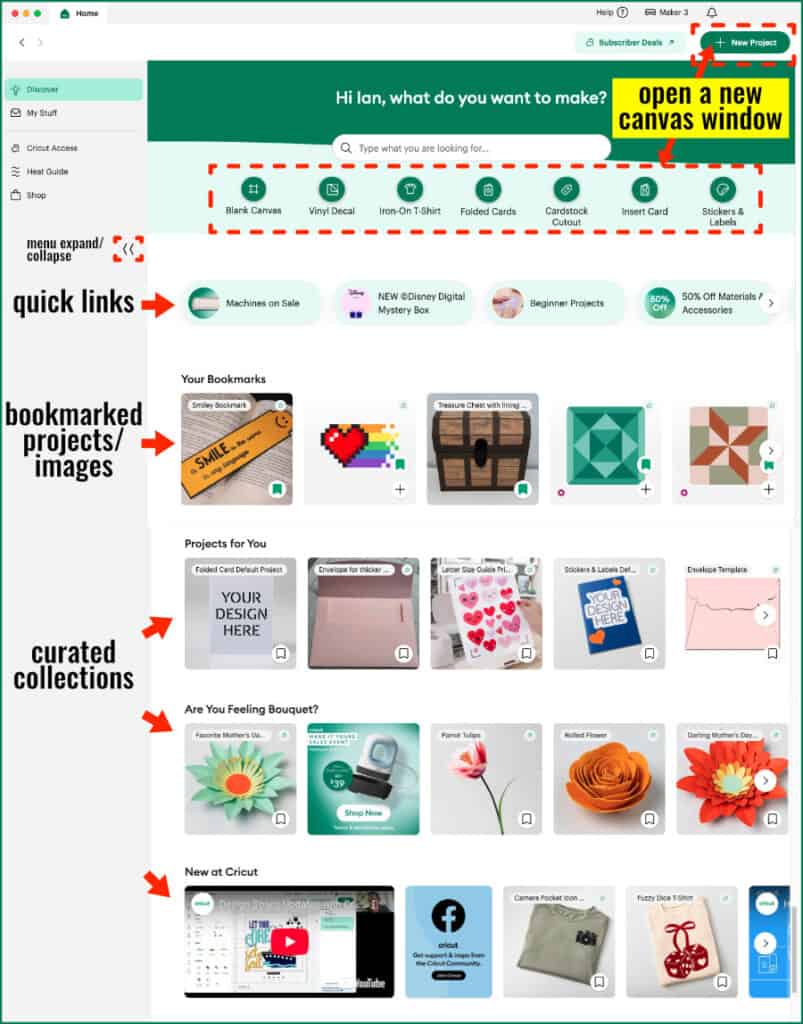
The lefthand sidebar (click the arrows at the bottom to open this menu) has the following options:
- Discover: the main home page, including curated collections and a search bar for project and image searches
- My Stuff: opens new screen with all of your bookmarked, uploaded, and purchased images and projects
- Cricut Access: opens new screen with your subscriber info or benefits list if you’re not a subscriber
- Heat Guide: takes you to the Heat Guide webpage at cricut.com for time/temp instructions for Cricut Iron-On
- Shop: takes you to cricut.com shopping site
To get to the Canvas, you can choose Blank Canvas or the New Project button, a project template, or select a project or image. All roads lead to the Canvas.
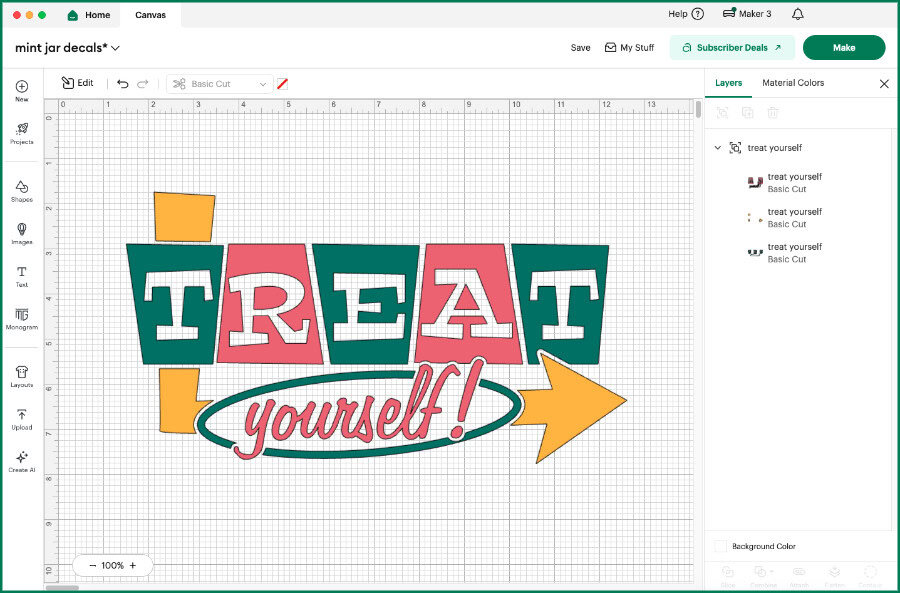
The Canvas: where you create or modify designs
The Canvas is the heart of the Design Engine part of Design Space. This is a digital worktable where you will create or modify designs before you send the finished project to be cut. The Canvas is where creativity happens, but it’s also where planning decisions begin.
The next (third) article in this Beginner’s Guide series takes you on a tour of the Canvas and its tools, so I won’t go into details here.
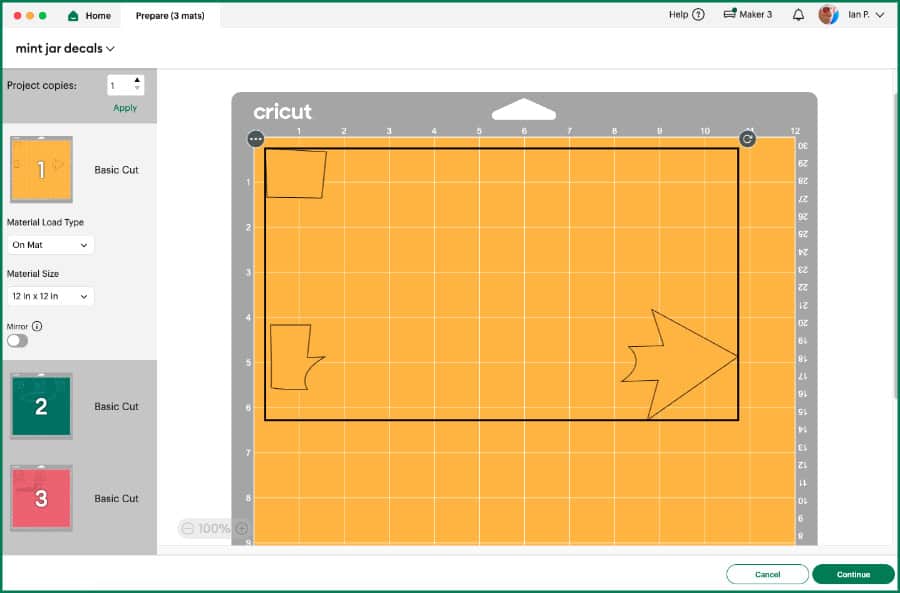
The Prepare screen: planning the cuts
After you finish your design and click Make, you will be taken to the Prepare screen (formerly called Mat Preview). This is where the Planner part of Design Space is most apparent, because every part of your project will now be presented to you on numbered, color-coded mats, with Operations listed in order for each mat. This is where you can move objects on or between mats and make choices about what mat you want to cut first.
The fourth article in the Beginner’s Guide series takes you through a tour of the Prepare screen.
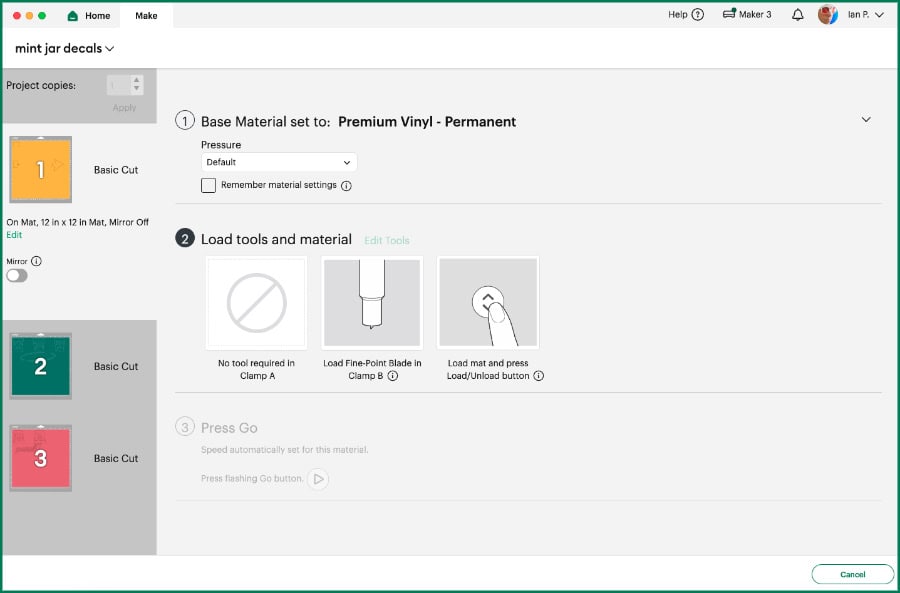
The Make screen: last stop before the cut
The Make screen (formerly Set, Load & Go) is the final thing you’re going to see before sending your project to the Cricut machine for cutting. This is where you are going to tell Design Space what material settings to use for the selected mat, and where Design Space will tell you what tools to set up in the machine first.
This is the stage where your Cricut machine must be powered on and connected to Design Space.
The fourth article in the Beginner’s Guide series takes you through a tour of the Make screen.
The Cricut machine
Your trusty Cricut will now execute the Operations on the mat in a fixed order, following the instructions it has been given by Design Space. Your role will now be loading materials on mats and following Design Space prompts to change tools, if necessary. You’ll also be watching to make sure the cuts are completed correctly, hitting the Go button on your machine again to re-do an Operation that was incomplete, or making other adjustments.
Why understanding the Design Space workflow matters
Ian and I think of Snip to It as a place where we teach you how and why things work the way they do so you’ll be prepared to troubleshoot anything that comes your way.
Over the past few months, we’ve seen people really struggling with a Design Space update that didn’t change the way anything worked, but made the Canvas look different. We want to teach you the core functions of Design Space so cosmetic changes won’t faze you at all. You’ll know exactly where to find every important tool and you’ll know what all of them do, not just what buttons to click.
We want to help you become the person who knows exactly what went wrong when you hit Make and everything on the Canvas got separated into a bunch of little pieces. We want you to know what decisions you’ll make at every step of the workflow, and what Design Space will automatically do behind the scenes. Most importantly, we want you to be able to learn the fundamentals so this piece of software enhances, not blocks, your creativity!
Cricut Design Space Beginner Series
Now that you’ve got an idea of what Design Space is and the workflow every project will follow, we’ll be taking a tour of the Canvas.
There has been a lot of confusion about the new configuration of the Canvas, but once you learn about the 3 zones where all the tools live, everything will make a lot more sense!
- How to Install Design Space
- What Does Cricut Design Space Do? Understanding The Workflow ← YOU ARE HERE
- The Canvas: Understand The 3 Zones ← UP NEXT
- The Prepare & Make Screens: Planning Your Cut
- From Canvas to Cut: Your First Complete Cricut Project