
This article is part of Snip to It’s Design Space Mastery series, focusing on setup, files and troubleshooting.
After learning the difference between SVG and PNG files and getting the hang of uploading basic cut files, let’s take a walk through the process of uploading PNG (and JPG) images to Design Space. These files are essential for Print Then Cut projects, and the upload process involves a few more steps than uploading SVG files.
Don’t worry, this explainer will cover everything and even give you a few pointers for dealing with common problems!
Why do I need to upload files to DS? Don’t they have tons of images?
Stickers are one of the most popular types of projects made by Cricut users. It doesn’t take too long before most beginners are itching to try making their own custom stickers, and it’s extra enticing to make personalized artwork. What’s the point of having these versatile machines if you can’t make one of a kind projects?
Even though Design Space has almost 2 million images and over 300,000 projects in its library, sometimes you need personal images and there’s nothing like it in Design Space. (Or you find images you love on third party sites like Creative Fabrica). Knowing how to upload your own images is a key skill to practice in Design Space so you can make and personalize whatever you want, membership or not!
How to add print and cut images from the Design Panel
Note, these steps are based on Design Space Live version 9.64.103 (April, 2026). If you are using the Beta version or some future version of Design Space, this upload process may have changed.
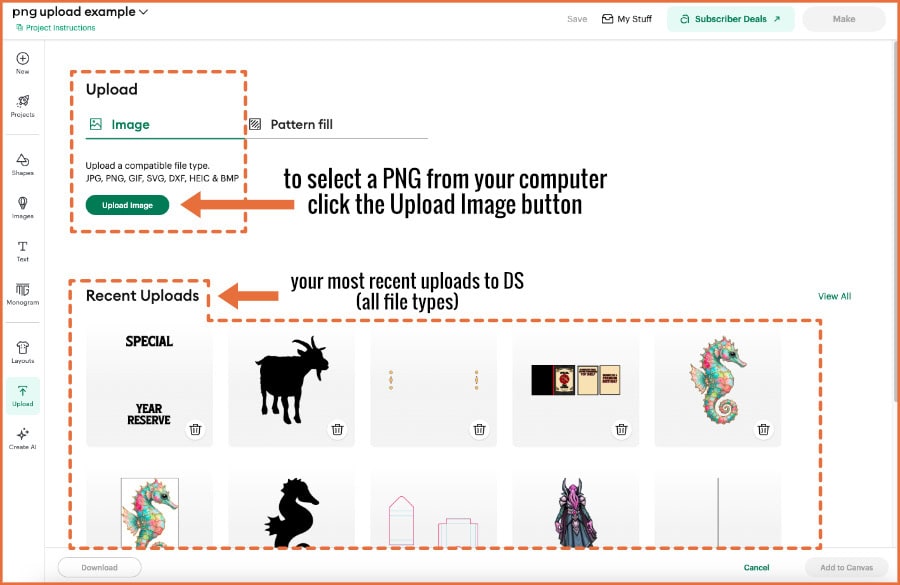
If you’ve read our tour of the Canvas, you’ll remember that you can add text, images and shapes to your project using the tools in the Design Panel. To upload one of your own PNG images to Design Space (DS), start on the Canvas and click the Upload tool icon on the left side of the screen.
When you click Upload, Design Space will open a new screen, with an option to start an upload from your computer at the top of the screen, and an option to browse images you’ve already uploaded to DS. Click the Upload image button to go to the File browser window. Here, you can either drag a file into the upload area or browse on your computer for the image.
PNG/Raster images need multiple steps to upload
If you are uploading a PNG or JPG file to Design Space, there will be a few extra steps in the upload process compared to uploading an SVG file.
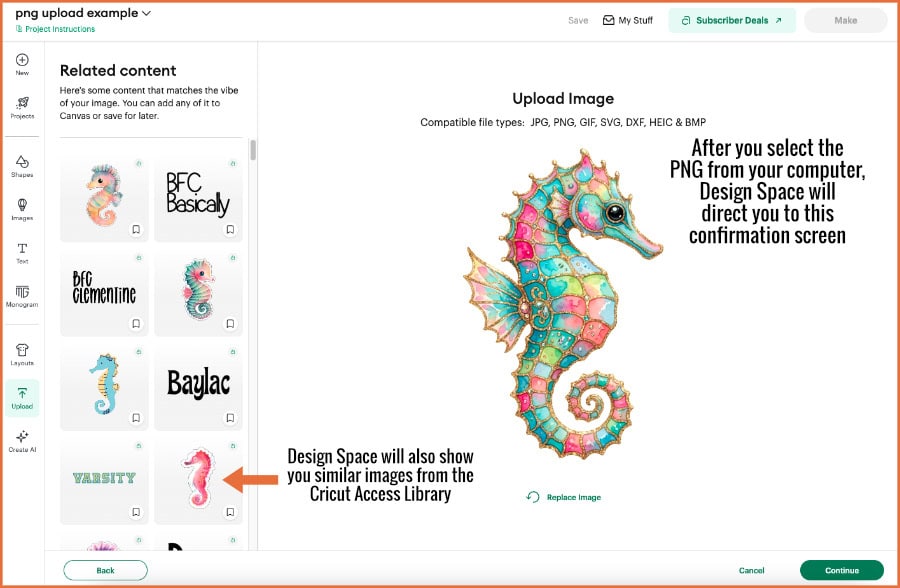
After you select your file on the Browse screen, DS will take you to a confirmation screen where you can verify you uploaded the correct image. Design Space will also show you similar images available in the Cricut Access library, in case you need more of what you just added (this is trying to entice you into the Cricut Access Subscription). After you click the Continue button, it’s on to the Background Remover screen.
Basics of the Background Remover Screen
The big appeal of using PNG images in Design Space is that they usually have a transparent background. That means that when you upload them into Design Space, you will be able to cut around the edge of the image after you print. In most cases, when you upload a PNG to Design Space, the Background Remover screen is a formality, another visual confirmation that indeed the background is transparent and you’ll be able to cut around the edge of the image.

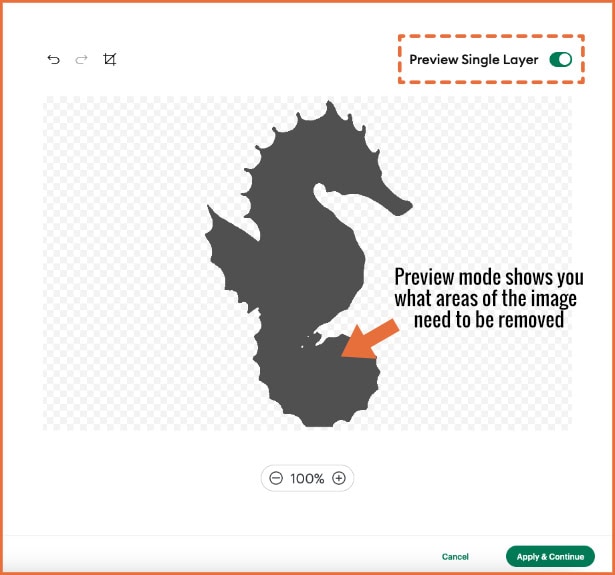
If you can see the checkerboard background around the edge of your image, that means there is no background to be removed. If you’re not sure because there are some parts of your design that are light-colored and they don’t show up well against the background, you can use the preview feature to get a high contrast preview of the outer cut line that Design Space sees:
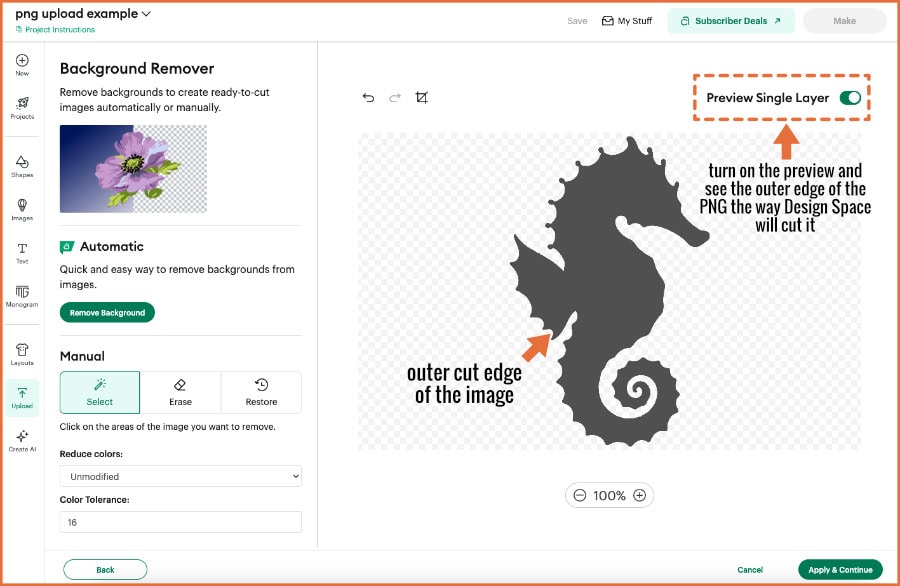
If it looks like the edge is clearly defined and there are no stray groups of pixels floating in the background, go ahead and hit Apply & Continue to move to the next screen. However, if you do need to use the Background Remover tools, here’s how…
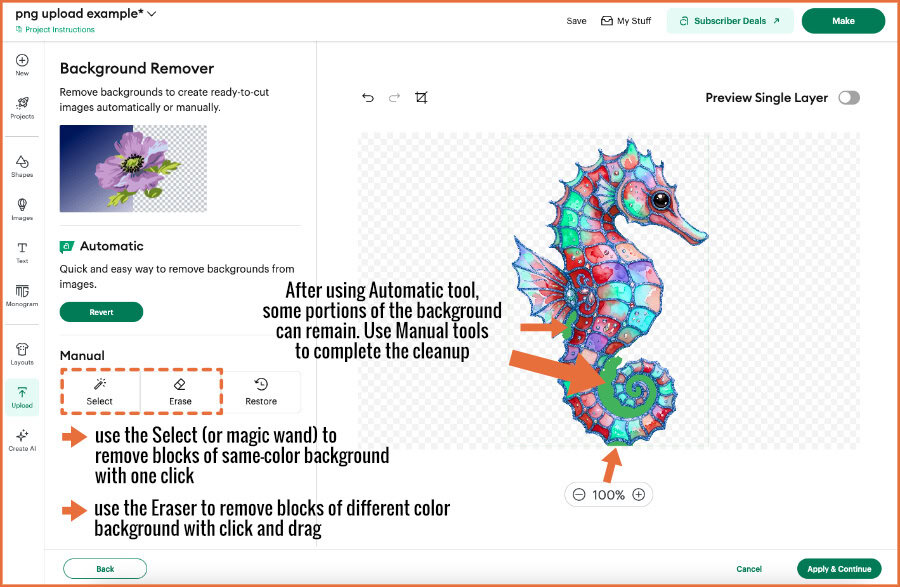
Using the Background Remover tools
Not every image has a transparent background. PNG files can have transparent backgrounds, but they don’t always. Some PNG images still include a solid background, and JPG files always have a solid background. This is where the Background Remover tool becomes invaluable. It lets us upload any bitmap image, regardless of whether or not it has a background, and we can remove it and cut around the edge of the image.
There are two ways to use the Background Remover tool:
- Use the automatic tool (available to Access subscribers only). This is a one click tool that scans the image and removes what it calculates are the background pixels.
- Manually remove the background using the selector or eraser. Design Space also has a restore brush and an undo button that will help you fix mistakes.
To illustrate, let’s look at an alternate version of the seahorse graphic. I’ve made sure it has a solid background and saved it as a JPG file. If you are an Access member, you can use the Automatic Background remover tool, and that usually works fine, but not all the time.
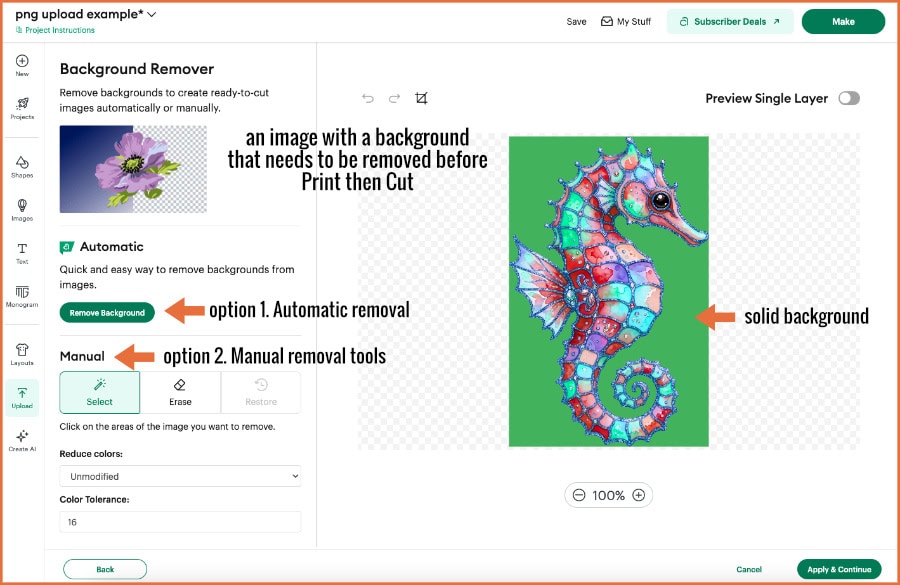
You can see in this example that the Automatic remover didn’t get all of the background pixels. In cases like this, you can use the manual tools (selector and eraser) to finish cleaning up the job. The selector (or Magic Wand) works best for single color areas, and it’s a simple one-click on the background area to remove it. If you are dealing with a multi-color background (like in a photograph), you might find the eraser more helpful. It’s a simple click and drag to remove pixels (the zoom tool is useful in this case as well).
If you aren’t sure about what areas of the image should be removed, or if the entire area has been removed, use the preview toggle to see the single layer view.
Choose the upload type and you’re done!
After you have finished removing the background of the image, click the Apply & Continue button. Design Space will take you to File Type Selector screen. Here, Design Space wants to know what format you want this image uploaded as. It might seem a little silly to go through these steps to upload a graphic for printing and still have to confirm that you want a printable image, but Design Space always allows for flexible options.
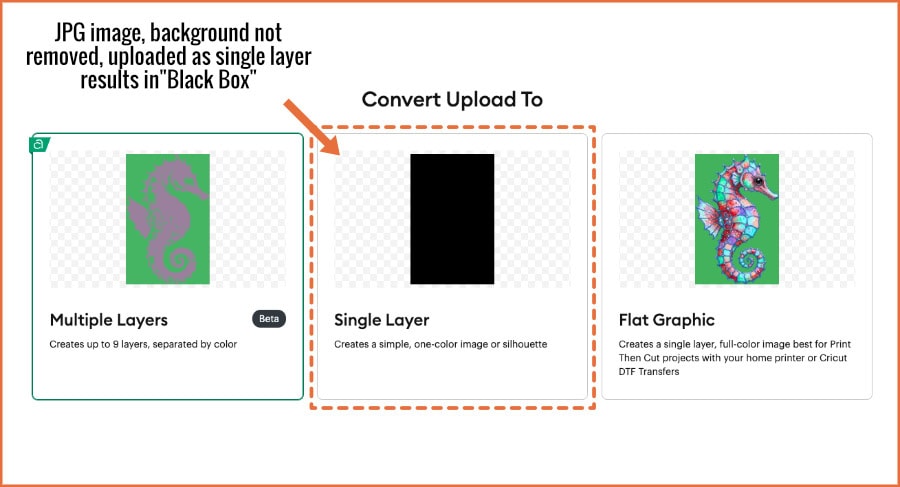
There will be a preview of your image as 3 image types. You will be prompted to choose which version of the file you want uploaded.
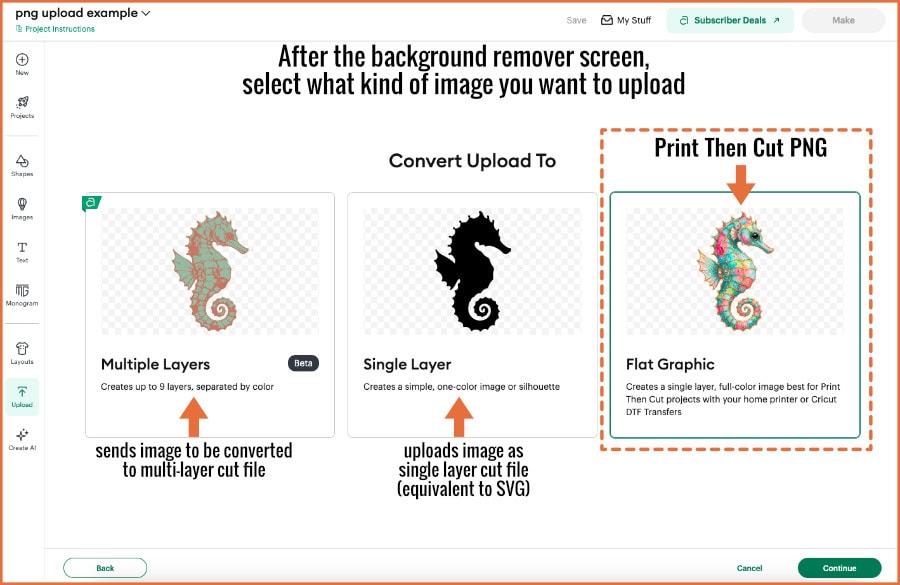
- Flat Graphic – The image will be added to the Canvas as a single layer with the Operation set to Print Then Cut
- Single layer cut file – This option will show a simple silhouette of the original image. Selecting this option is the same as uploading a simple SVG to the Canvas and the Operation will be set to Basic Cut.
- Multiple layer image – This option turns the PNG into a multi-layer vector image with the Operation set to Basic Cut. This option is suited for simple illustrations, but does not work well on photos or detailed illustrations like the seahorse graphic I’m using in this example. You can read more about the Design Space image to vector converter here.
After you’ve made your image type selection, you will be taken to a final Upload screen. You have the options to edit the image name, add tags and add the image to a collection. After you make your selection, click the Upload button to continue.
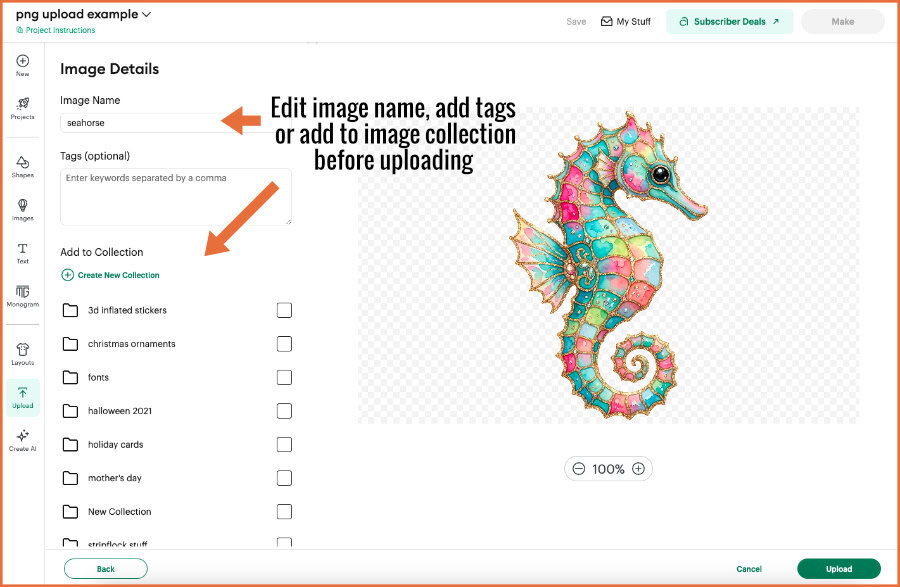
Image Warnings in the Layers Panel
Design Space will take you back to the Canvas and your image will be visible in the Layers Panel as well. PNG and JPG images will appear as a single flat layer because they are pixel images. It’s not uncommon for Design Space to show warning messages after you’ve uploaded a PNG image, specifically a size warning or a low resolution warning.
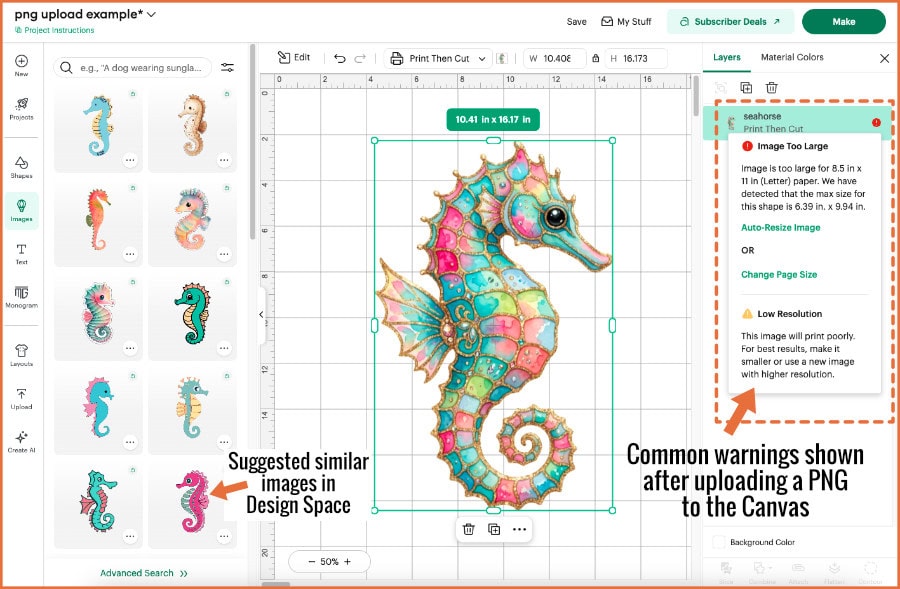
Print Then Cut size limitations are typically around 6.75″ × 9.25″. If you get a size warning (Image too Large), your options are:
- Make the image smaller
- Increase the page size of your Print Then Cut sheet
Design Space will provide a shortcut link that will help you do both.
Low image resolution warning: why it matters
If you get the low resolution warning, Design Space will recommend you shrink the image, or upload a higher resolution version of the file. This is a common warning message, and most people will tell you to ignore it. Even when I upload this seahorse image, which has a 300 dpi resolution (more than enough for any Print Then Cut project), I get this warning.
The risk is that if your image really is low resolution, it can make the outer cut edge jagged and rough. A higher resolution image will have a smoother cut edge.
If you are concerned about the quality of your image, print a test copy on high quality setting. If the print quality is acceptable, go ahead and load it on the mat for cutting. If it cuts cleanly and the blade doesn’t zig and zag, use it in your project. Otherwise, consider resizing the image on the Canvas, or uploading a higher resolution version. Tip: in cases like this, use the “Add Bleed” option in the print settings!
Troubleshooting common problems
Even though we’ve walked through the basics of uploading PNG and JPG files, we’ll take a moment to address specific issues that come up when people are having trouble uploading images.
Image surrounded by a white box/black box
If your image ends up on the Canvas with a white box around it, there are a few things happening. First, your image is a JPG, not a PNG, so you need to revisit the Background Remover screen to address the problem. If you can’t see the white background surrounding the image, use the image preview to check. Then exit preview mode and use the background remover tools – automatic, manual or both if needed – to remove the white background. Keep checking the preview to make sure you’ve got all of the background pixels removed, then proceed to the next step.
If your image ends up on the Canvas as a black box, it means that you started with a JPG image, not a PNG. It also means that you skipped the Background Remover step, and then selected Single Layer cut image on the “Convert Upload” screen. The result is a black square. Start the process from the beginning, don’t skip the Background Remover step, and select the Flat Graphic option on the “Convert Upload” screen.
Next Steps in Design Space
So now that you’ve got a handle on uploading images for Print then Cut, you’re probably itching to try it out. Check out our articles on the Design Space Print Then Cut process, starting with getting the calibration set for your Cricut machine. You’ll also find our explainer on the Flatten tool helpful!
If you’re looking for more information of using your own resources in Design Space, check out our step by step guide to downloading and installing fonts on your computer so they can be used in Design Space.