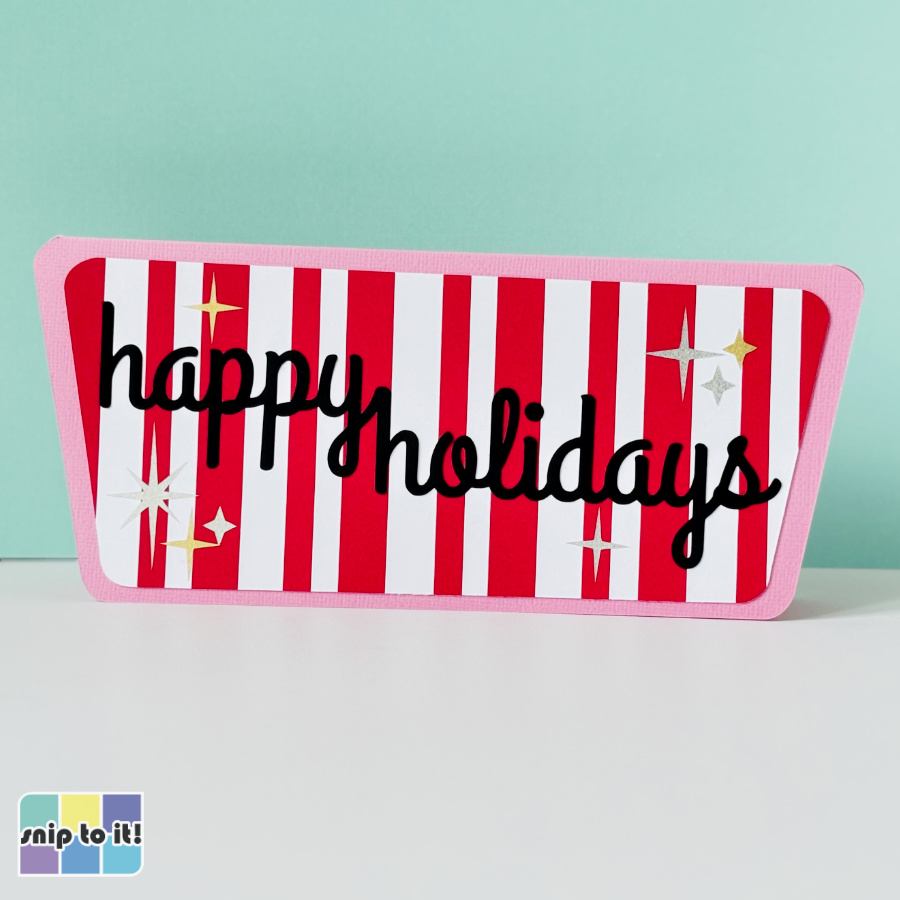
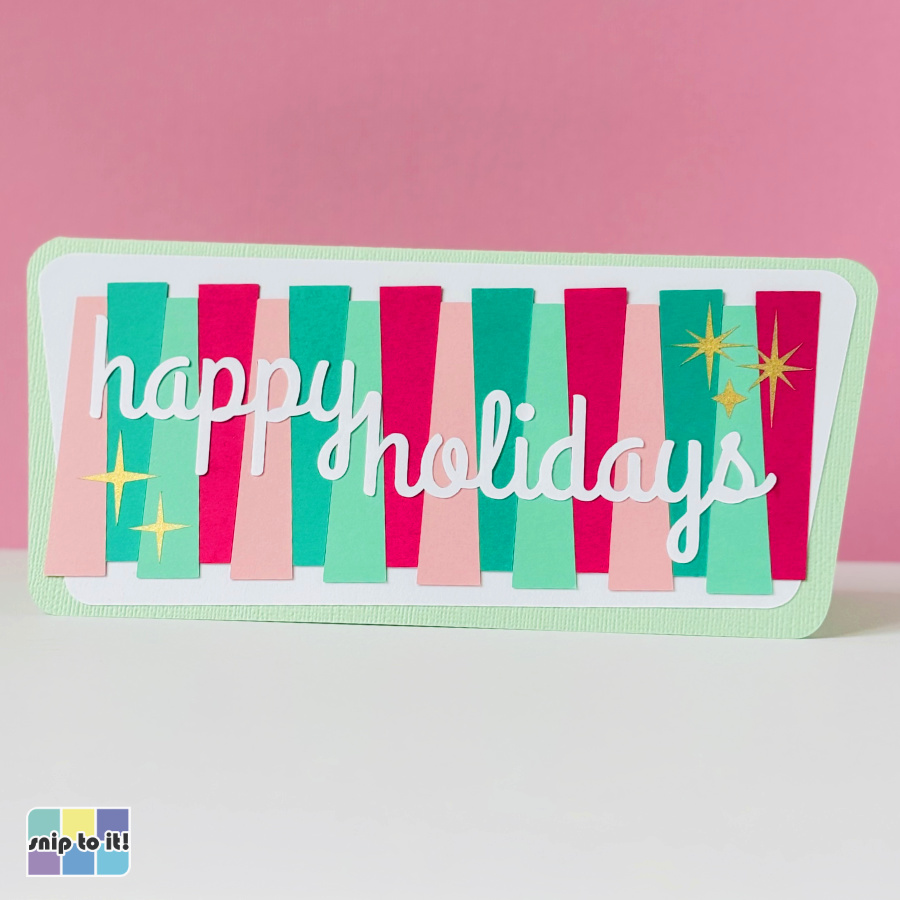
This year we’re adding to our Mid Century Christmas cards with 2 new styles of inlay card. These cards feature colorful striped custom cardstock with inlaid text and unique card bases with that signature MCM trapezoid shape.
These slimline cards are designed to fit in a standard letter size envelope (final size is approximately 9×4″) for easy mailing.
What is an inlay card?
An inlay card is a card where text or images are cut out of one panel, then the space leftover is filled by a duplicate in a different color, texture, or pattern.
This is a complete tutorial for these 2 cards, but you can find the tutorial and video for our intro to inlay cards here.
Get the inlay card files
We have SVGs for 2 different styles of inlay card. The Candy Cane Striped card gets its look from layered red and white strips, and the Pink & Mint card uses fun trapezoids for a retro vibe. We’ll cut “happy holidays” right out of the striped panels and inlay black or white cardstock letters for a polished finish.
Download the files from our Resource Library.


Become part of the Snip to it community
We really appreciate your interest in our guides and tutorials. If you’d like to get notified when we have new resources, projects and stories available, please consider joining the Snip to It community and sign up for our newsletter below:
What you need
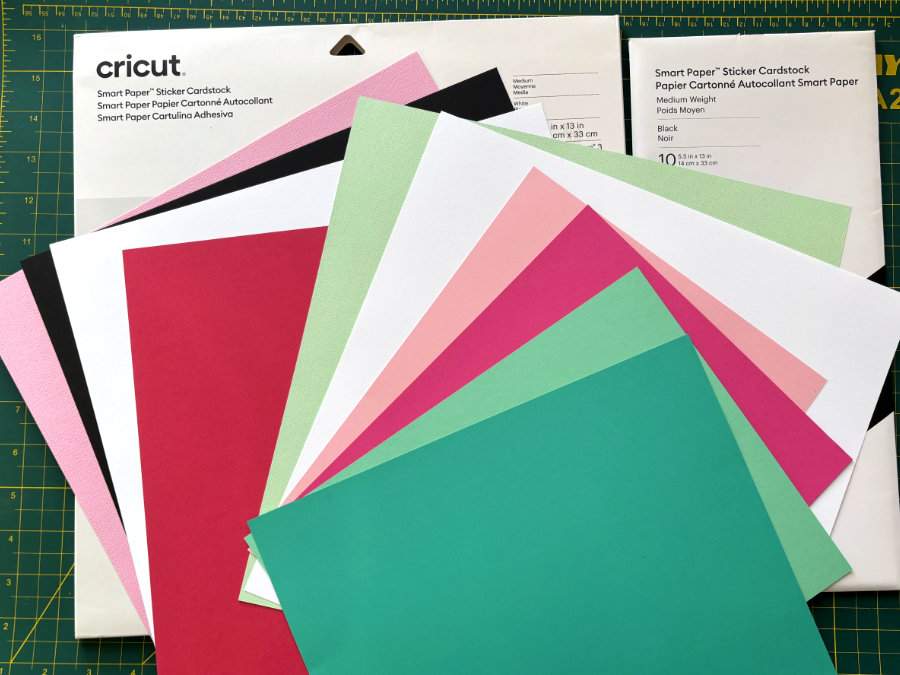
- Candy Cane Striped card: 65lb cardstock in red, black, and white; 80lb cardstock in pink
- Pink & Mint card: 65lb cardstock in dark & light mint, dark & light pink, and white; 80lb cardstock in mint
- Cricut Smart Paper Sticker cardstock (any color, I’m using white) – the full size or Cricut Joy-sized sheets are both fine
- vinyl or cardstock for the starbursts – I’m using Cricut Shimmer vinyl in gold, silver, and pink
- pen for the inside sentiment – I’m using 0.8mm Glitter Gel Pen in black
Candy Cane Striped card instructions
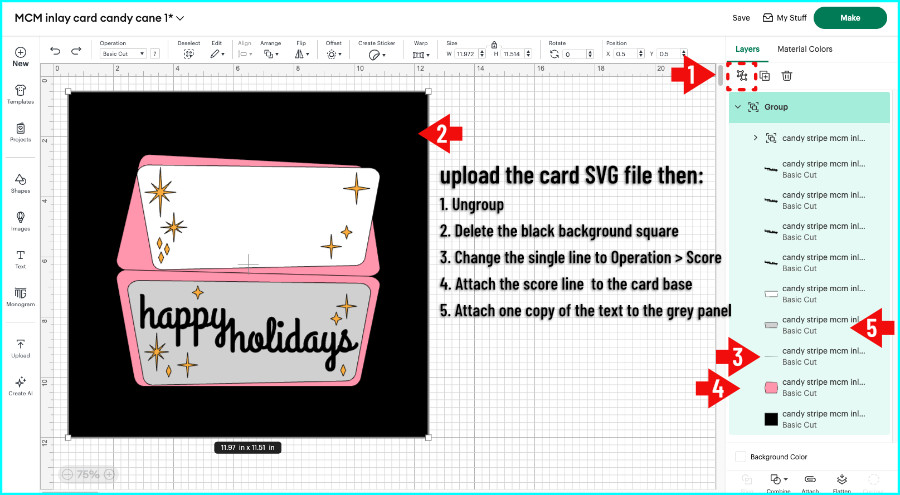
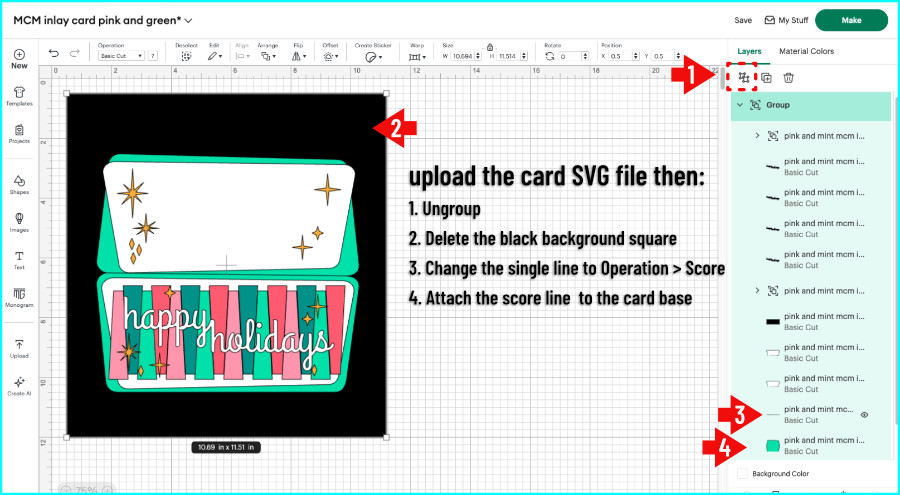
Upload the SVG to Design Space (browse or drag & drop the file to upload and follow the prompts). The file will open with all of the card elements grouped together, and the group will already be selected by default.
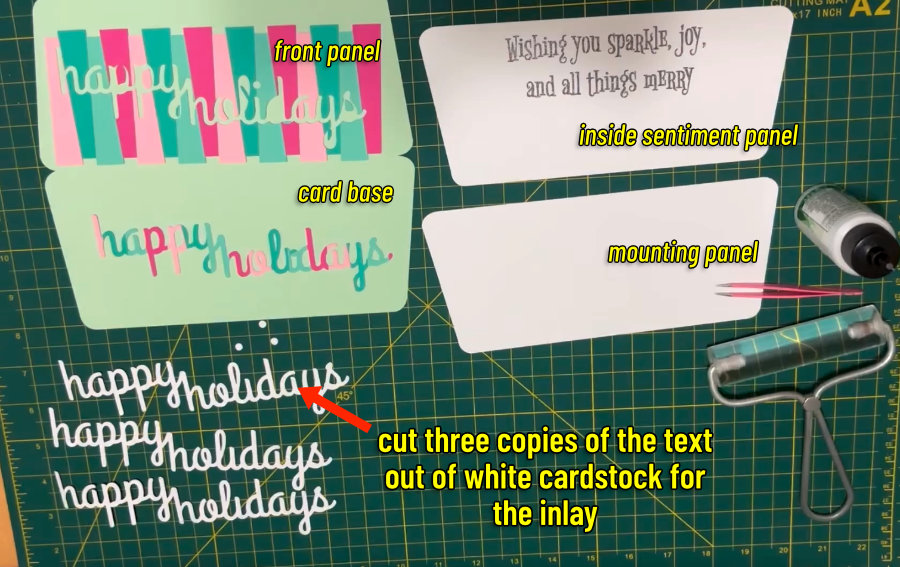
Included with the file are a card base (pink), front panel (grey), inside panel (white), text (black, 4 copies), and various starbursts.
- Click Ungroup (the 2 boxes icon at the top of the Layers Panel)
- Select the black square behind the design and delete it
- The bottom layer is the card base, and the layer above it in the Layers Panel is a single line. Change the Operation of the single line to Score
- Select the card base and the score line and Attach
- The grey panel is the front panel of the card, and will be cut out of the striped cardstock. There are 4 copies of the text at the top of the group. Attach one copy of the text to the grey panel. The other 3 copies will be cut out of black cardstock.
All the starbursts/diamonds are their own group, and they’re all the same color so you may have to ungroup and change colors depending on the material you want to use.
Add your sentiment
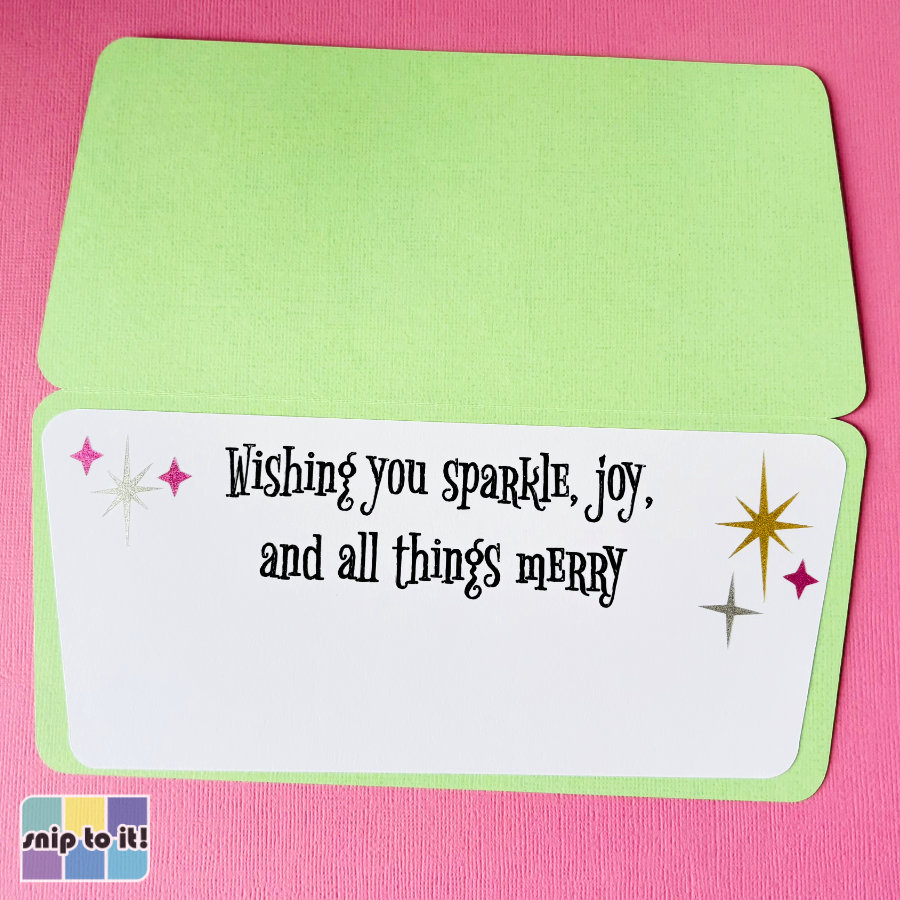
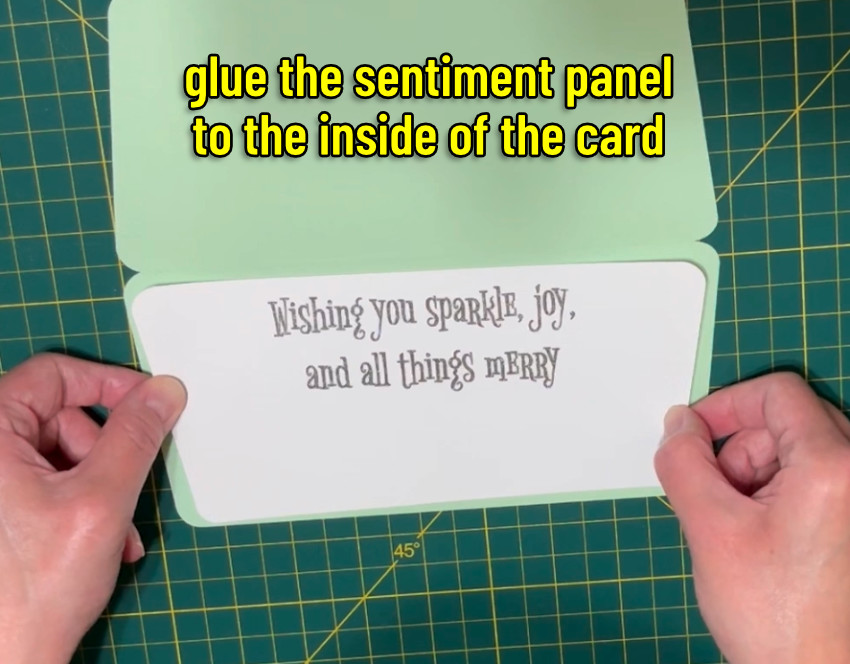
The inside panel (white) is blank, and you can add a sentiment if you like.
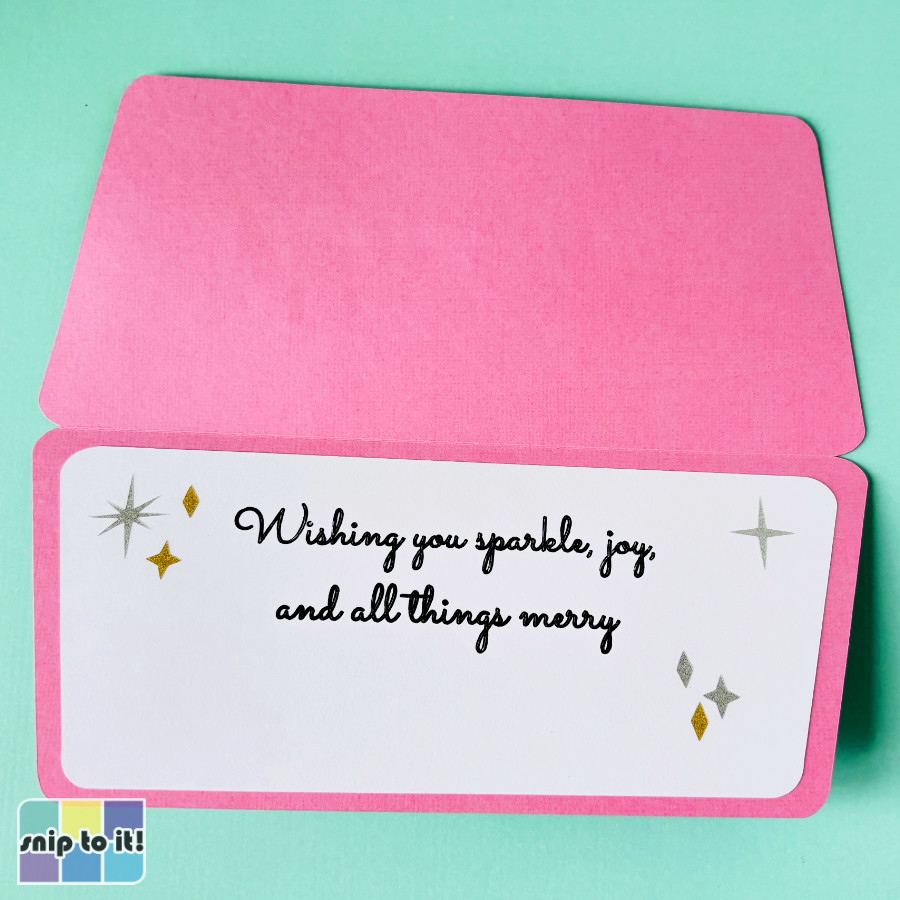
The message on my inside panel is “Wishing you sparkle, joy, and all things merry”. I’m using the font Sacramento, sizing the 2 lines of text to 4.3″ wide. I’m going to add a negative offset (inset) of -0.008″ to fill in the text.
Type in your sentiment and size it how you like, change the Operation to Pen, then add an inset if desired. Select the original text, inset, and the inside panel and Attach.
Create the custom striped cardstock
The front panel of the card (grey panel in the SVG) is approximately 8″x3.5″, so we need to create striped cardstock larger than that.
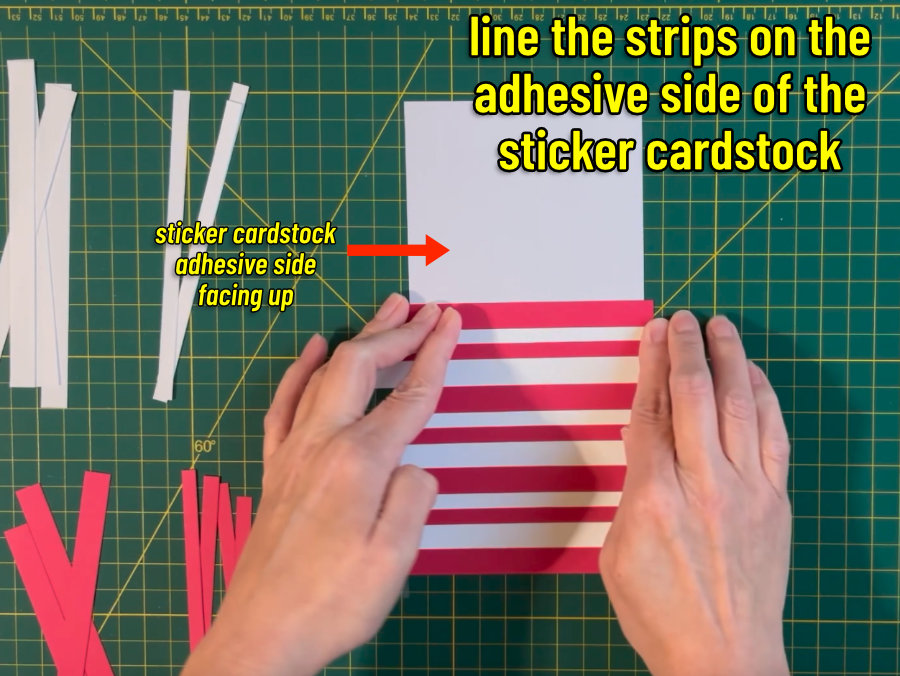
Cut a piece of adhesive cardstock to use as your base. I’ve cut a piece of Smart Paper Sticker Cardstock that is ~9″ x 4.25″. You can use plain cardstock, but you will have to ensure that the entire surface of each strip is glued to the base.
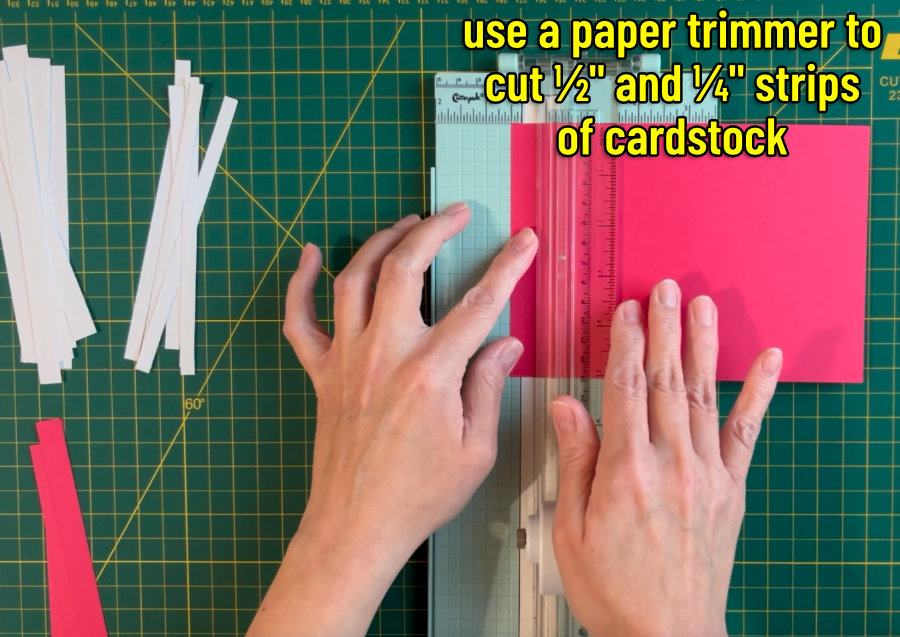
Cut red and white cardstock in 0.5″ and 0.25″ strips. The strips have to be longer than the width of the base piece (i.e. more than ~4″). I used a paper trimmer for my strips, but you can use your Cricut if you want. I needed about 6 half inch red strips, 6 half inch white strips, and 5 each of the quarter inch strips to cover the Smart Paper.
Place the Smart Paper sticky side up and lay down the red and white strips in a vertical stripe pattern along the length of the adhesive base. Strips should be completely flush to one another and you should press them down thoroughly/run a brayer over them. You can use any pattern (or colors!) you want, I repeated a pattern of 0.5″ red/0.5″ white/0.25″ red/0.25″ white.
Cut the striped cardstock
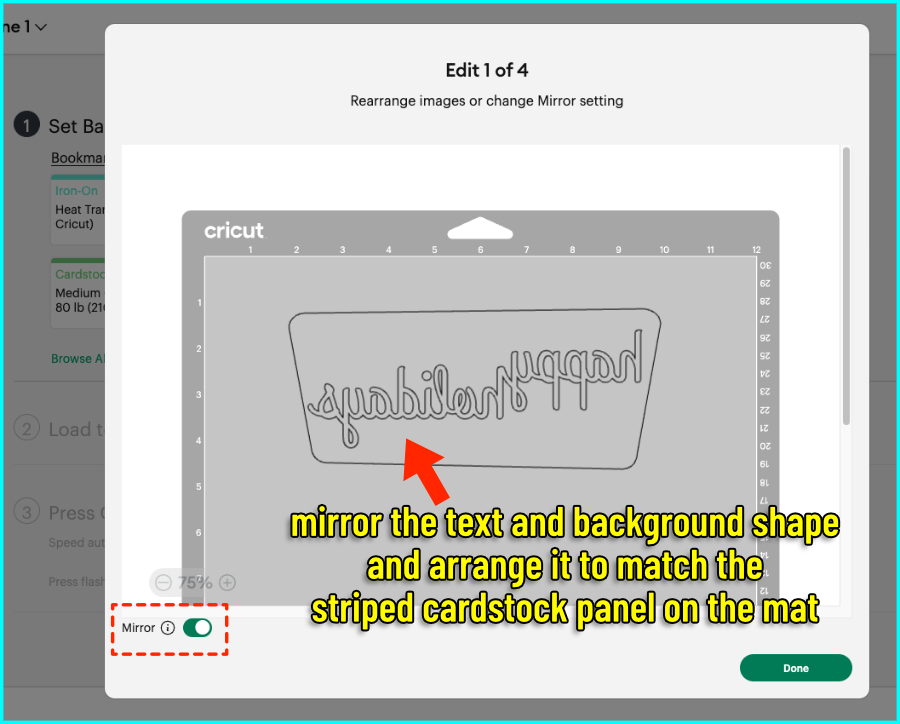
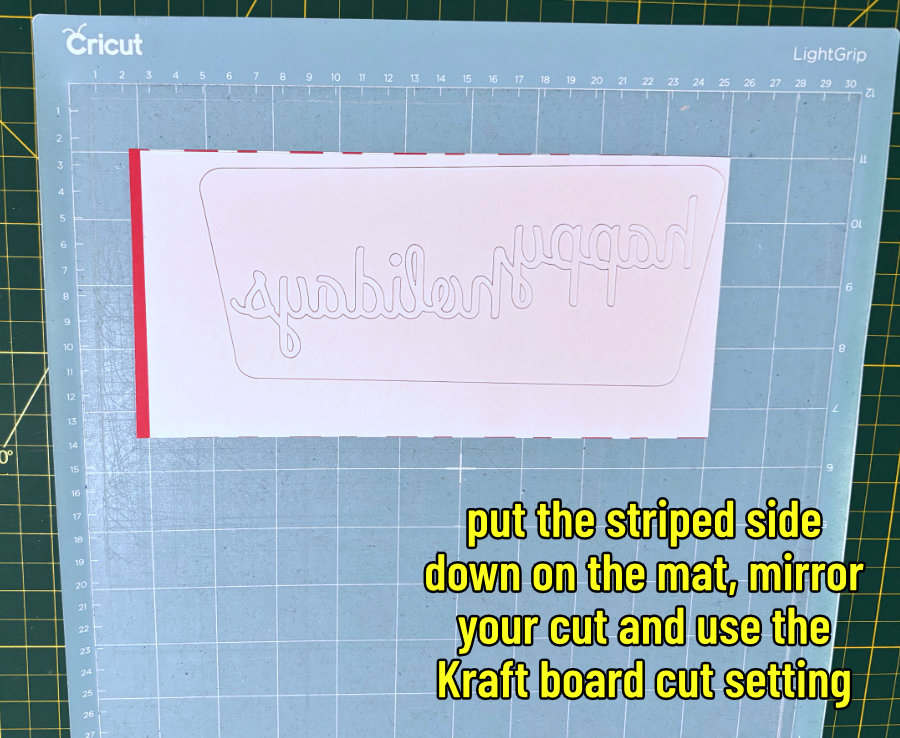
You will be cutting the grey panel with attached text out of the striped cardstock you just made. Place the striped cardstock face down on the mat before cutting – this material should be cut from the BACK.
In the Mat Preview in Design Space, MIRROR the mat and make sure the alignment of the panel matches the real-world placement of your cardstock on the mat.
Cut the cardstock using the Kraft Board setting (it will automatically do 2 passes). If you have one, I recommend using the Deep Point Blade for this cut, but the Fine Point will work too.
When you remove the striped panel from the cutting mat, be sure to keep all the counters (the inside pieces from each of the letters) – you will need these!
Cut your other card pieces
Now you can go ahead and cut everything else you need for your card. I cut all my cardstock with the Medium Cardstock setting.
- Card base with a score line
- Inside panel with a written sentiment (I used 0.8mm Glitter Gel Pen)
- Inlay text – MIRROR the text to keep the top smooth (optional)
- Starbursts – I cut these from Shimmer Vinyl in gold and silver (using Shimmer Vinyl setting, More pressure), but you can use whatever material you like. If you use vinyl, you can place these just like stickers, no transfer tape needed.
Assemble the Candy Cane Striped card
I am assembling my card using a combination of tape runner and Bearly Art glue.
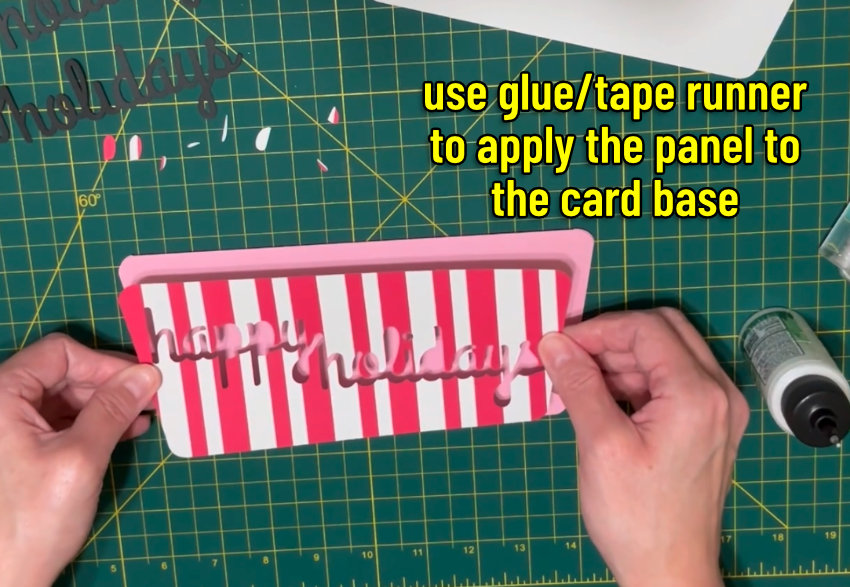
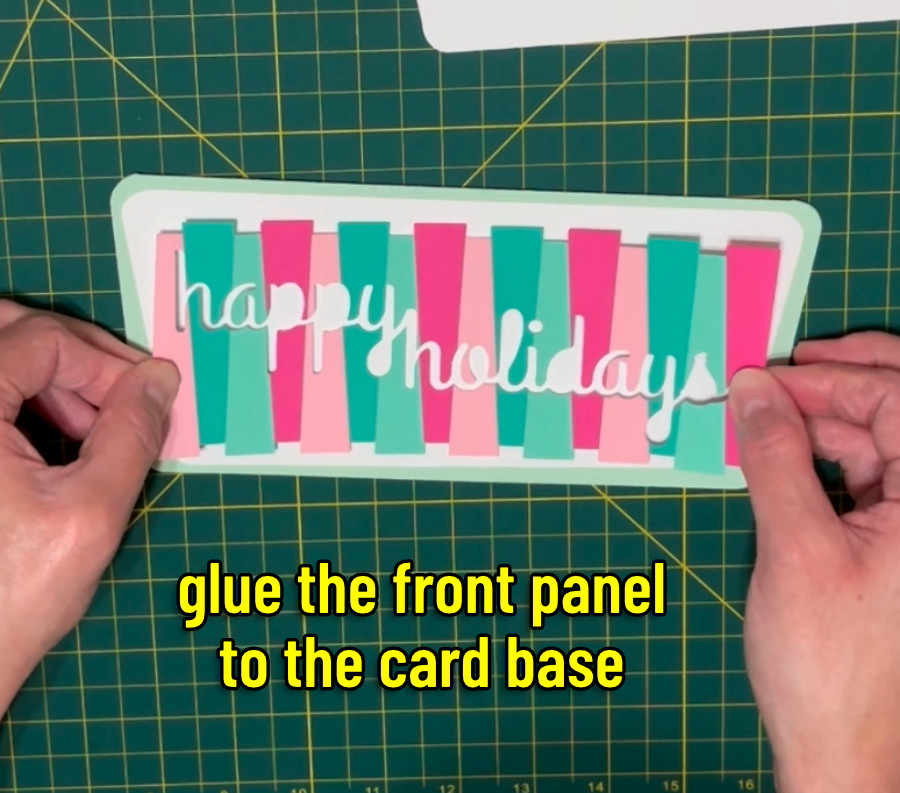
The front panel of this card sits on the card base with an even border all the way around. I begin assembly by folding the card base along the score line and attaching my striped front panel.
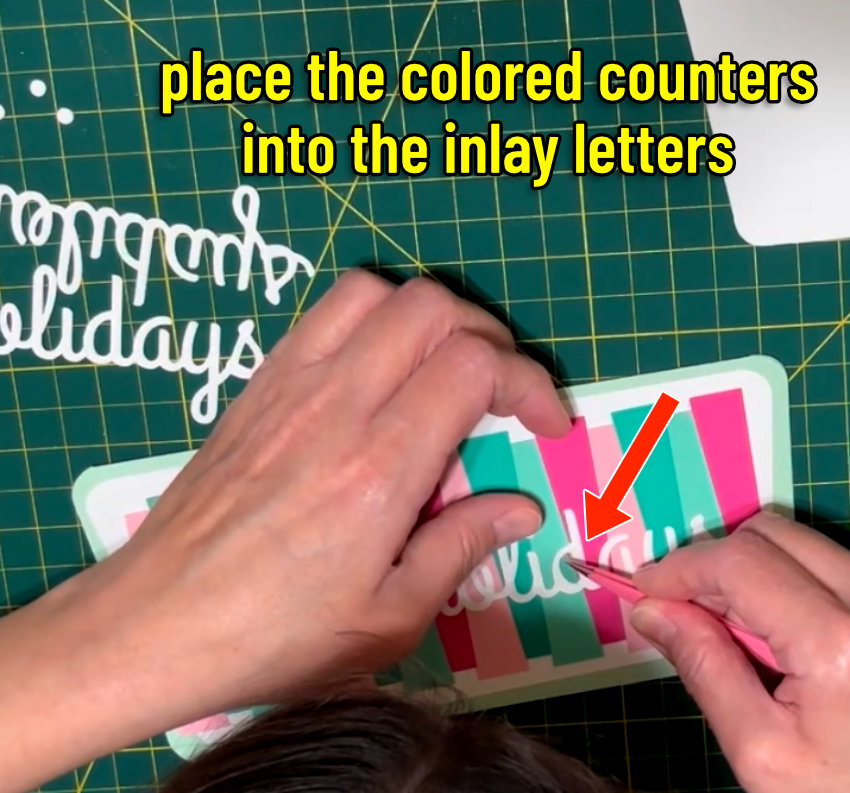
Notice all of the counters (insides of the letters) are all there on my mat, in order (insides of the 2 p’s and the bottom of the y; then a tiny piece from the o, and the counters from the l, d, y, and s).
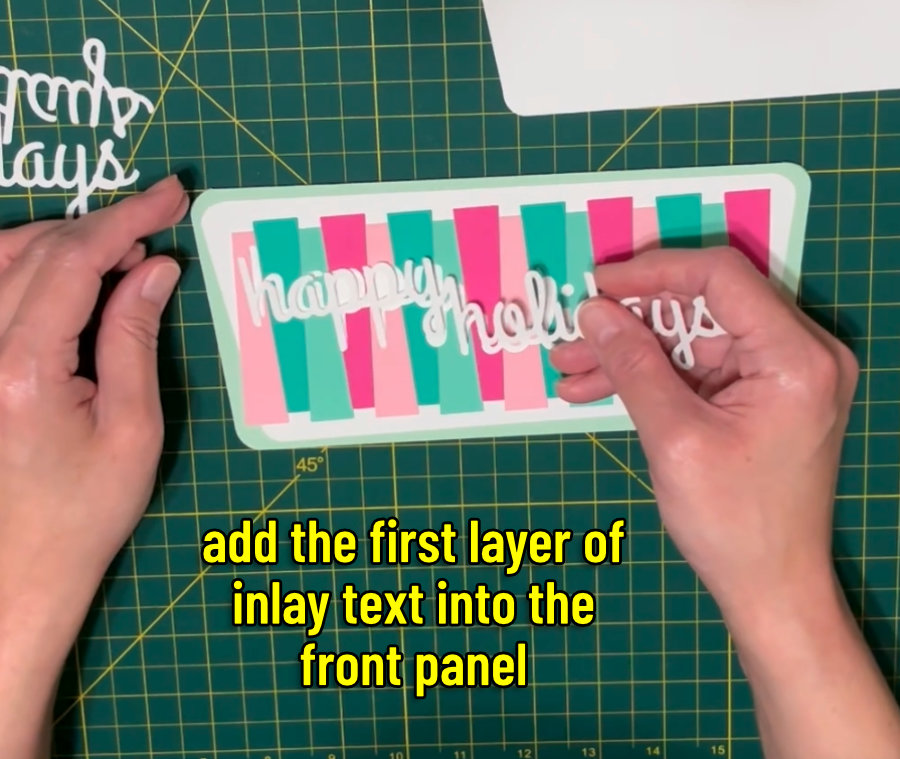
Apply glue to the cutout in the front panel (the fine metal tip for the Bearly Art glue is very good for this) and inlay the first copy of the black cardstock text. I like to use an embossing stylus to push the edges of the inlay right down into the recesses, and this will leave marks on the first layer of text, but it doesn’t matter because we’re going to use 2 more layers on top.
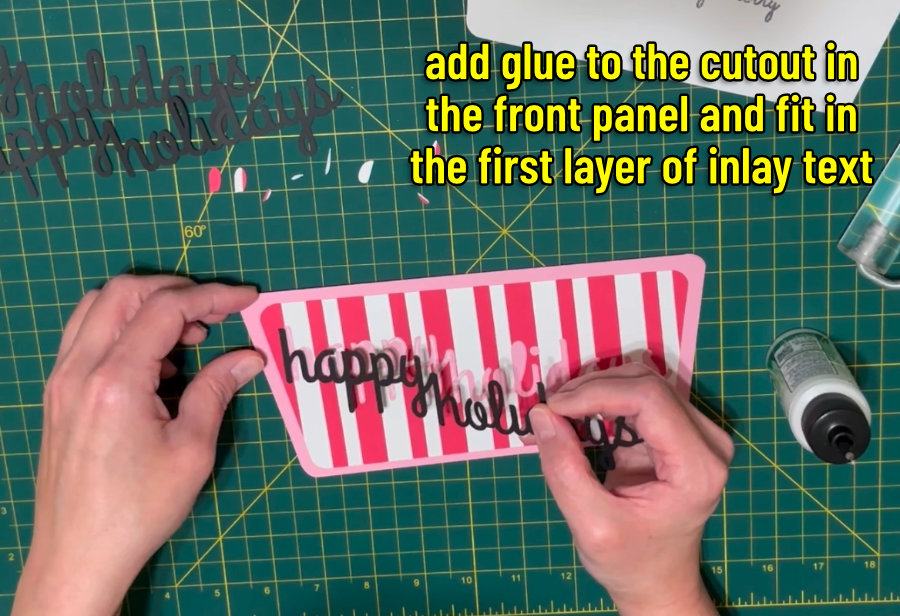
Apply glue to the spaces inside the p’s, y, o, l, d, y, and s and inlay the striped cardstock counters.
Now glue down the second and third layers of text, applying glue to the base and laying down your cardstock on top.
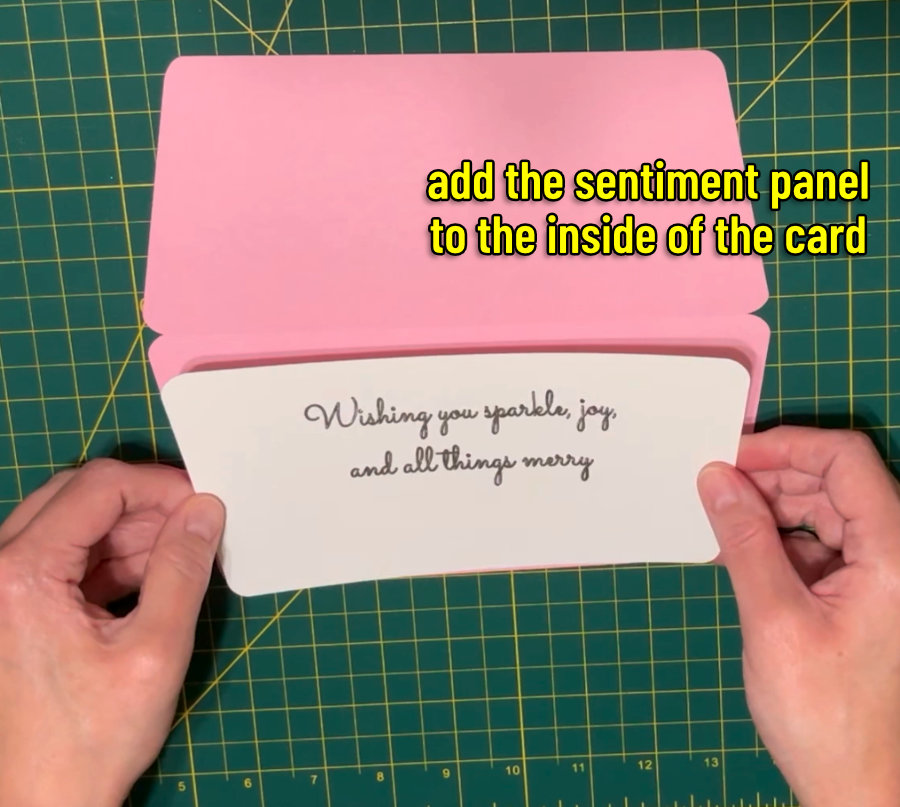
Once your front panel is finished, attach the sentiment panel inside the card.
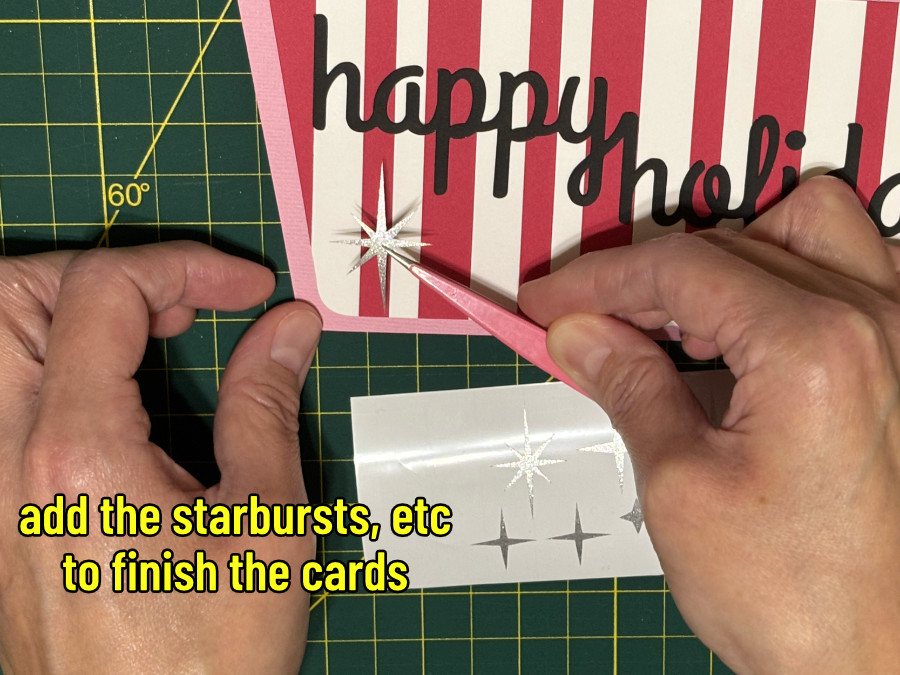
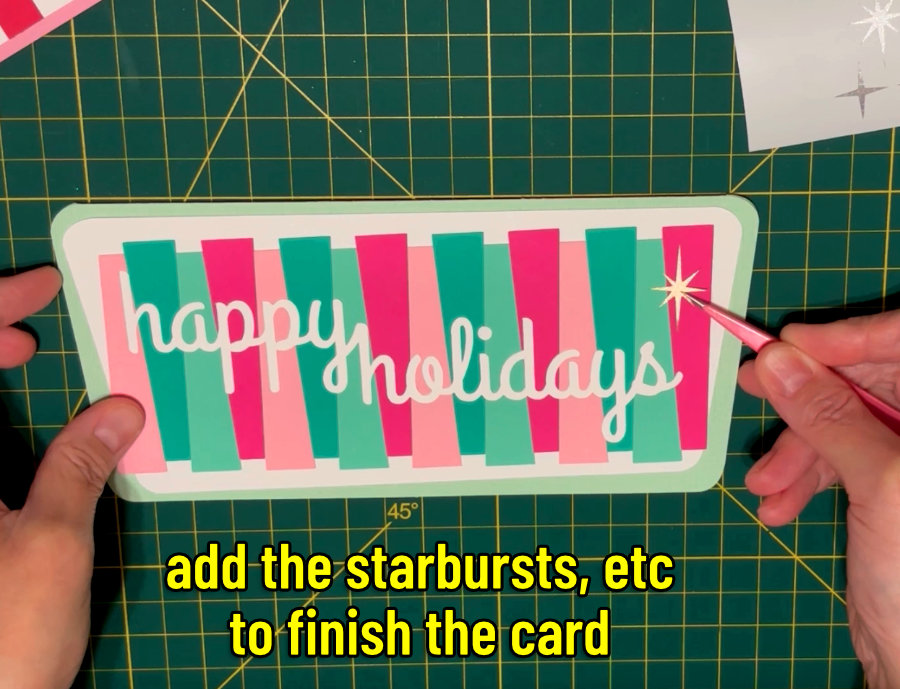
To complete the card, add your starburst embellishments anywhere you like. Shimmer vinyl is sturdy, so I use tweezers to lift each starburst off the backing sheet and apply directly to the card, no transfer tape involved.
Pink & Mint card instructions
Upload the SVG to Design Space (browse/drag & drop the file and follow the prompts). The file will open with all of the card elements grouped together, and the group will already be selected by default.
Included with the file are a card base (mint), front panel & inside panel (2 copies of the same white panel), 16 trapezoid shapes (light & dark mint, light & dark pink), rectangle backing shape for the trapezoids (black), text (white, 4 copies), and various starbursts.
- Click Ungroup (the 2 boxes icon at the top of the Layers Panel)
- Select the black square behind the design and delete it
- The bottom layer is the card base, and the layer above it in the Layers Panel is a single line. Change the Operation of the single line to Score
- Select the card base and the score line and Attach
All the starbursts/diamonds are their own group, and they’re all the same color so you may have to ungroup and change colors depending on the material you want to use.
Add your sentiment
The inside panel (white) is blank, and you can add a sentiment if you like.
The message I’m putting on my inside panel is “Wishing you sparkle, joy, and all things merry”. I’m using the font Bigelow Rules, sizing my 2 lines of text to 4.5″ wide, and I’m going to add 2 negative offsets (insets) of -0.008″ and -0.012″.
Type in your sentiment and size it how you like, change the Operation to Pen, then add an inset if desired (I added the -0.008″ inset, then selected the original text again and added the -0.012″ offset). Select the original text, insets, and the inside panel and Attach.
Create the trapezoid/striped front panel
First, identify the black rectangle from the SVG, which measures 7.5″ x 2.78″. Cut this rectangle out of Smart Paper Sticker Cardstock using the setting for that material. Take the rectangle off the backing sheet and place it sticky side up on your work surface – this is the base for your front panel.
Cut out the 16 colored trapezoids for the front panel. I cut 4 each of light & dark mint and light & dark pink, but you can use any colors you like.
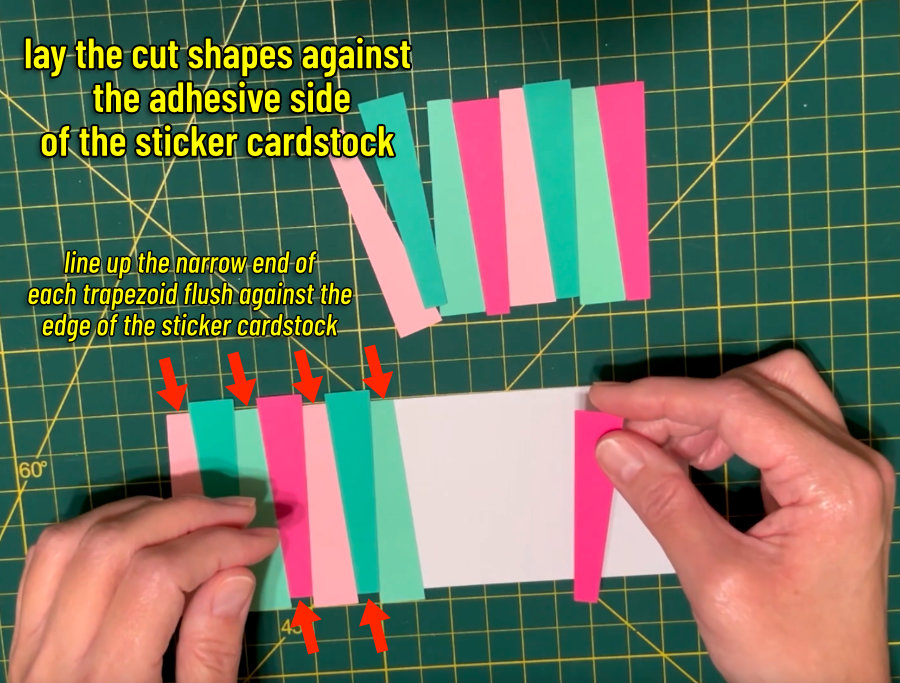
Assemble your front panel by sticking each trapezoid to the Smart Paper:
- Line up the narrow end of the first trapezoid with the top lefthand corner of the rectangle and stick the piece down. The wide end will hang off the opposite edge of the rectangle.
- Line up the narrow end of the next trapezoid flat against the bottom edge of the base rectangle, flush against the first trapezoid, and stick the piece down. The wide end will hang over the top edge of the rectangle.
- Stick down the rest of the trapezoids flush against one another, always aligning the narrow ends of the shapes with the edges of the base rectangle. The shapes will alternate between narrow side up and narrow side down.
- Make sure all the trapezoids are well-adhered, I like to run a brayer over the whole thing.
Cut out the lettering
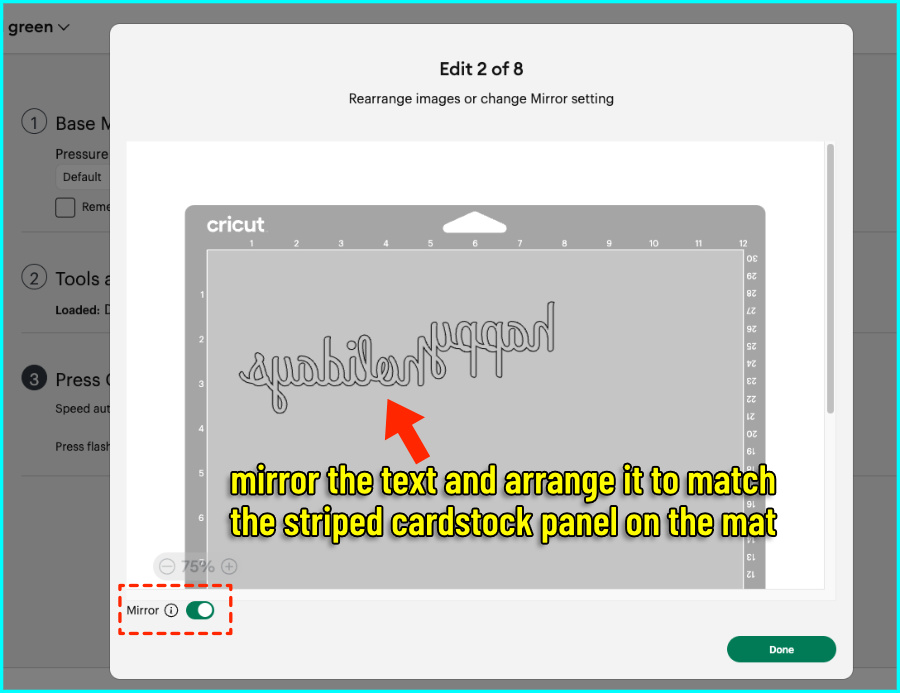
You will be cutting one copy of the “happy holidays” text directly out of the front panel you just made. Place the panel face down on the mat before cutting and cut from the BACK.
In the Mat Preview in Design Space, MIRROR the mat and make sure the alignment of the text in DS matches the real-world placement of the front panel on your cutting mat.
Cut the text out of the front panel using the Kraft Board setting. I recommend using the Deep Point Blade if you have one.
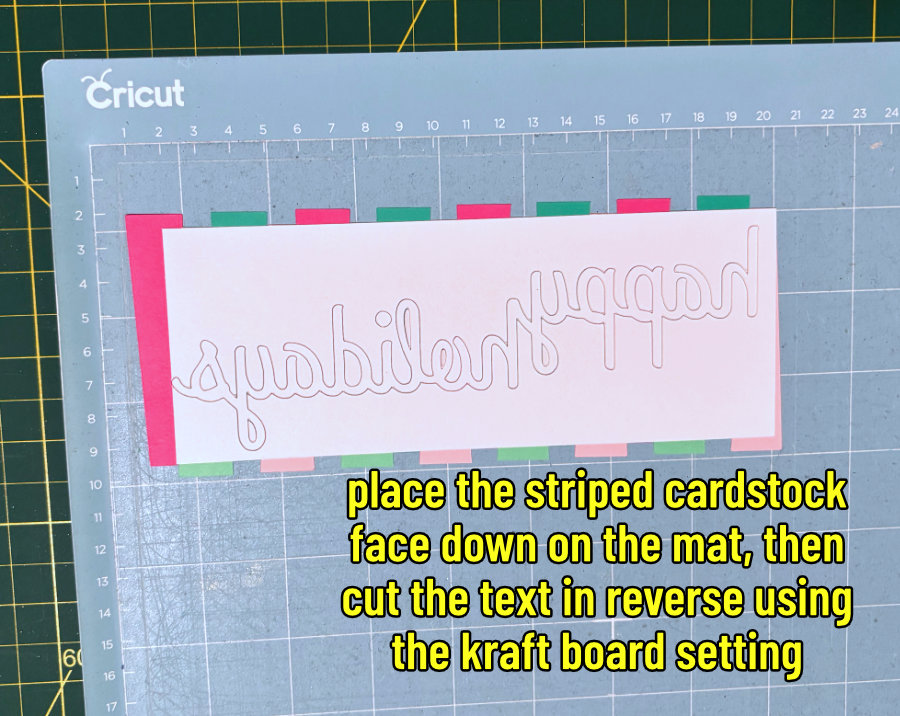
Keep all of the counters (insides of the letters) when you remove the cardstock from the mat!
Cut the other card elements
Now cut everything else you need for your card. I used the Medium Cardstock cut setting for all the cardstock, and the Shimmer Vinyl (More pressure) setting for the vinyl starbursts.
- Card base with a score line
- blank white front panel
- Inside panel with a written sentiment (I used 0.8mm Glitter Gel Pen)
- Inlay text – MIRROR the text to keep the top smooth (optional)
- Starbursts – I cut these from Shimmer Vinyl in gold, silver, and pink
Assemble the Pink & Mint card
I’m assembling my card using tape runner and Bearly Art glue.
Attach the front panels to the card base. The white panel is designed to be off-kilter from the card base, so place it slightly askew/tilted upward – see the picture below. Then attach the trapezoid panel on top of the white panel, parallel to the card base.
Next, apply glue to the cutout in the front panel and inlay the first copy of the white cardstock text. I use an embossing stylus or my tweezers to push the edges of the lettering into the cutout, which can leave marks, but it’s OK because I’m putting down 2 more layers.
Apply glue to the spaces inside the p’s, y, o, l, d, y, and s and attach the colored cardstock counters that you saved after cutting the trapezoid panel.
Apply glue to the white lettering and lay down the second layer of text, then repeat for the third layer.
Attach the sentiment panel inside the card, placing it tilted slightly upward like the white panel on the front.
Finally, add the starbursts in whatever way you want on the front and inside the card. I like to pick up each star with tweezers and place them like stickers.
All done!
Before you go…
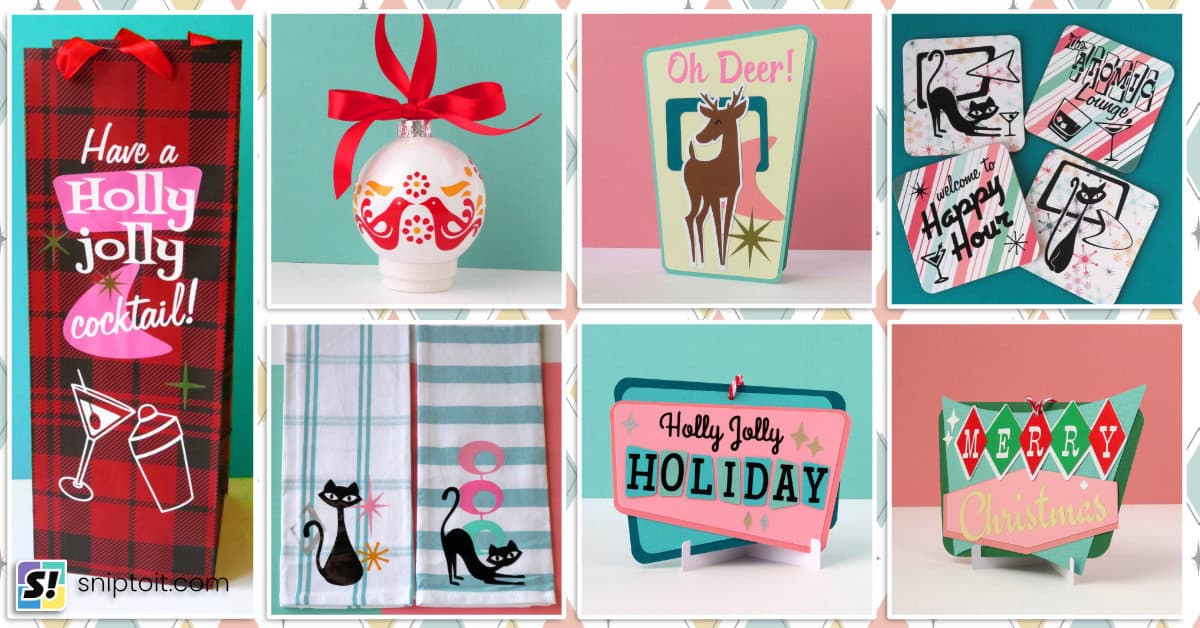
Check out our other Mid Century holiday fun!