Do you have cardstock scraps and Smart Paper collecting dust in your craft room? I’m going to show you how to turn them into custom patterned paper and adapt a classic die-cut inlay technique—Cricut style—to make colorful, creative cards.
I’m going to show you how I set up an inlay card project in Design Space, make custom striped cardstock, and what cut settings to use. Then I’ll show you how to assemble these super easy cards, inlaying text into a panel. Fast, colorful, and absolutely adorable!
Video: Cricut inlay card tutorial
Set up the inlay card in Design Space
Set up the card base and panels
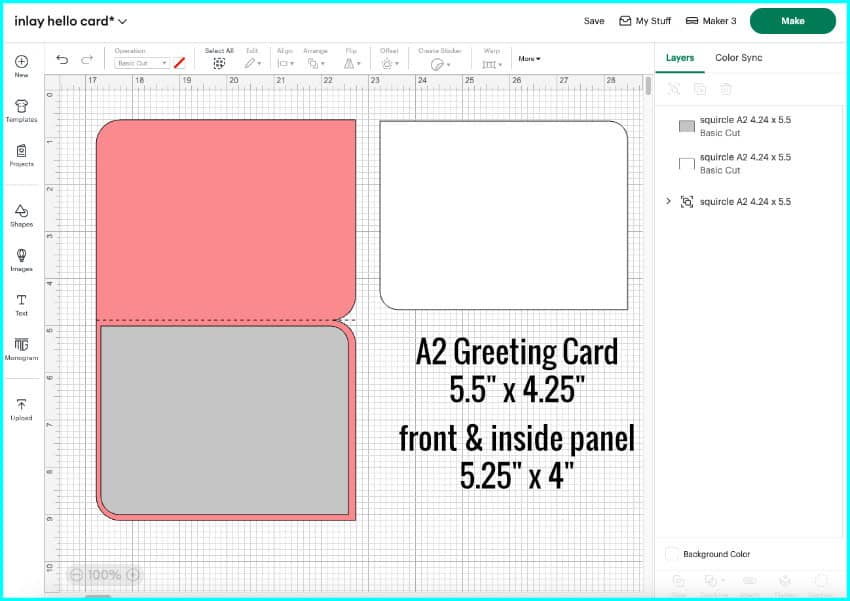
I’m making an A2-sized card, which is 4.25″ x 5.5″. Ian designed the card base and panels using a program called Affinity Designer, and I love using this kind of unique shape for cards. You can use any card base of any size you like, you can even just attach a score line to the middle of a rectangle.
The front and interior panels for the card are 4″ x 5.25″, leaving 1/8″ border all around each panel.
Add your text
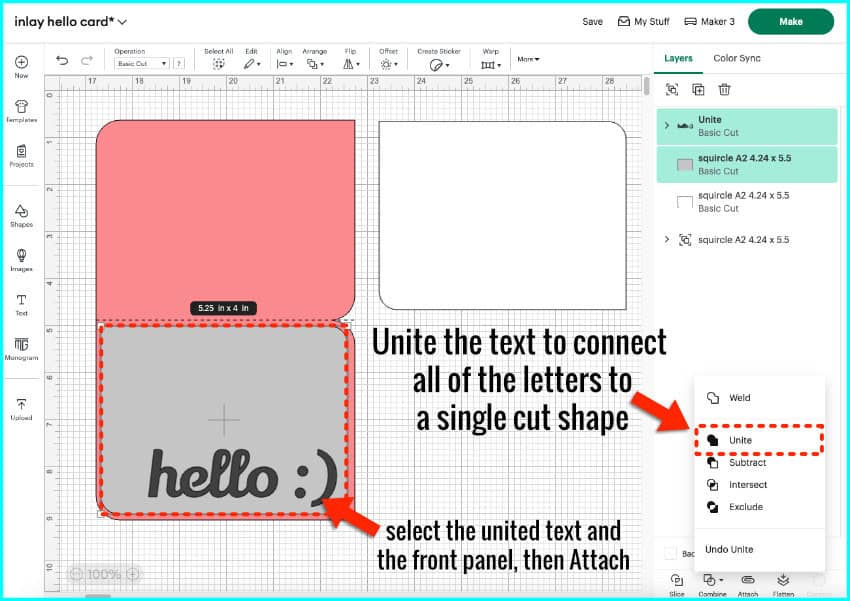
First, I click to add a text box and then type in my sentiment (“hello :)”). I’m going to select my font next, and for this example I’m using Lily Script One, which is free to download from Google fonts. Lily Script One is a cute cursive with a uniform thickness which makes it easy to cut from cardstock. The letters in the word I’m using are all connected, which makes it easy to inlay as a single shape.
I set the size of my text to 4″ wide, and I’m placing it near the bottom of the front panel. Select all the text and open the Combine tools menu, and either click Unite or Weld.
To complete the front panel, select the panel and the text and click Attach.
Duplicate your text or make a second, opposite card
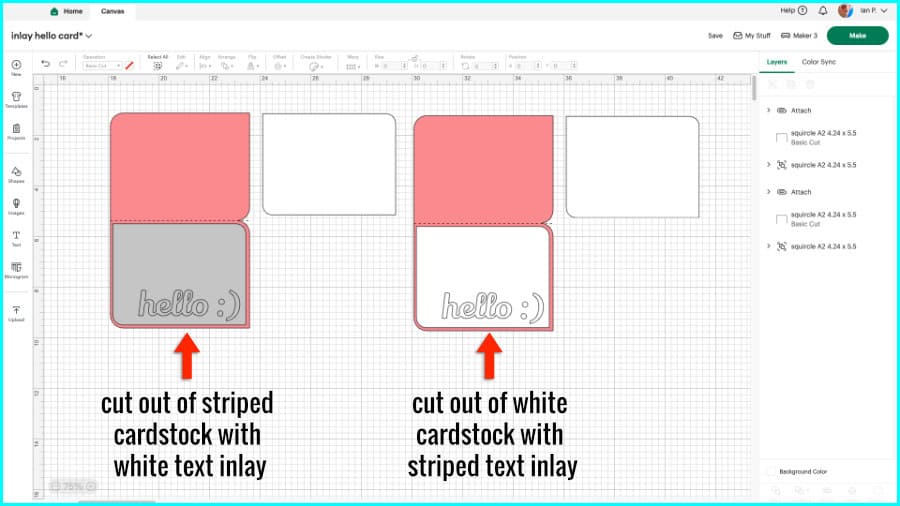
The last thing you’ll need is another copy of the text to inlay into the striped front panel. I’m going to make a second card that’s the reverse of this one – striped text on a white panel – so I’m just going to duplicate the entire card and change the color of the front panel to white. I will inlay the white text from this panel into the striped one. If you don’t want to make 2 cards, just make a copy of the text to cut out of another color.
Make the custom striped cardstock
Choose your palette & cut your strips
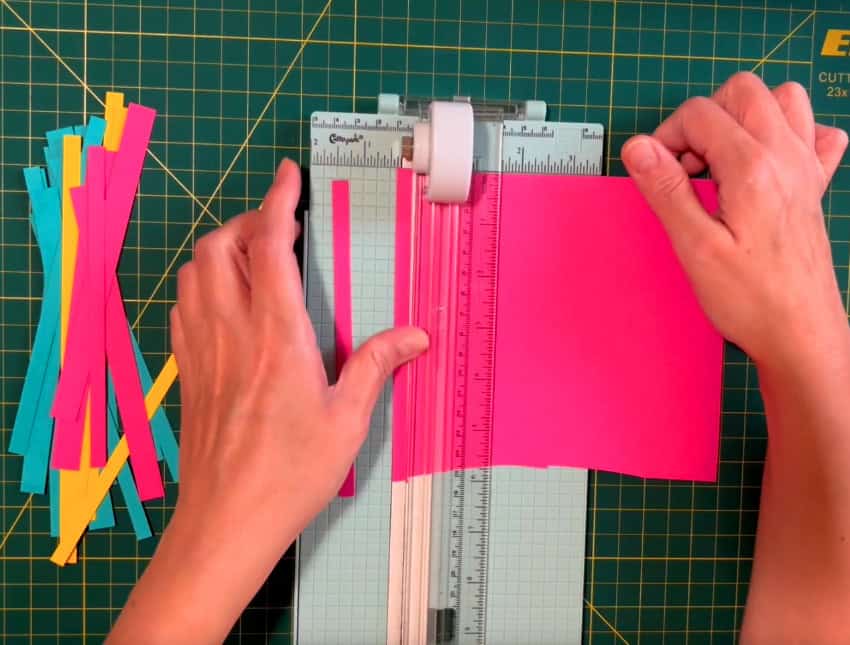
To make my striped cardstock, I started by looking through my scraps and pulling out pieces of 65lb cardstock in bright, summery colors. Choose any colors you want! I’ll definitely be doing Christmas cards with this striping in a holiday palette this year.
I cut my strips to either ¼ inch or ½ inch wide using a paper trimmer. The length of the strips can vary, they just need to span whatever you’re using as a base. You can use your Cricut to cut the strips, but honestly this is much faster.
Stick your strips to a base
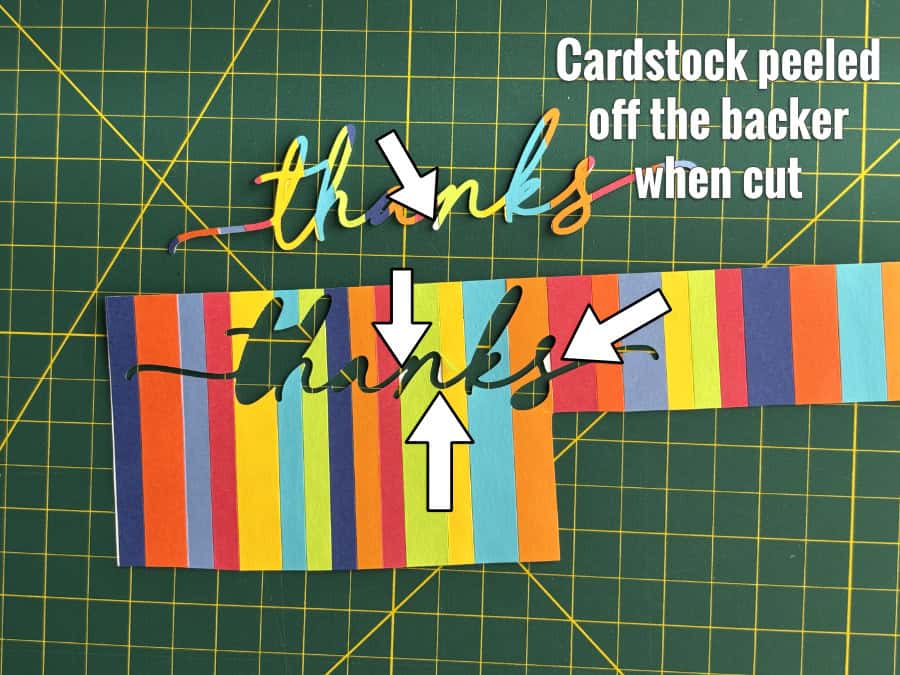
The second step is to adhere the strips to a backing sheet. The first time I tried this, I glued the strips to a piece of plain cardstock and let it dry, putting it under a book to keep it flat. The problem was I didn’t have an even coating of glue on every strip, so some tiny pieces of the striped layer lifted after cutting:
If you want to use glue, I recommend spreading it evenly using a small spatula. But honestly, what I really recommend is using Cricut Smart Paper Sticker Cardstock instead. You probably have some of this lying around, but if you haven’t seen it, it is a medium weight cardstock with an adhesive back. Smart Paper is perfect as a base for your custom stripes, and the strips will all adhere evenly.

For this project, I only need a 4 x 5.25″ panel, so I’m using the Joy-sized 5.5 x 13″ Smart Paper. I cut all my strips so they would be more than 5.5″ long to cross the width of the Smart Paper.
Take off the backing sheet and lay the Smart Paper face down to adhere your strips. I put on the first strip, tape the ends of that strip down to my mat to stabilize the sheet as I work, then I add the rest of my strips, lining up each one flush against the last and alternating colors and thick and thin stripes.

After I’ve added all my strips, I roll over it with a brayer a bunch of times, then trim the excess from the sides. Now it’s ready to cut, since unlike glue, there’s no drying time needed!

Cut your cardstock
Striped cardstock cut settings
When you cut the custom striped cardstock, I recommend placing the panel face-down on the mat and mirroring the cut. This keeps the blade from peeling the edges of the stripes as it gets dragged around corners and prevents the raised edge you get on the top side of a cut. The sticker paper is 13″ long so I’m going to place it vertically on the mat.
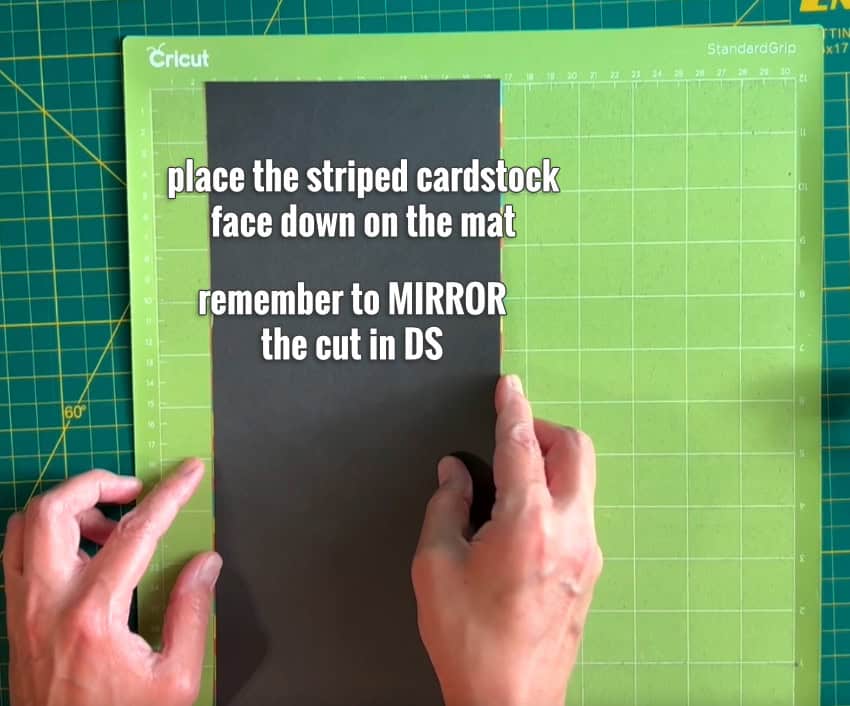
Now, I’ll click the ‘Mirror‘ toggle on the mat preview then rotate my panel to match the orientation of the stripes on the cardstock. Now I’m ready to proceed to the Set Load and Go screen to choose my cut setting.

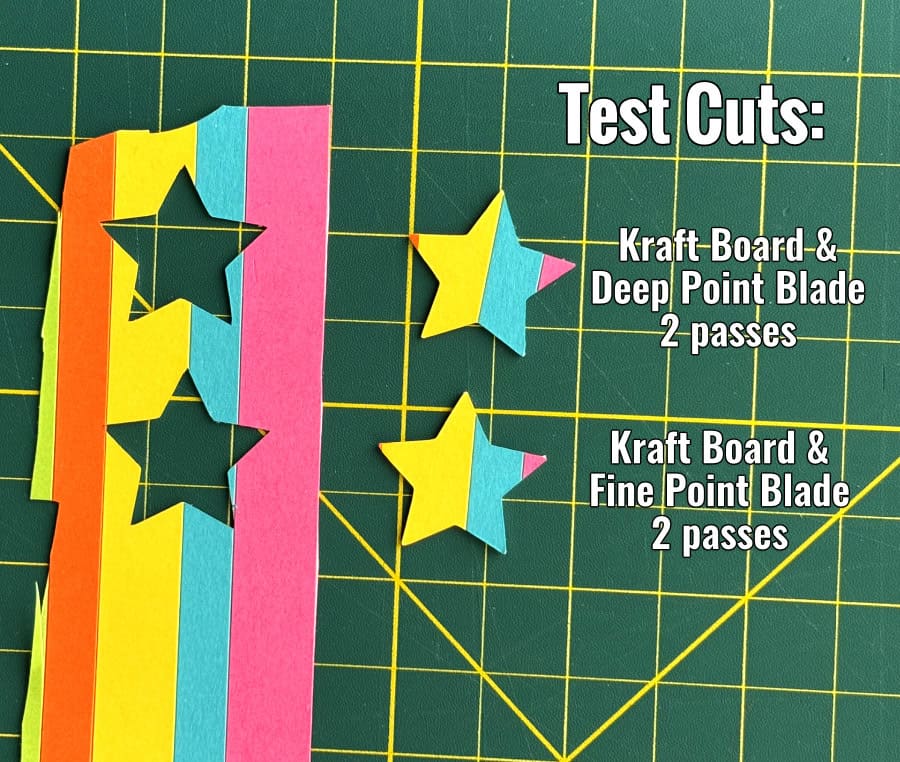
The striped cardstock is two layers of medium-weight cardstock laminated together, and I’ve had good results using the Kraft Board cut setting. This setting has a built-in multi-cut and you can choose to use either a Deep Point or Fine Point blade. I’m using a Deep Point blade for cleaner, more precise cuts, but a Fine Point blade will also work.
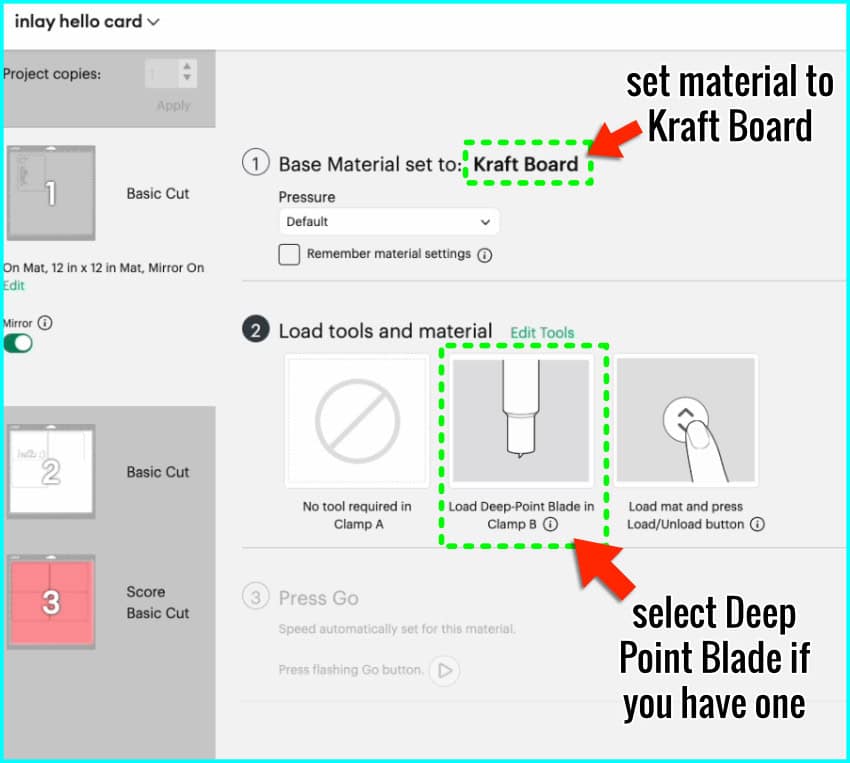
Before cutting your actual design, do a test cut—something like a 1-inch star or triangle from a scrap or from the top corner of your cardstock. If the cut isn’t clean, adjust your settings or add another pass.
Inlay text cut settings
I’m going to mirror my cuts for the white cardstock lettering and panels as well, to keep the text smooth on the top. I’m using the medium cardstock setting. If you have trouble getting clean cuts with white cardstock, I’m using Astrodesigns white 65lb 12×12 cardstock which always cuts perfectly for me.
Card assembly
Now that I’ve got all my pieces cut, I’m ready to assemble the cards.
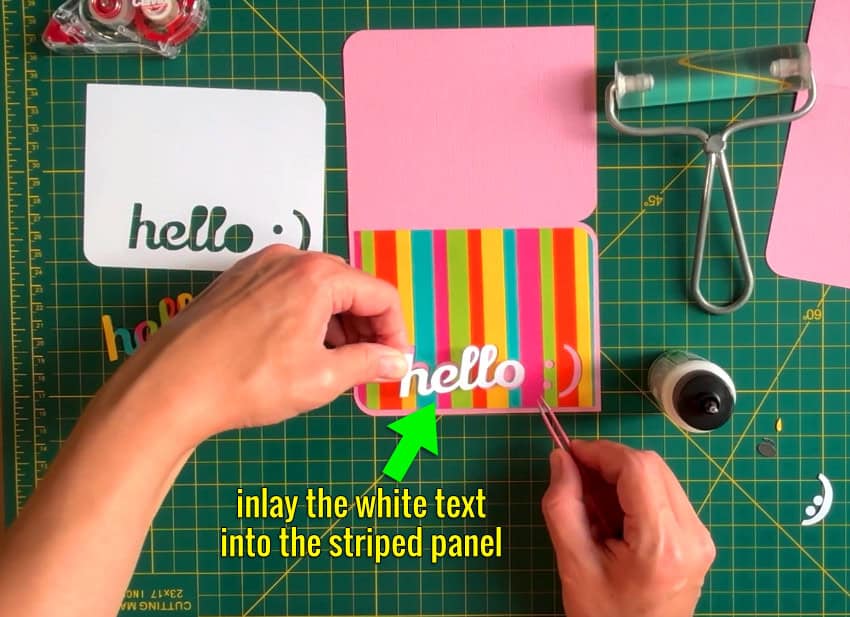
The striped panel gets matched with the white text and the striped counters (which are the pieces from the holes in the letters). The white panel gets matched with the striped letters and the white counters. And I’ve got my Bearly Art glue with the little metal tip for the detail work around the text.
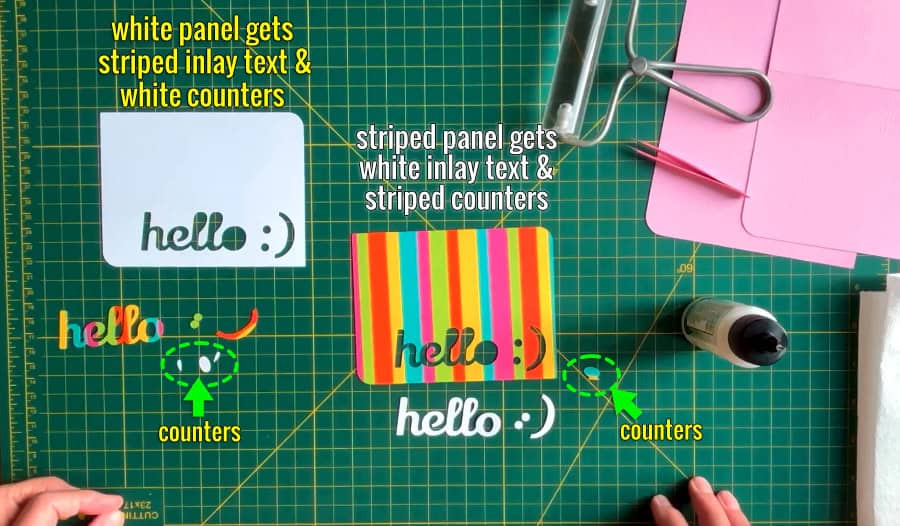
For each of these cards, I’m going to attach my front panel to the card base, and then inlay the text and counters. The inlay text fits perfectly inside the front panel, and the counters from the O and the loops of the Ls are glued in as a final step.
If you want to increase the dimensionality of your inlaid text, you can add an extra layer or two of text on top of the first one. I decided to add another layer of white text to my striped card.
These cards are super easy to assemble and they are so cute!
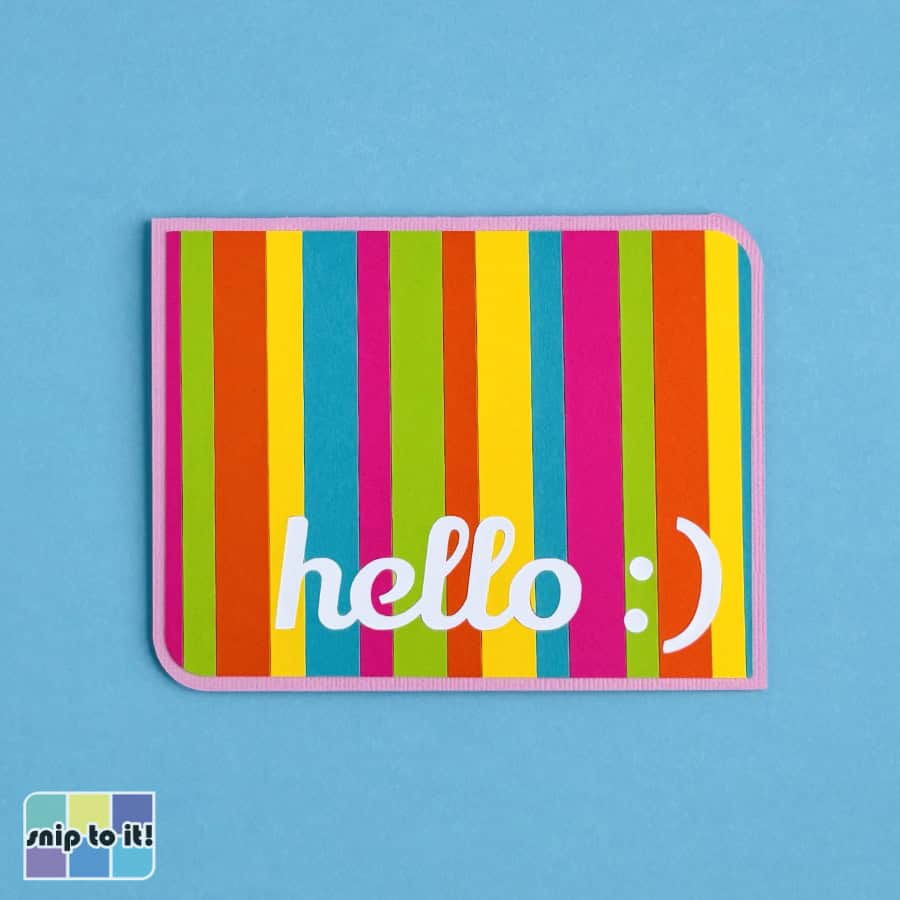

And that’s it—two colorful inlay cards made from scraps and some old Smart Paper. I love how this technique lets you create your own patterned cardstock, and you can customize it for any occasion or color scheme.
Before you go…
you might like these other Cricut adaptations of classic die cut cardmaking favorites: