
Design Space is the software you use to create projects and plan precise instructions for your Cricut cutting machine. This Beginner Series guides you through navigating the workspace to completing your first project, from the first click to the first cut. The series is part of our Mastering Cricut Design Space learning path.
If you’ve been following along in our Beginner Series, this is the moment it all comes together. You’ve toured the Canvas, you’ve learned how to Add, Change, and Organize your designs. You’ve seen how Design Space plans your mats and prepares your machine.
Now it’s time to go from Canvas to cut.
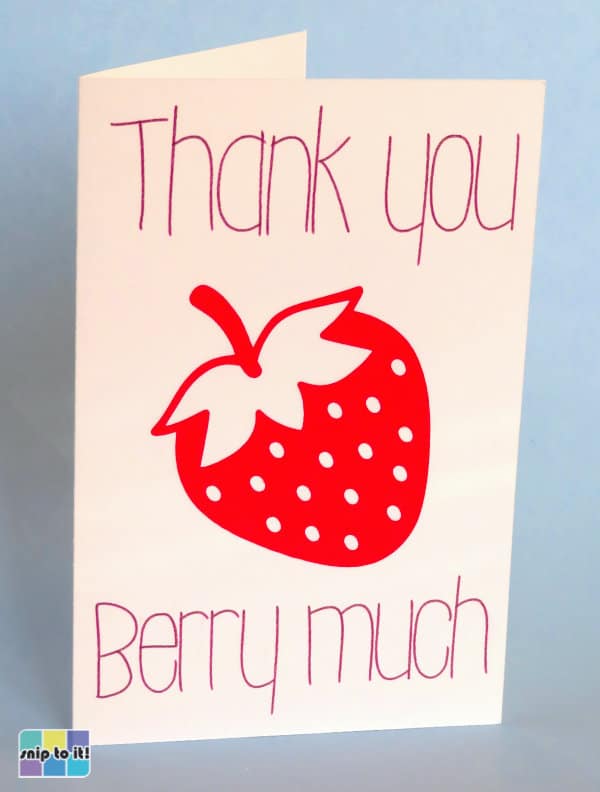
In this tutorial, we’ll create a simple Than You card while walking step-by-step through the entire Cricut workflow, from blank Canvas to finished project.

This project may look simple, but it walks you though the same steps you will use in much more advanced Cricut projects:
- How to add shapes, images and text to the canvas
- Resize and Align objects
- Change colors
- Change fonts and font styles
- Change operations
- Duplicate objects
- Attach
To help you, I’ve labeled all of the steps “Add it”, “Change it” and “Organize it” to match the 3 zones we talked about earlier in the Canvas tour. Each screenshot is labeled with orange, pink or blue highlights to let you know what Canvas zone is being used for that step!
What you need to make this Project
Although this project is primarily aimed at teaching Design Space fundamentals, we still want to create this fun little card. Here’s what you’ll need:
- White and red cardstock (65 or 80 lb)
- Craft glue or 2 sided tape
- Cricut Mat (preferably the blue Light Grip mat)
- Cricut compatible pen (I am using a fine point pen)
- Cricut Scoring Stylus or Scoring Wheel
- Cricut cutting machine (I am using a Maker 3, but this project can be made with any Maker, Explore, Venture or Joy Xtra machine)
Don’t worry if your machine looks different from mine, the Design Space workflow is the same.
Creating a Card Base
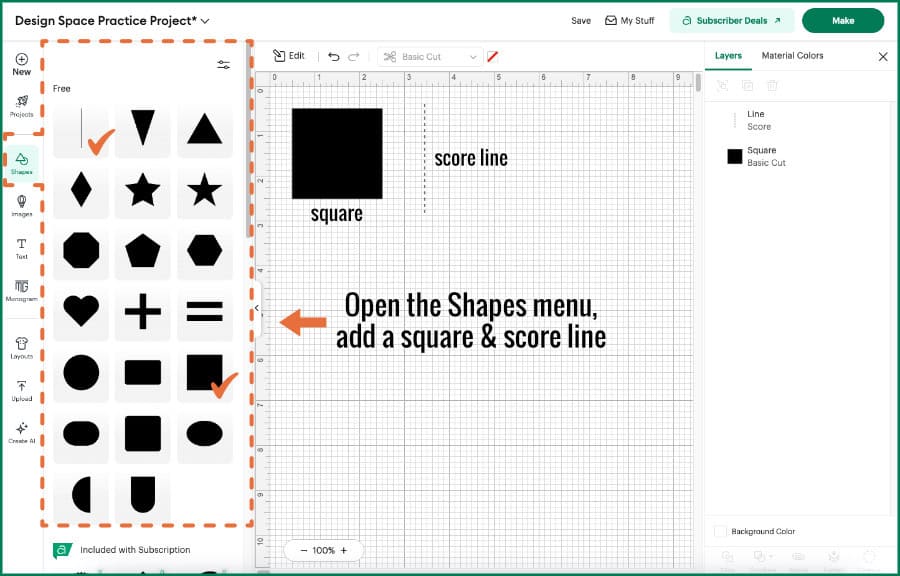
Open a blank Canvas window to start. In the left-hand Design Panel, open the Shapes menu.
Add it: For our simple card, add a square and a score line to the Canvas.
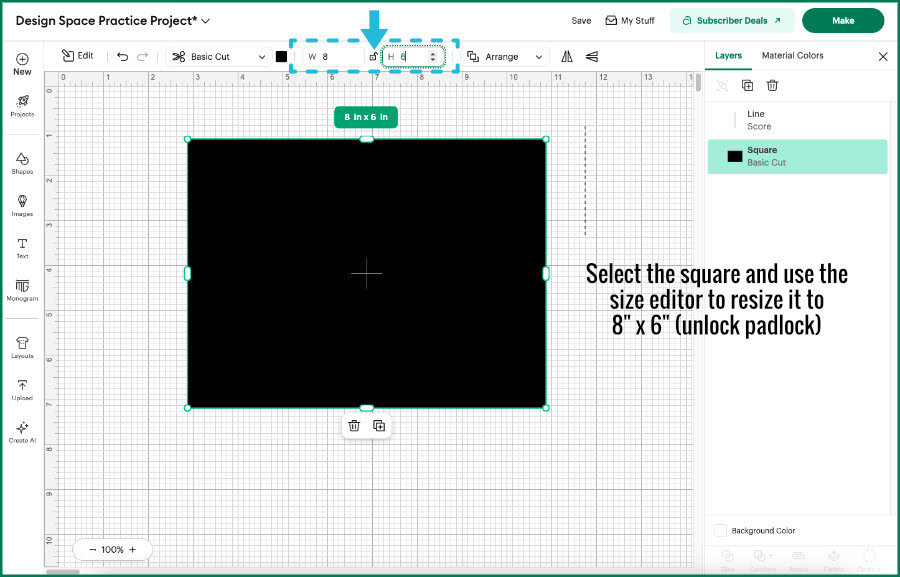
Change it: Select the square, and use theSize adjustment tool in the Edit Bar to unlock the padlock and change the dimensions to 8″ wide and 6″ tall. This will create a 4″ x 6″ finished, folded card. Close the padlock. Select the score line and change the length to 6 inches.
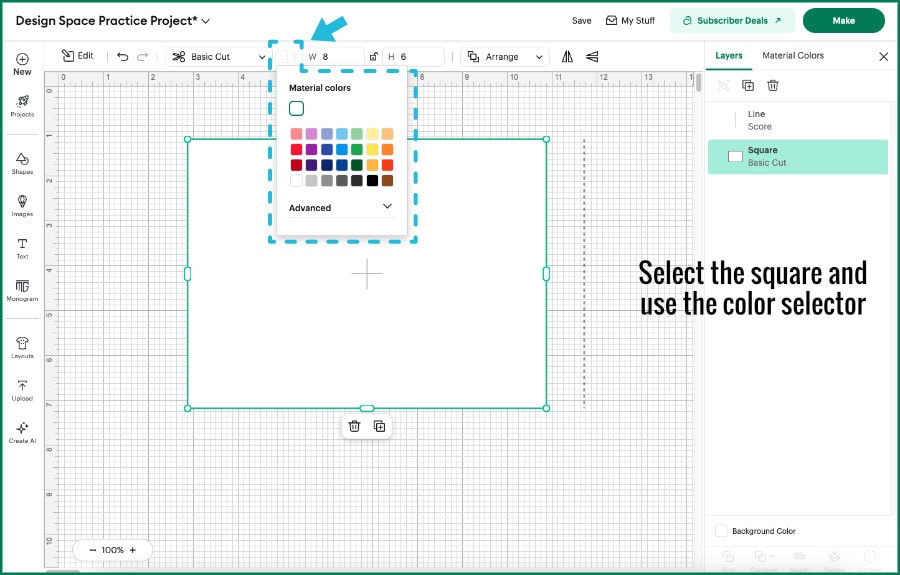
Select the square and open the color selector (also in the Edit Bar). Change the color from black to white.
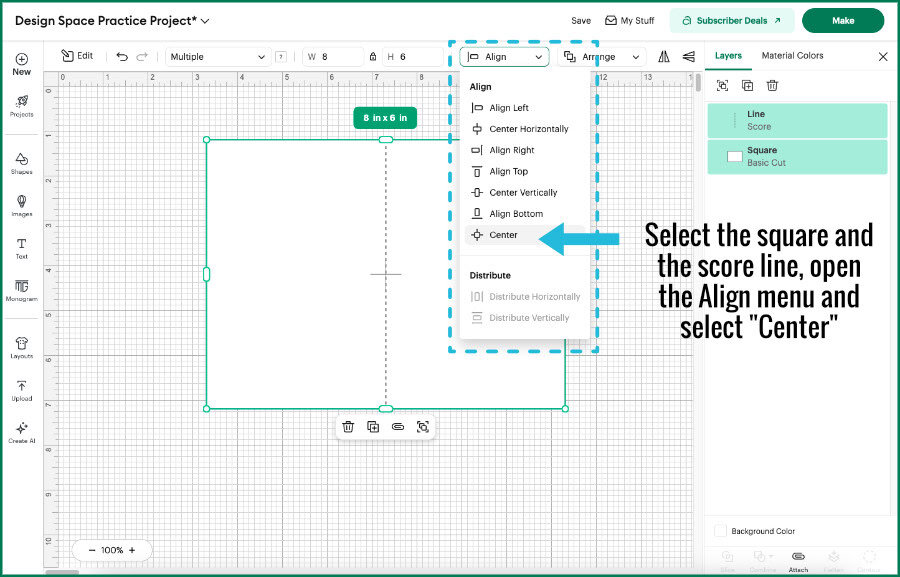
Select both the rectangle and the score line. To select multiple objects at the same time, use your cursor to drag a box around both objects. OR, you can click the square, then hold the Shift key and click the score line to select both objects at the same time.
With both objects selected, open the Align menu in the Edit Bar, and select “Center”. This will align the rectangle and the score line so they are centered both horizontally and vertically.
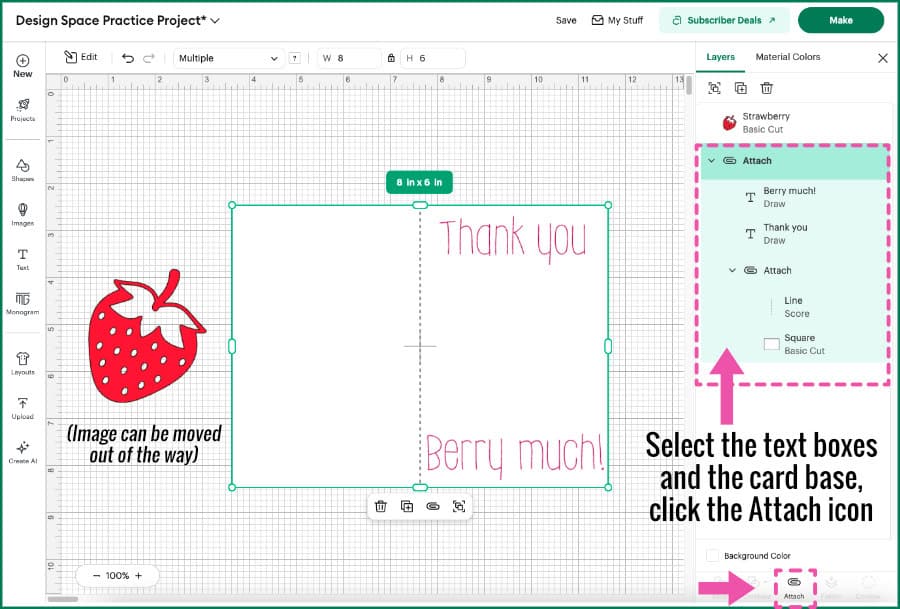
Organize it: With both of these objects still selected, click the Attach icon at the bottom of the Layers Panel. Design Space will treat them as a group while on the Canvas, and also as a locked group when you move into the planning stage.
This is your first example of telling Design Space exactly how something should behave later in the planning phase.
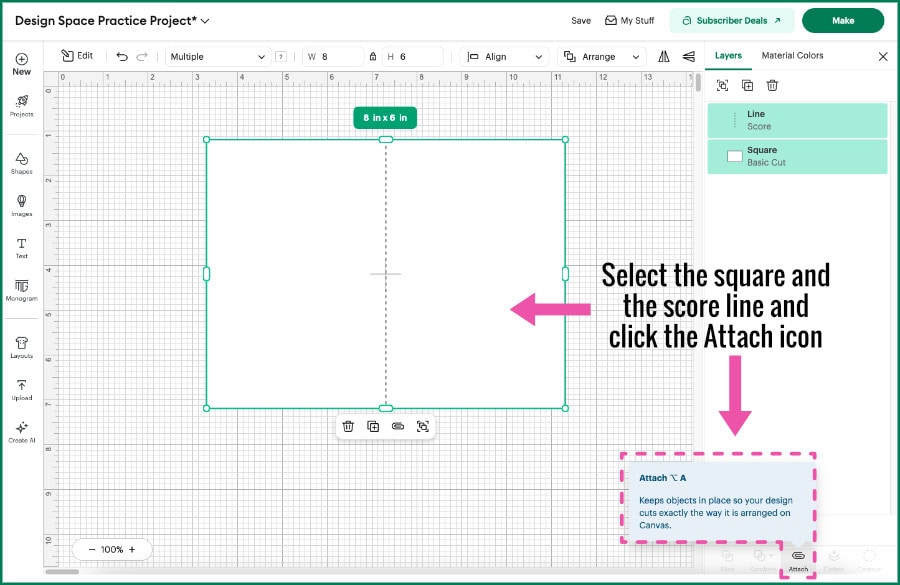
These layers will form the base of our card. When these objects are sent to the Prepare screen, the Attach command will tell the Planning brain of Design Space to keep this rectangle and score line grouped together in this exact position, and when the machine executes the operations, it will trace a score line into cardstock first, then cut the rectangle with a blade second.
These basic steps will be endlessly repeatable as the starting point for creating cards for every occasion.
Adding and editing images
Add it: Now that your card base is set, lets add a few decorative elements. Start by clicking the Add Image icon in the Design Panel, and searching for something specific. I typed “strawberry” into the search bar at the top of the menu, and I found a basic single layer image. Clicking on the image thumbnail in the menu adds the image to the canvas.
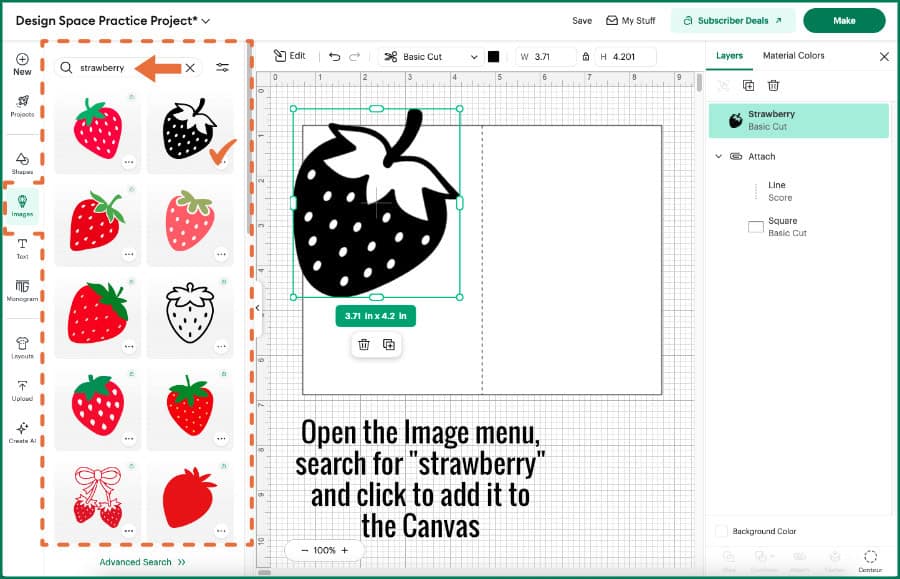
From here, you’ll see 2 things right away. First, is that the image is quite big compared to the card base, and second, it’s black, which is not a very nice strawberry color.
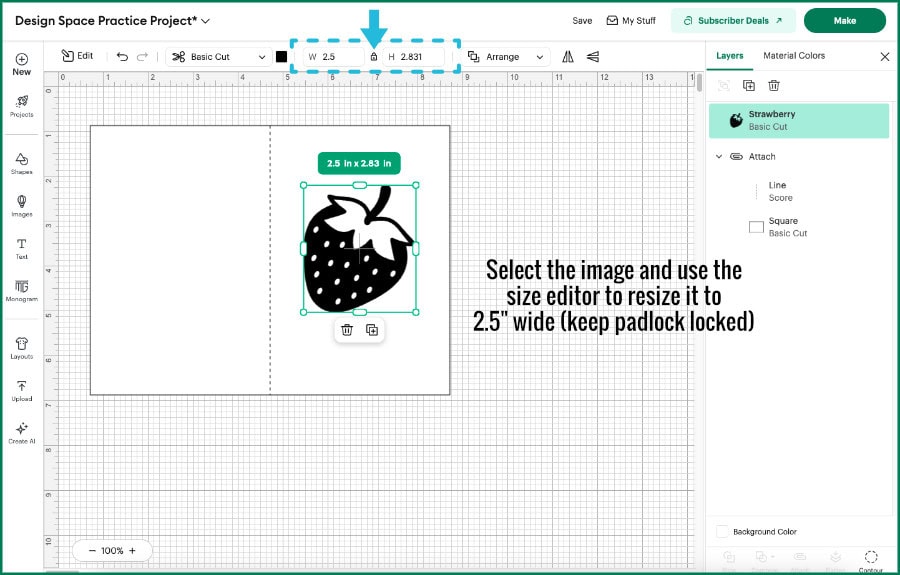
Change it: We’ve already used the resize function once for this project, so using it again is simple. Select the strawberry image and use the Size adjustment tool in the Edit Bar. This time, however, I want to maintain the height-width ratio, so I’m going to leave the padlock icon closed. Enter 2.5″ as the width and the image will resize so it maintains its original proportions.
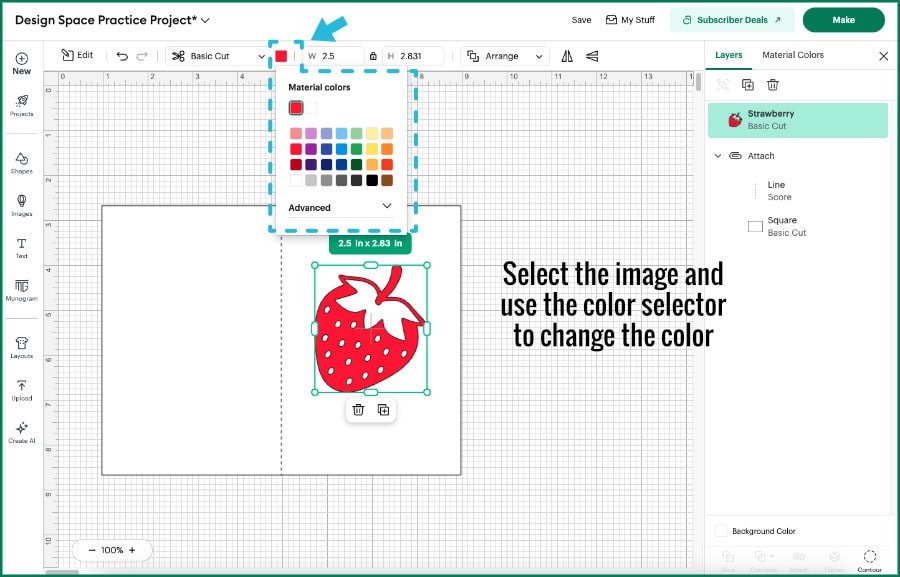
Next, open the color selector in the Edit Bar and select red.
Organize it: You’ll see the strawberry image and the card base as different layers in the Layers Panel, and we’re going to cut them out of different colors of cardstock, so they are going to remain separate in the Layers panel. There is no need to Attach them to keep them grouped together.
Adding and Styling Text
Add it: The next element I’m going to add is some text for the front of the card. Since I’ve added a strawberry, let’s add a punny sentiment to write with a pen. Click the Add Text icon in the Design Panel, and a text box will appear on the canvas.
A few things to note:
- the default text appears as “Text” in Cricut Sans font, size 72pt
- the font style is “Regular”
- the default color is black
- the default operation is Basic Cut
Change it: We are going to change a few things about this text (besides the message):
- we are going to change the font
- change the font style from “Regular” to “Writing”
- change the operation from “Basic Cut” to “Pen”
- change the color
Using the Font Menu
We are going to use the Font Menu and its filters to take care of a few of the changes we want to make, all at once.
Make sure the text box is selected, and click the font selection button in the Edit Bar. This will open the Font Menu in a flyout panel on the left side of the screen.
Here’s a few things to be looking for in the Font Menu:
- There’s a row of tabs across the top: Cricut’s own fonts, System fonts (fonts that are installed on your computer), Recent fonts (both Cricut and System fonts) and Bookmarked (Cricut fonts). For this project, we are going to be using Cricut fonts
- There is also a search bar at the top of the menu. You can search specific font names, or styles/vibes
- Font tags: you can filter fonts by selecting a tag from the list: Decorative, Retro, Typewriter, Marker, etc.
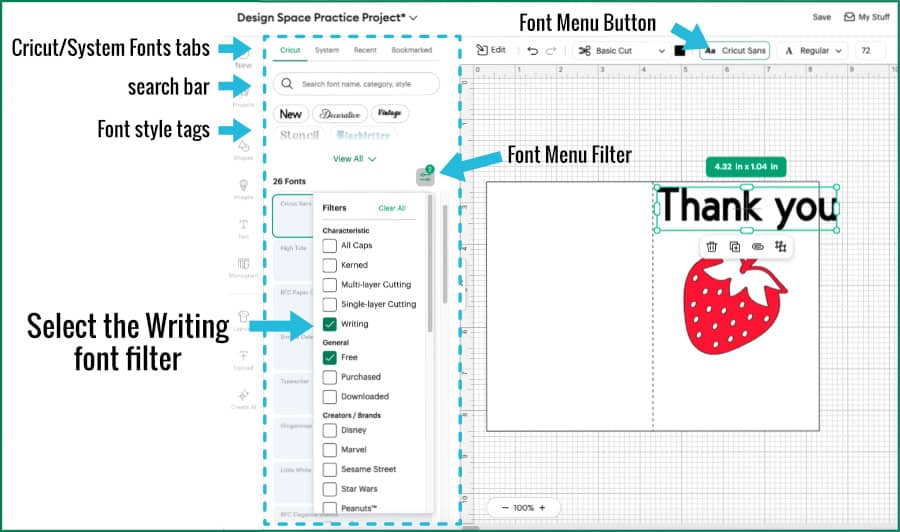
What you’re looking for is the filter icon (2 lines with open dots) just above the list of fonts.
Instead of manually changing font style and Operation, we can use filters to do that work for us automatically.
For this project, we are going to select the “Writing” filter, and to make this project accessible to everyone, I’m also going to check the “Free” filter. This means that the fonts that get displayed don’t need a Cricut Access subscription to use.
To close the filter menu and view the list, just click the filter icon again. Now you can scroll through the filtered results until you find a suitable font.
I’m choosing a font called “Little White Lies.” It’s a simple font that looks like hand printing, and I think it will be a good match for the theme of the card.
When the font changes, there are a couple of things to note. First of all, by using the “Writing” filter on the fonts, the Operation automatically changes from “Basic Cut” to “Pen”. And secondly, the font style automatically changes from “Regular” to “Writing”. If you open the Operation menu when the style is set to “Writing” you’ll see that the Basic Cut setting is greyed out. And if you change the Font style back to “Regular”, the operation will automatically revert to “Basic Cut”.
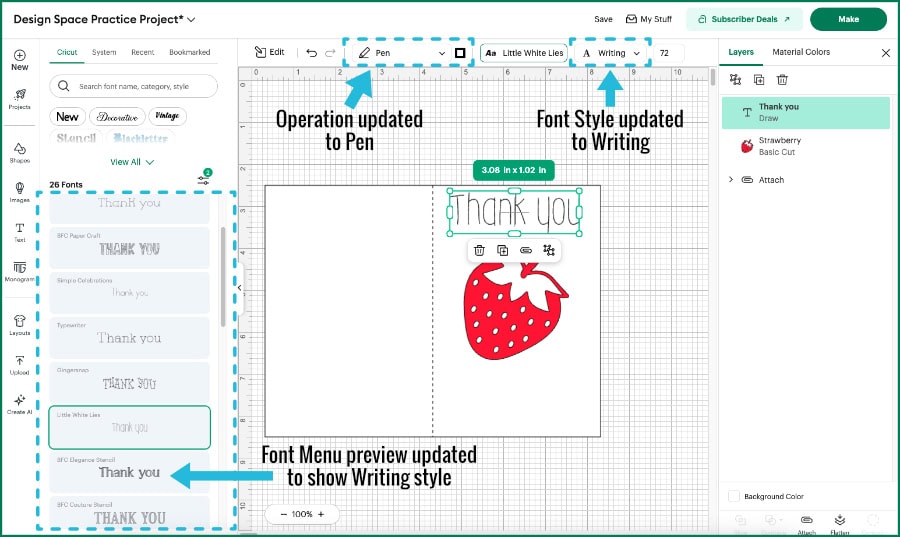
So by using the Font Menu filter for Writing, we are pre-selecting the correct operations and font style in the Edit Bar!
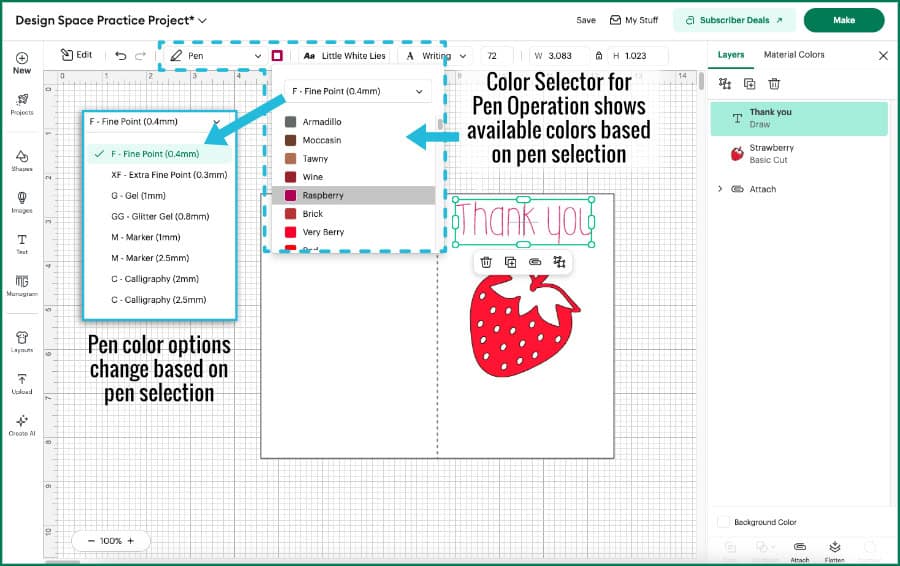
Select Pen Width and Color
Next, I want to change the ink color from the default black to something more fun. You’ll notice that when you select the text layer with the operation set to Pen, the color selector now appears as an outline instead of a solid color.
Open the color selector, and you will see a pulldown menu for the pen type (fine point pen, extra fine point, marker, etc.) and the color options available for that pen weight. I’m going to leave the pen type as the default, and select “Raspberry” from the menu. Of course, these selections are for Cricut brand pens, and what you end up choosing will depend on the actual pens you’ve got.
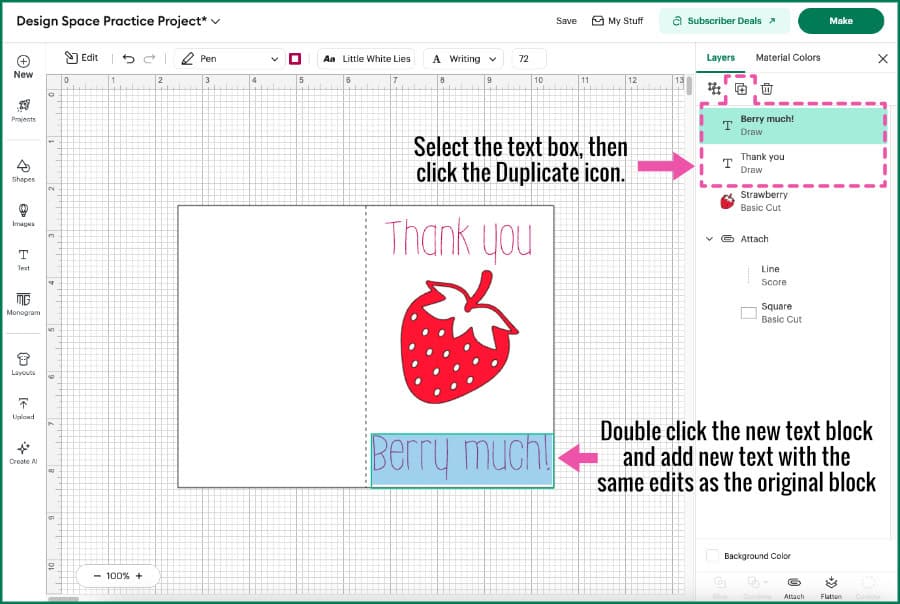
Organize it: So now we’ve got a text block that has the right font, style and color. In the Layers Panel, make sure the text is selected, then click the Duplicate button. This creates a copy of the original with all of the edits we’ve made (font, style and color).
Change it: I’ve moved the second text block to the bottom of the card base, under the strawberry. Now we can double-click the second text block to highlight the text, and type in the the second half of the sentiment. Replace “Thank you” with “Berry much”.
Attaching Text to the Card Base
Organize it: Next, we want the text blocks to be written on the card base. This requires that they be Attached to the white rectangle.
If you skip this step, the text will move to its own mat on the Prepare screen.
The card base itself is an Attach group containing the white rectangle and the score line. The easiest thing to do for beginners is to select the new text blocks and this card base group and Attach again. Design Space allows you to have multiple Attach groups like this without creating problems.
If you are feeling bold, you can click the text block layers in the Layers Panel and simply drag them into the original Attach group of the rectangle and score line. It might appeal to an innate sense of tidiness (or whatever), this is how I would normally do it.
Click the Make Button to move to the Prepare Screen
This is a very simple design, and after the text is Attached to the card base, you can save the project and click the Make button in the top right corner of the screen.
This will take you to the Prepare screen. This shows you a preview of each each mat in the left hand sidebar, sorted by color, and it also shows you the operations that will be performed on each mat. This is a simple project, so there isn’t much to do in the Prepare screen.
Our project consists of 2 mats:
- White: containing the card base shape, score line and pen writing
- Red: containing the red strawberry image
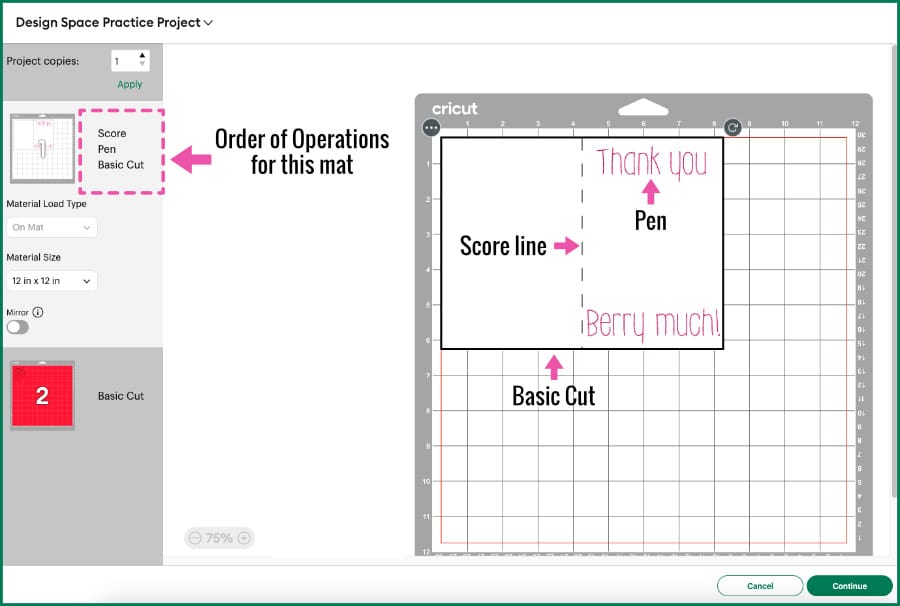
The first thing I want to point out is that the list of Operations is right next to the mat preview thumbnail. On mat 1 (white) you’ll see Score, Pen and Basic Cut. This is the order of Operations for this mat.
The other settings are fairly straightforward:
- Material Load Type – set to “On Mat” and there is no option to change it. A little sleuthing shows that this is because the Score Operation is present, and therefore must use a mat (not matless). Another example of Design Space protecting your Cricut machine automatically!
- Material Size is set to 12 x 12″ by default, but I could change that to a different size in the pulldown menu if I wanted (only media sizes that match the size of the cut will be shown)
- Mirror – not necessary for this project, but if selected, it will flip the text so that it will write backwards.
The Operations for the red mat are even simpler. The only Operation on this mat will be Basic Cut.
Unless you are using scraps to cut these pieces, there is no need to move anything on the mat. So it’s time to proceed to the Make Screen to select Material Settings and Tools. Click the Continue button.
Make Screen: Material and Tool Selection
To get to the Make screen, your Cricut machine needs to be connected to your computer and powered on.
On the Make screen, you’ll see the same lefthand sidebar showing your mats, and the white mat should be highlighted. In the main body of the window, Design Space will prompt you to select a material you plan to use. Typically, you will be shown your bookmarked materials (i.e. what you use a lot), but if you are brand new to Cricut and have no bookmarked materials, Design Space will probably show you popular materials.
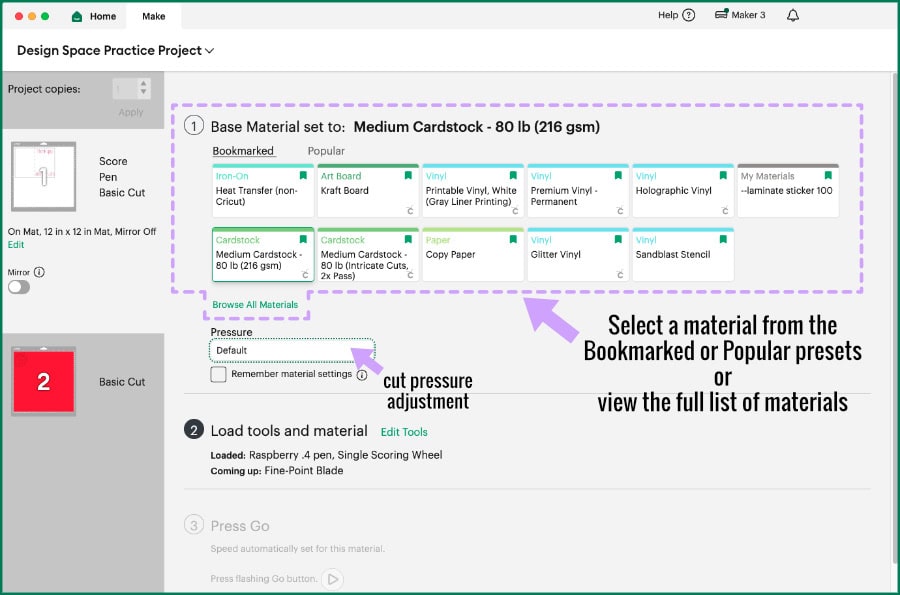
For this project, we are going to score, write, and cut on Medium Cardstock. If you don’t see it in the Bookmarked or Popular materials, you can select “Browse all materials” to see a full list. You can make a material selection and add a bookmark there.
Once you select a material, you can also adjust the cut pressure slightly using the pulldown menu under the materials list. Design Space lets you add More or Less cut pressure, but for Medium Cardstock, it’s usually never an issue, so we can leave this setting at Default pressure.
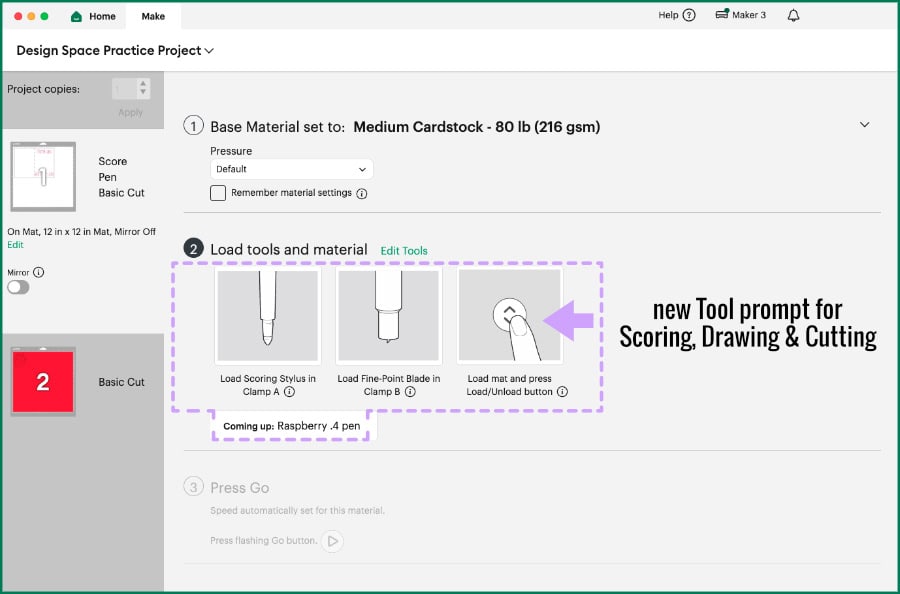
Tool Prompt
After you select your material, the Load tools and material prompt portion of the window slides open. You’ll see a preview image of each tool and where it’s supposed to be loaded (Clamp A or Clamp B). Here’s how the tool prompt works:
- Design Space has a default tool selection based on the machine.
- I am using a Maker 3, so the default Scoring tool is the Scoring Wheel (which uses Clamp B)
- Design Space also assigns a Pen to Clamp A
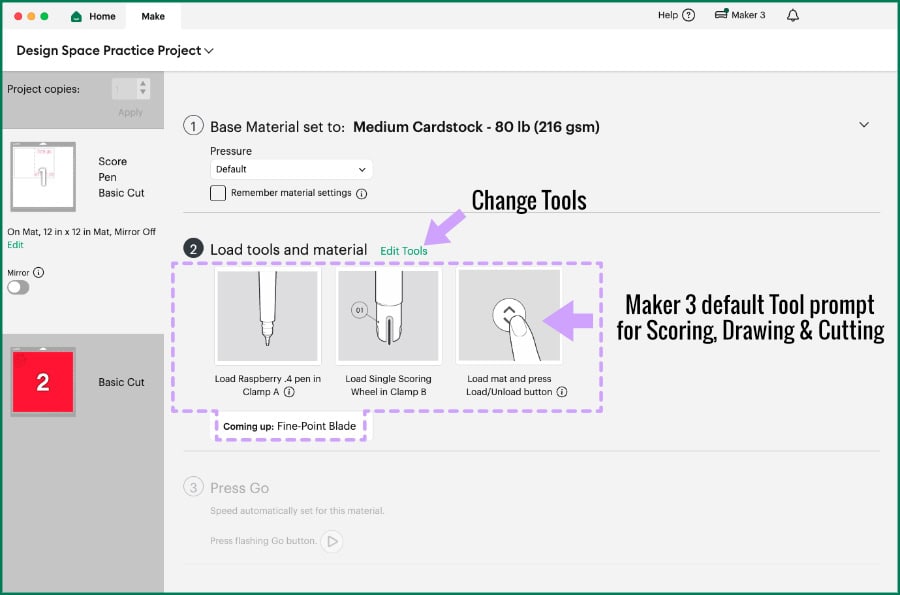
You’ll notice that if we move forward from here, there is no blade loaded in the machine as we start to make this project. After scoring, we would be prompted to remove the Scoring Wheel and replace it with the Fine Point blade.
But, I personally don’t use a Scoring Wheel, I prefer the Scoring Stylus, which goes in Clamp A. So I need to edit my tool options.
(you don’t have to edit tools unless you prefer a different one. The default is perfectly fine)
Click the Edit Tool option, and in the pop up window, you’ll see the option to choose between the Scoring Wheel and the Scoring Stylus. If you choose the Stylus, the Fine Point Blade gets loaded right away in Clamp B.
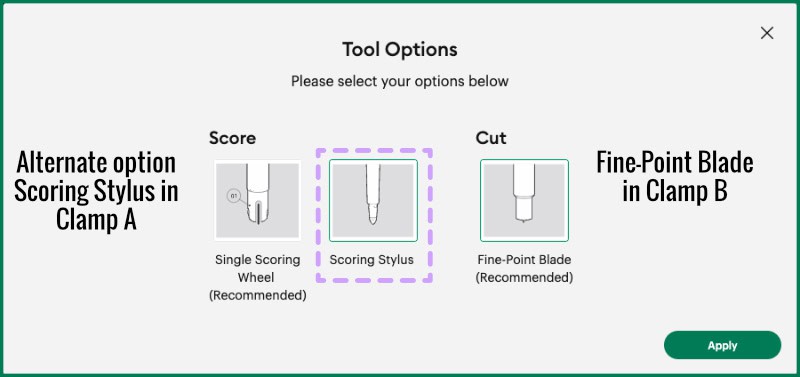
So after Editing, the tool preview shows the Scoring Stylus in Clamp A, the Fine Point Blade in Clamp B, and a reminder that after the score line is finished, there will be a prompt to replace the Scoring Stylus with the Fine Point pen.
(Just a note, this edited configuration will be the default if you are using an Explore or Venture machine. If you are using a Joy Xtra, you will be prompted to change tools after each Operation.)
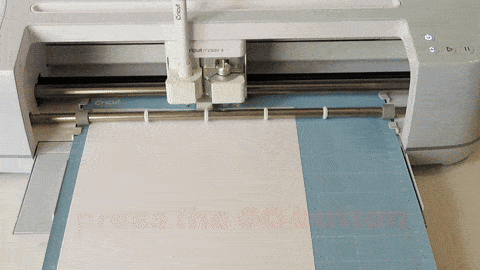
Now you’re ready to load your cardstock on your cutting mat, load it into the machine, and make your cuts!
Loading and Cutting your Mats
Matching materials and mats and loading materials onto machine mats is a topic beyond Design Space, but I’ll go over this briefly here, too.
Cricut machine mats are coated with a repositionable adhesive, and they differ in terms of stickiness (blue LightGrip mats are the least sticky, green StandardGrip are medium sticky, and purple StrongGrip are super sticky). When you’re cutting cardstock, you need a LightGrip mat or an old/less-sticky StandardGrip mat – you want to stick the cardstock down but you don’t want to tear it apart when you remove it from the mat.
First step, put your material on the mat. Remove the clear plastic mat cover. I’m using white cardstock as the base of this card, so I’ve lined a sheet up in the top left corner of the mat to match the preview. I always use an acrylic brayer to roll over my cardstock and firmly stick it to the mat without bubbles.

How to load a mat in a Cricut Maker or Explore machine
Make sure you have enough physical space around your machine (at least a foot or so) for the mat to move in and out, front to back.
By this time, the Load button on the machine will be flashing.
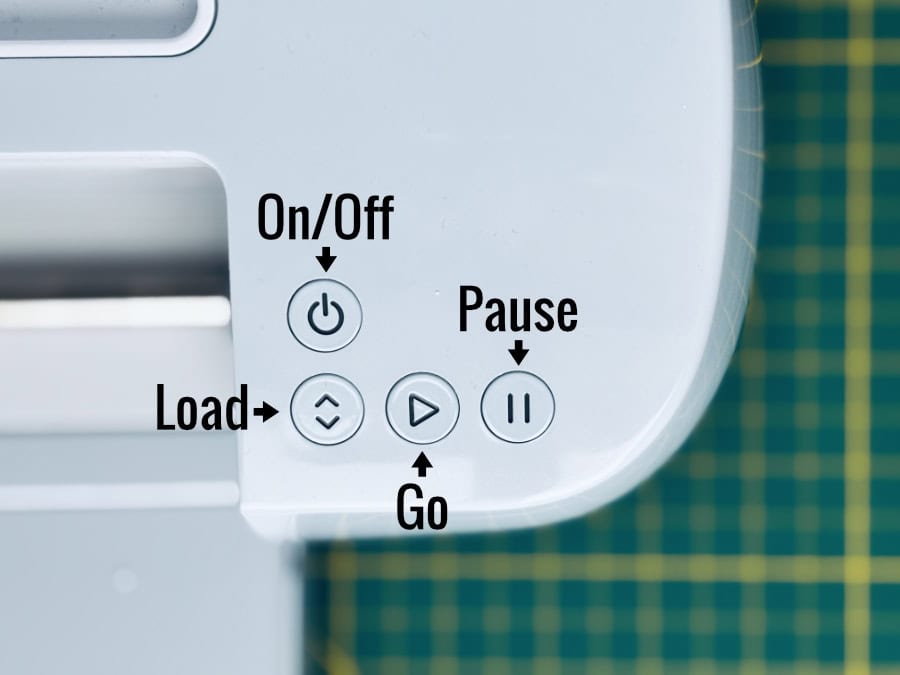
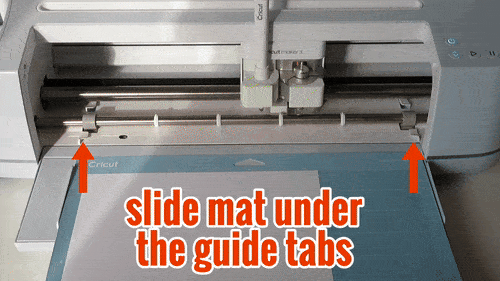
Lay your mat (with the top facing the machine) underneath the white tabs at each side and push it towards the grey rollers. When the mat is flush against the rollers, press the Load button and the mat will get pulled into the machine.
If the mat seems crooked or something doesn’t look right, you can press the Load button to eject the mat and try again.
When the mat is loaded correctly, the Go button will flash and you can press it to start cutting! If something seems to go wrong while the machine is cutting, you can press the Pause button and troubleshoot.
(If you’re using a Joy Xtra, the machine will automatically load your mat or material without pushing any buttons, and the Go button is part of the app that you’ll use on your phone.)
Loading and changing tools in the Cricut machine
As the Cricut machine works through different Operations, the machine will automatically pause and the Design Space Make screen will show you prompts to switch tools.
For example, in our practice project, I have to load the Scoring Stylus in clamp A to begin the operation, then the machine will pause and tell me to replace the scoring stylus with the pen. After I have made the replacement, I must push the Go button on the machine to start the next Operation.
Finishing the project
Once the machine has finished cutting the card base, the Cricut will stop and the Load button will flash, prompting you to press it to remove the mat from the machine.
To remove the cardstock from the mat I recommend flipping the mat over and using a squeegee/scraper to gently pry the mat away from the cardstock, starting at one corner.
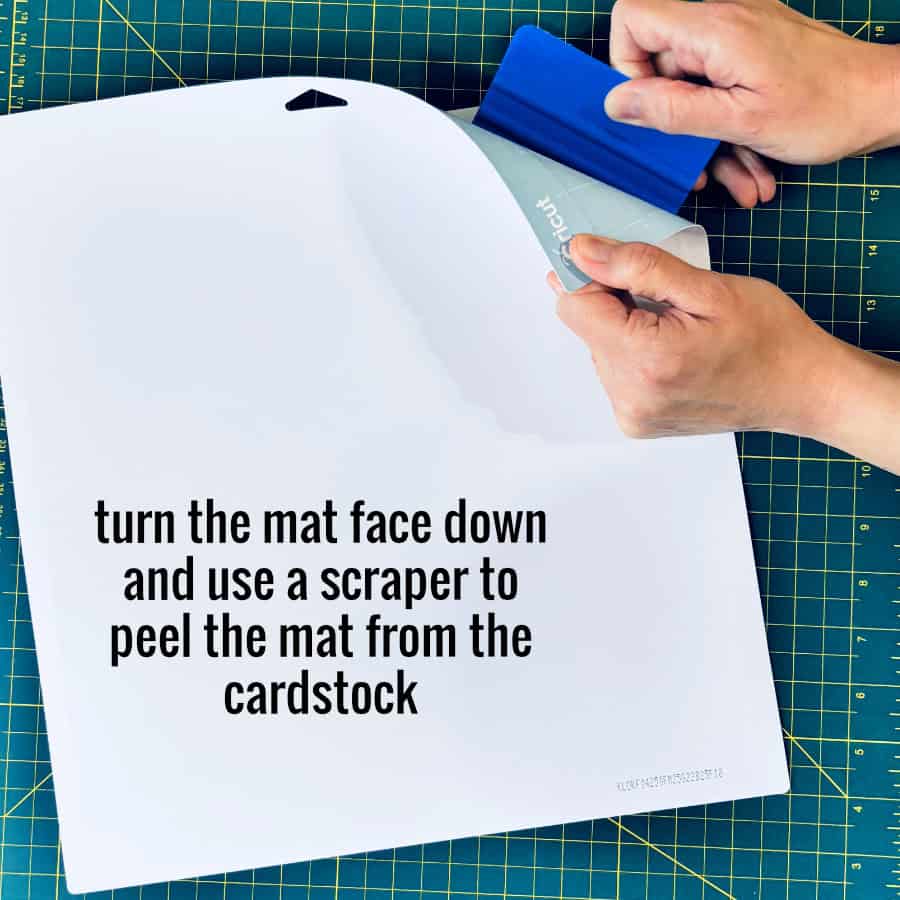
Then, load the red cardstock on the mat and go through the whole process of loading and cutting again. After the strawberry is cut and you remove it from the mat, use your squeegee/scraper to get all the little bits of stray cardstock off your mat and replace the cover. Now you can glue or tape the strawberry to the card base, fold along the score line and you’ve got a cute little Thank You card!
What you accomplished
You just:
- created a custom card base
- used scoring, writing, and cutting in one project
- mastered font style and Operations
- organized layers for multi-step execution
- selected materials and tools
That’s the full Cricut workflow, baby! From blank Canvas to finished project, woo-hoo for you!
What we covered
- How to Download, Install & Log in To Cricut Design Space
- What Does Cricut Design Space Do? Understanding The Workflow
- The Canvas: Understand The 3 Zones
- The Prepare & Make Screens: Planning Your Cut
- From Canvas to Cut: Your First Complete Cricut Project ← YOU ARE HERE
What’s up next?
If you’re looking for project inspiration, read our explainer on browsing and loading Cricut’s ready to make projects!