
Design Space is the software you use to create projects and plan precise instructions for your Cricut cutting machine. This Beginner Series guides you through navigating the workspace to completing your first project, from the first click to the first cut. The series is part of our Mastering Cricut Design Space learning path.
So you finish your design and hit the Make button, now what? You are about to enter the final planning stages before Design Space packages your project into instructions for your Cricut machine. This is the part that makes a lot of new Cricut users nervous, but it’s actually where Design Space does most of the thinking for you.
This article takes you on a tour of the Prepare and Make screens of the Design Space workflow, where you and Design Space work together on the final plans before your Cricut gets to cutting!
To make this article easy to scan, we are continuing our color-coding from the Canvas tour. The Prepare (pink) and Make (lilac) screens are both Planner areas of Design Space, so we kept them in the same color scheme as the Layers Panel.
[Note: many of the exact options (Material Load Type, Material Size, Material Settings and tool options) you see on the Prepare and Make screens depends on the machine you have selected (Explore, Maker, Joy, Venture). I’m showing examples for the Maker 3, but the general principles hold for all machines.]
The Prepare screen
Formerly known as the Mat Preview screen, the Prepare screen shows your project separated into its color-coded components and arranged on mats. This is where the Planner part of Design Space is fully on display, and the mats shown in this preview are representing the machine mats you’ll be using in the real world as you load your materials for cutting.
Once your design is finished, click the Save button at the top of the Canvas, then click the Make button to go to the Prepare screen:

[the screen dims, a circle spins, the tension builds]
What you will see next is all the pieces of your project arranged by color on a series of numbered mats in the left hand sidebar. The first mat will be selected and shown in the mat preview in the main part of the screen:
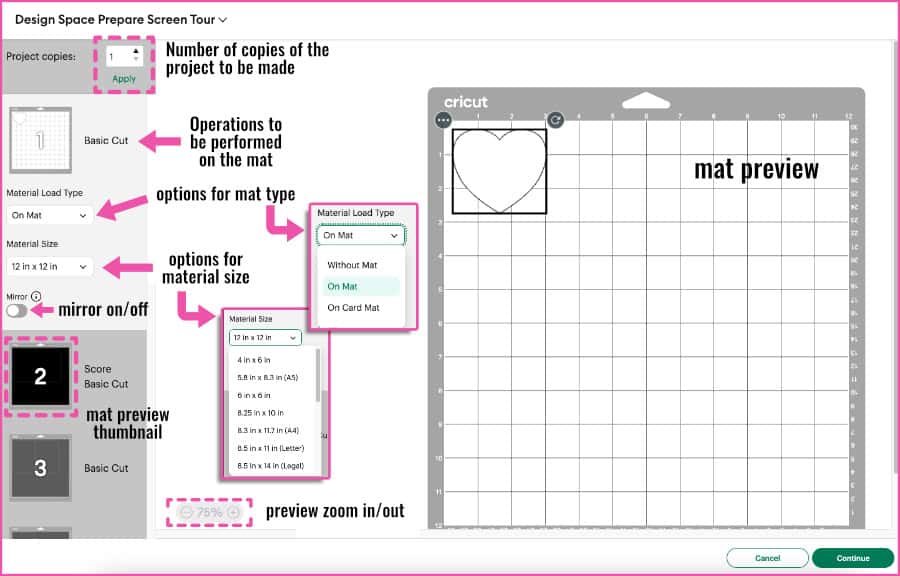
The features of the Prepare screen are as follows:
- Project copies: a quick way to make multiples of every element of your project. A good shortcut if you want to make more than one copy of the same card, t-shirt decal, etc.
- Operations: the operation(s) being performed on that mat, in order (top to bottom)
- Material Load Type: pulldown menu showing the type of mat you will be using for that operation (On Mat, Without Mat, Card Mat) – options depend on the model of Cricut machine you’re using
- Material Size: selecting a material size will generate a preview of the object on the mat with that material size. Sizes are standard (e.g. 12×12″, 8.5×11″, etc.) and include over a dozen options for cutting with a mat; matless cutting allows you to enter a value for length. Don’t worry about it, it’s optional
- Mirror setting: flips everything on the mat horizontally. Essential if you are cutting iron on/HTV
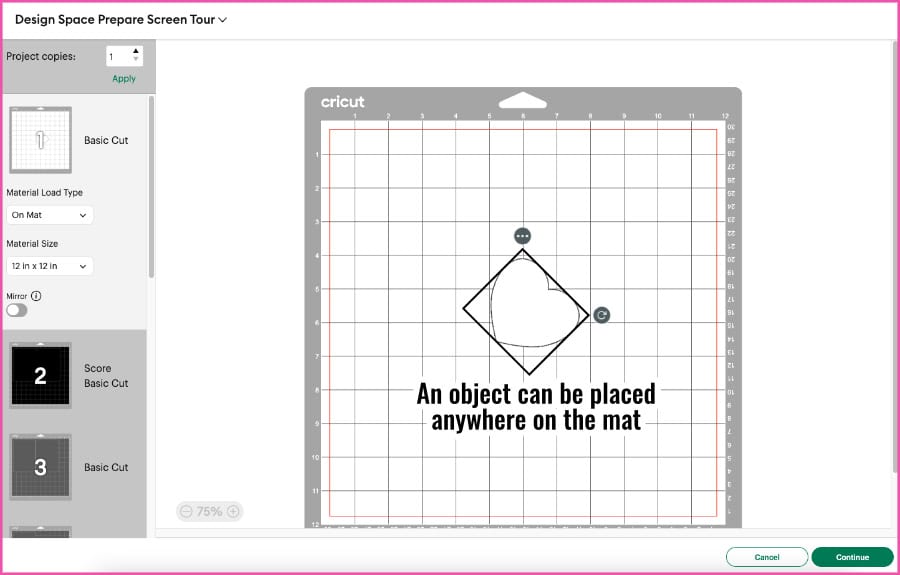
- Mat preview: a preview of where the image will cut on the mat so you can make sure it will line up with your material. You can drag an image anywhere on the mat, rotate it, or hide it.
- Zoom in/Zoom out: zoom in to get a closer look at your mat
- Continue button: after you are finished with your preview, click Continue to proceed to the Make screen
Things that you can and can’t control on the Prepare Screen
The Prepare screen is where you will see how Design Space has ordered mats, Operations, and pieces of your project. You can change some of the plans for your project, but some are non-negotiable and follow Design Space’s logic. Here’s how it breaks down:
Things you can control:
- move, rotate, or hide objects on a mat
- move objects to other mats or onto a new mat
- mat execution order (you can choose any mat to make first)
Things you cannot control:
- default margins (0.25″ on all sides OR within Print Then Cut boundaries)
- Operations order
- default mat color order
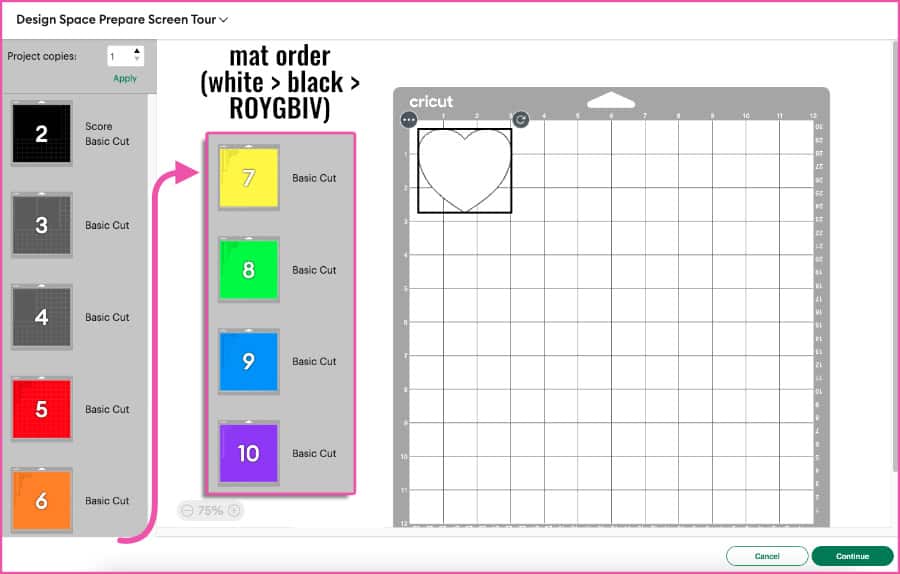
Mat order
Design Space will list any Print Then Cut mats first, then order mats according to object color: white > black > grey, then colors following ROYGBIV of the rainbow.
Design Space will use as many mats as needed to fit all the pieces of the same color on whatever size mat you have selected (which is why you see two 12″x12″ grey mats in this example). Just scroll down the sidebar to see all your mats.
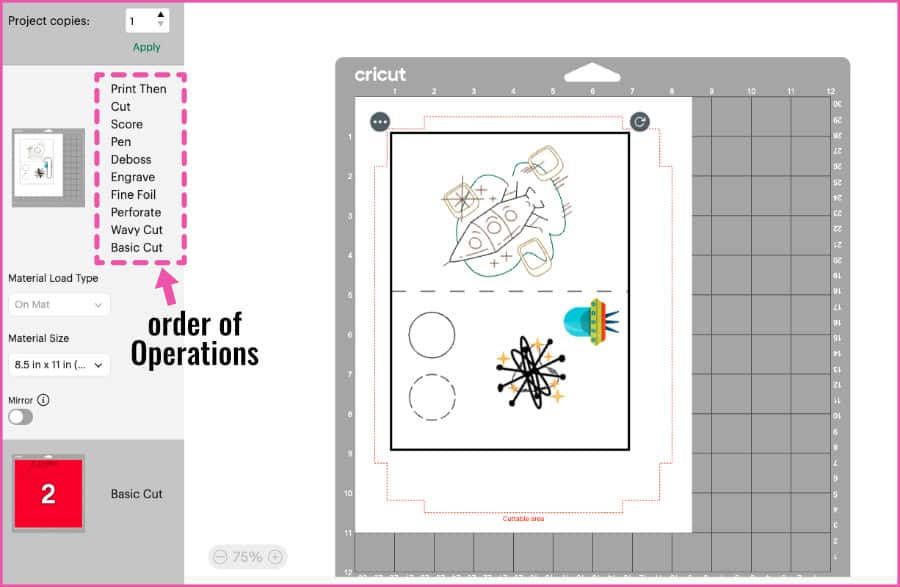
Operations order
Operations in Design Space are toolpath types that correspond to the machine tools you will use with your Cricut. That’s why the selection of Operations you get on the Canvas differs depending on the machine you’re using.
The Operations for each mat will be executed in the same order every time, as follows:
- Print Then Cut
- Score (toolpath to be executed with the Scoring Stylus or Scoring Wheel)
- Pen (pens/markers)
- Deboss (Debossing Tip)
- Engrave (Engraving Tip)
- Foil (Foil Transfer Tool)
- Perforate Cut (Perforation Blade)
- Wavy Cut (Wavy Blade)
- Basic Cut (Fine Point/Deep Point Blade, Bonded Fabric Blade, Rotary Blade, Knife Blade)
To demonstrate, I made a sample design on a single mat that includes every possible Operation for a project:
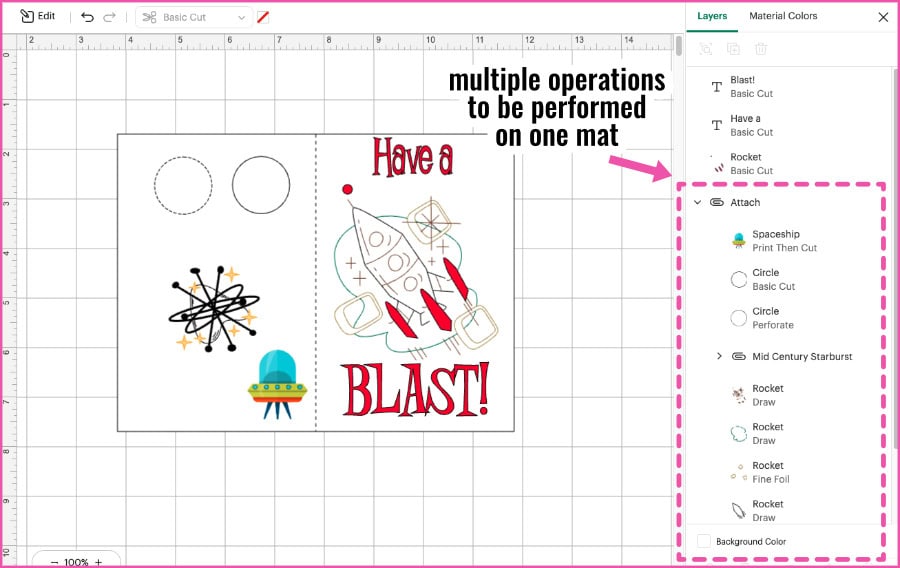
The Prepare screen shows us the order in which those Operations will be carried out:
This will be the order in which the Cricut machine actually does each task, with you being prompted to switch tools between Operations in the real world.
The order for Operations is non-negotiable. You cannot change or control this aspect of project planning; it is another guardrail that Design Space has set up to protect against machine damage and project failure.
Rearranging objects on or between mats
Design Space will automatically place objects on each mat starting in the top left corner, and will organize multiple objects to save space (although it will not rotate objects). As you do more Cricut projects, I guarantee you’re going to get really good at moving things around on Prepare screen mats to fit the real-world materials you’re loading onto machine mats.
Here’s how to move, rotate, hide, and consolidate objects on mats in the Prepare screen. [One thing to note: if 2 objects are Attached, they are locked together and you cannot move them independently on the mats.]
Rearranging objects on the mat:
To really save material, you will probably do a better job than Design Space if you rotate and re-place objects. I do this a lot when I want to make the most of my scraps.
To rotate an object, click on it and you will see the rotation icon (a circular arrow) at the top right corner – click and drag the icon to rotate.

To move an object, simply click and drag the object itself. An object can be moved anywhere on the mat (within the 0.25″ margin).
One thing to note: while the mat has grid lines and looks like the Canvas, there are no alignment tools to arrange the pieces of your project. When arranging your objects to correspond to materials on the machine mat, you will have to just do your best to click and drag objects to the correct approximate locations.
Hiding & rearranging objects between mats:
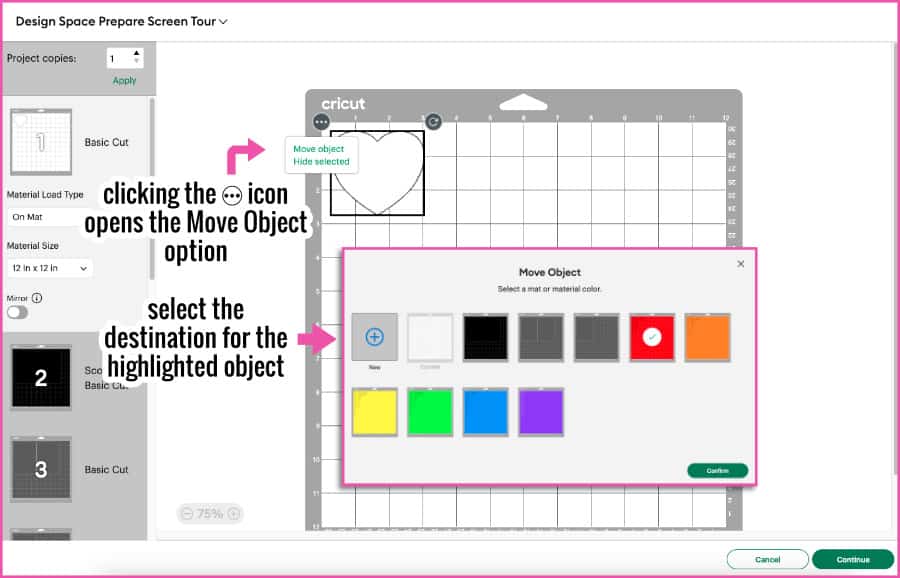
If you select an object on a mat, you’ll see a menu option with 3 dots in the top left corner. Click the dots and you’ll get two more options: Move Object and Hide Selected.
Move Object means that you can move that object to a new or different mat. Why would you need to do this? Say you are working on a project where you are cutting a red shape out of cardstock and red text out of vinyl. DS sees them as the same since they are both red. But you can select one and move it to another mat for a separate cut.
You can also move a bunch of different-colored objects to the same mat to save time, cutting them out of many different pieces of material that you’ve arranged on your machine mat.
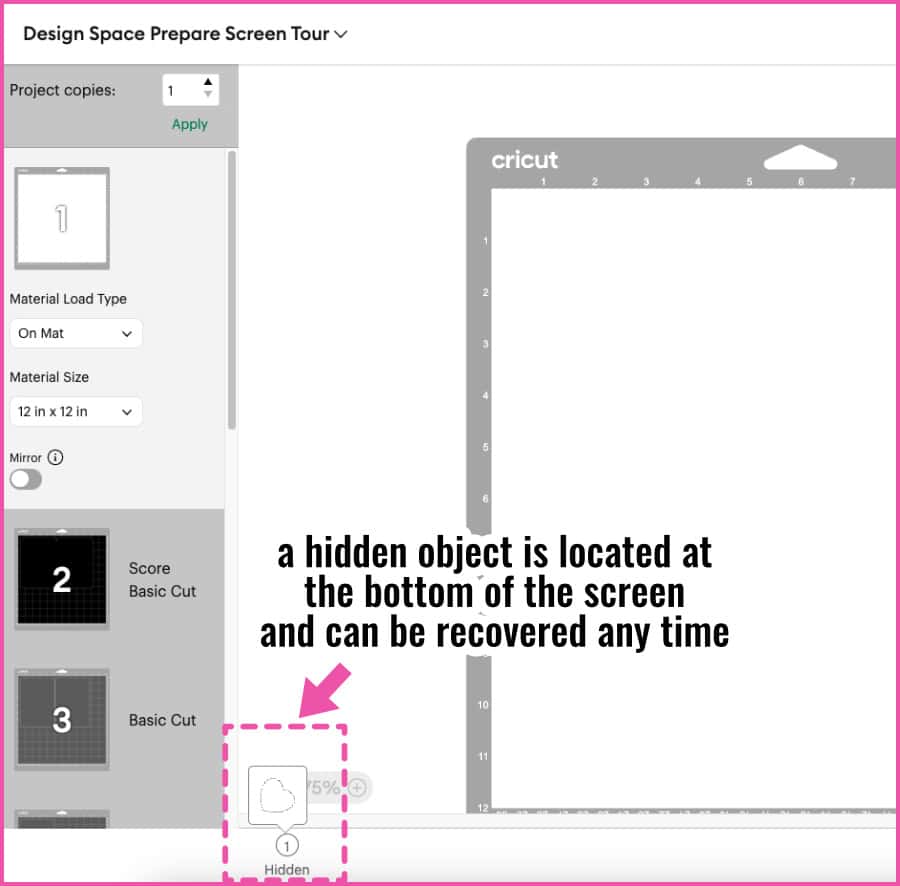
Hide Selected means you can make an object on the mat invisible, and it won’t get drawn/cut/etc. This is another good way to skip an operation then come back to it later. If a mat has a hidden object, it will be shown at the bottom of the screen and you can click to restore it on the mat.
Cutting order and how to change it the easy way, no planning needed!
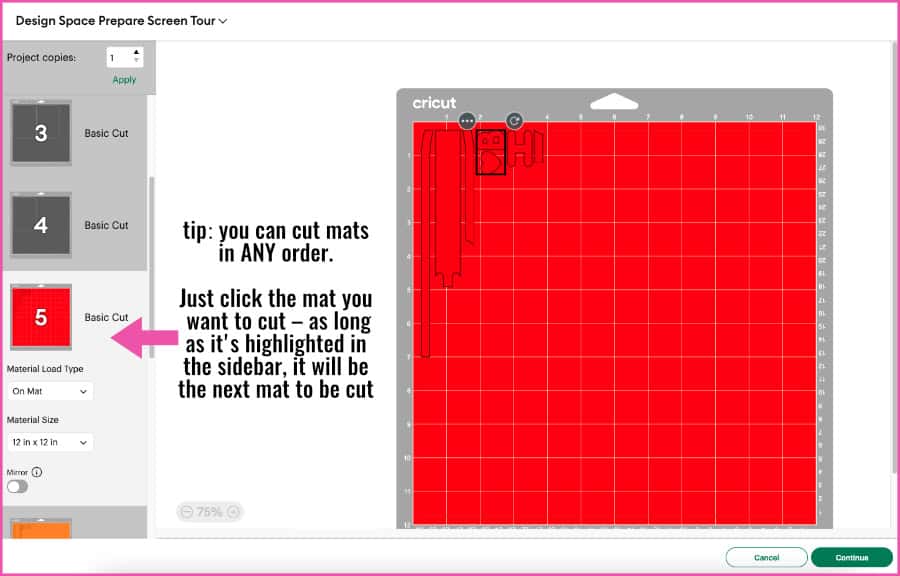
Design Space has its default mat order as noted above (which you can’t change), but this is just the default suggested CUTTING order.
It is a common misconception that you must cut your mats in the order Design Space tells you. You can cut your mats in any order you like. If you click the mat thumbnail in the sidebar and the area around it turns white, that mat is the active mat and will be the next one in the queue for the machine. Here, the red mat is still mat #5, but it will cut first:
And here’s another tip: After you have cut a mat, DS will display a checkmark over the thumbnail to indicate it is complete. You can still select that mat and make the same cut over and over again without quitting the task.
After you have finished organizing and you’ve selected a starting mat in the Prepare screen, click the Continue button at the bottom right.
The Make Screen
Once you hit the Continue button, you’ll get sent to the Make screen (formerly Set, Load and Go). To get to this screen, your Cricut machine must be powered on and connected to your computer (via Bluetooth or USB). This is so that Design Space can check the machine’s firmware and confirm its capabilities before translating the project into machine instructions.
This is the step where you will select the material settings (and tools) you’ll be using, one mat at a time.
Just like the Prepare screen, you will see your numbered mats listed down the left hand sidebar. The selected mat (in this case, #2) will list material load type (i.e. On Mat), material size, and Mirror status (note: you can still toggle Mirror to “On” at this point, in case you forgot to do it for HTV).
Clicking Edit will open an Edit window for that mat and you can move or rotate objects, but NOT move them to another mat or hide them.
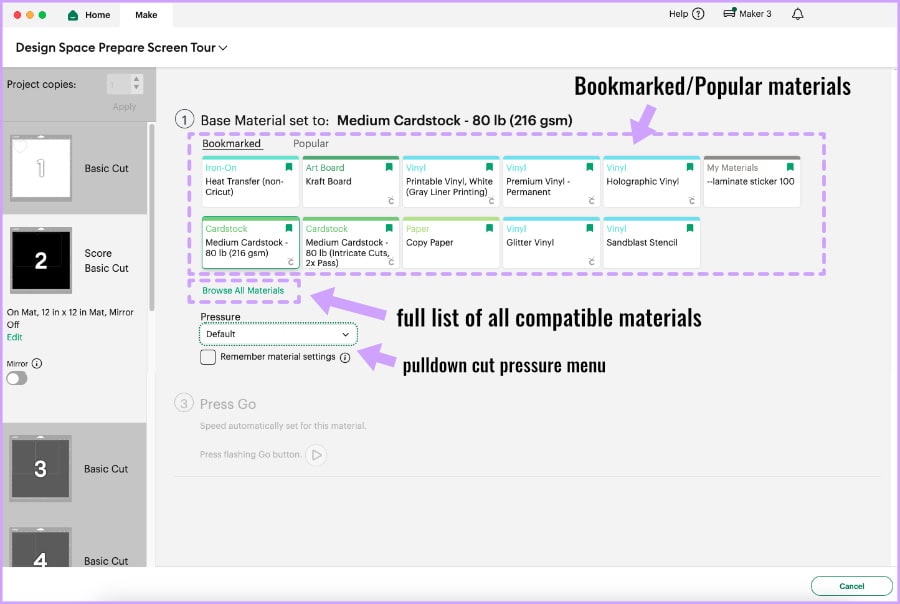
- Material selection list: tabbed shortcut lists of your own (Bookmarked) or Cricut’s (Popular) material settings. You can select a material from either list to proceed or go to the full materials menu
- Browse All Materials: a full list of materials that you can choose from, as well as the option to create a new custom material setting
- Tool Pressure menu: a pull down menu that lets you select final cut pressure instructions for the machine (more, less, or default)
Material settings
One of the most beginner-friendly features of Design Space is that it has a huge library of cut settings for various materials. You select the material you’re using (or something close to it) and the cut settings will automatically be applied, instead of you having to figure out cut settings for yourself.
When you select “Browse All Materials,” you’ll see a full list of materials compatible with your particular machine. You can use the search bar at the top right or open the category pulldown menu at the top of the list and then make a selection from the specific materials in that category. You can also add materials to your bookmark list.
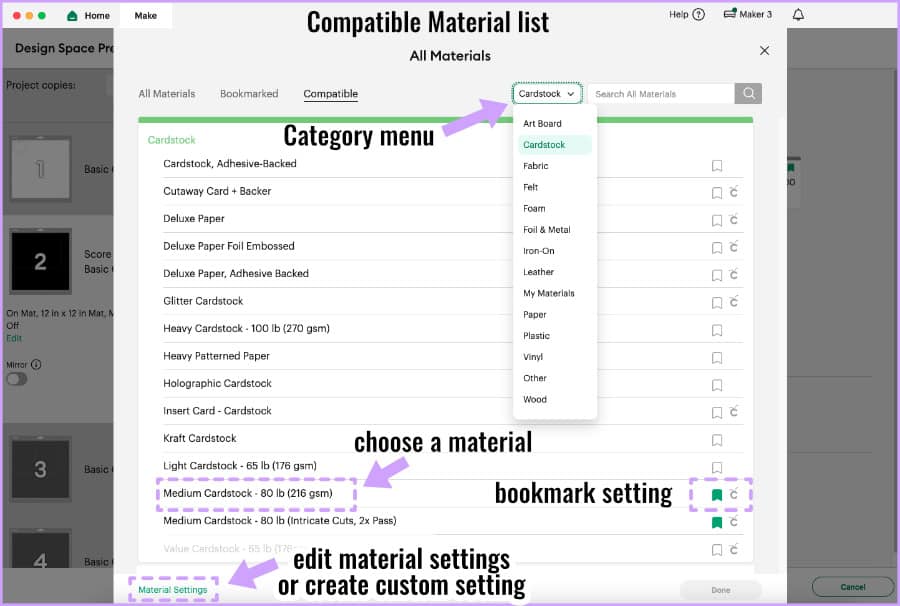
If you click on Material Settings in the bottom left of the page, you can either edit the settings for a particular material or create a custom setting.
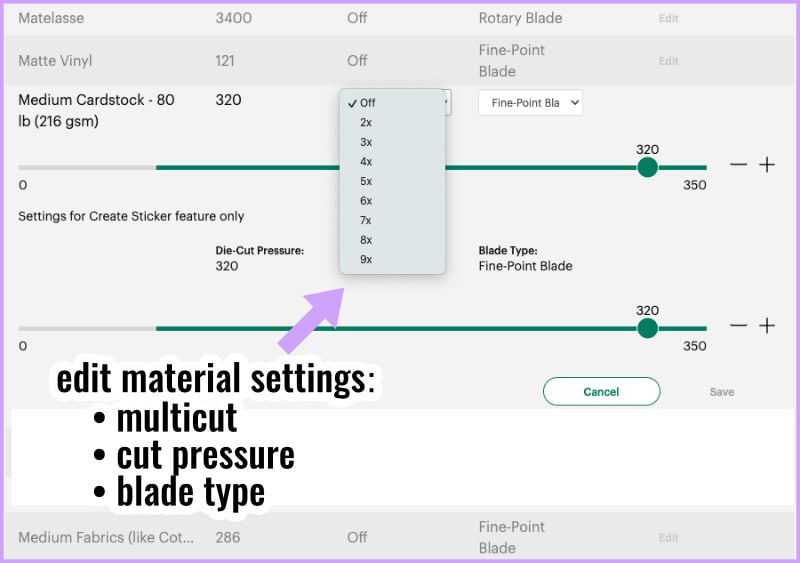
What are cut settings? Cut settings are technical tool instructions for the cutter: downward pressure, speed (velocity and acceleration), blade depth, blade offset, etc. With Cricut, most of these settings are hidden from users, but you will be able to make adjustments to: pressure, number of times the cut will be performed (“Multi-Cut“), and (sometimes) blade type.
TIP: cut settings will be something you might have to mess around with depending on the material you’re using. If you want to get some insight into the differences in cutting pressure and tools used for different materials, I highly recommend checking out Cricut’s giant list of materials and cut settings for each machine.
Tool selection and prompts
After you select a material setting, that part of the Make screen will collapse, and the Load tools and material prompt will expand. This is where Design Space lists the tools you need for the Operations on the mat and gives you instructions for loading the machine tools and mat into your Cricut.
If you have a Maker, Explore or Venture machine, there will be two thumbnail images showing what tool goes in the left and right clamp (aka clamp A & B). (Joy and Joy Xtra users will see a single preview image.)
Note: even though the cut pressure has now been set via material selection, you can still adjust the pressure up or down slightly using the Tool Pressure pulldown menu. I recommend starting with Default first, though.
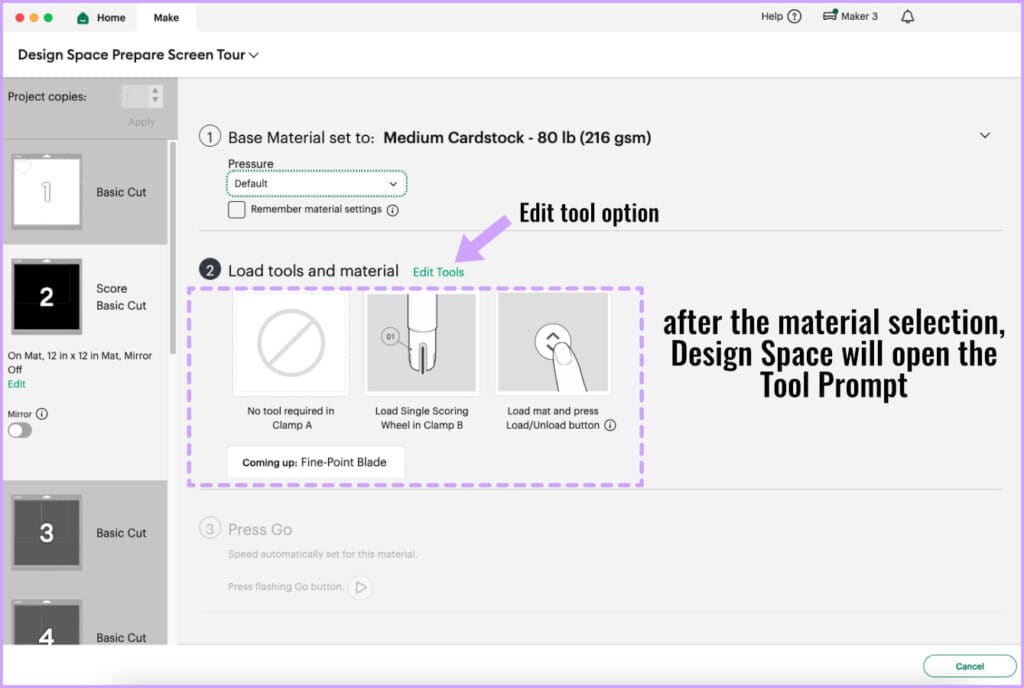
- Tool and mat load instructions: based on the order of Operations, Design Space will tell you what tools to load in your Cricut machine in tool Clamp A and B. Design Space also prompts you to load the mat into your Cricut and press the Load button (↕︎)
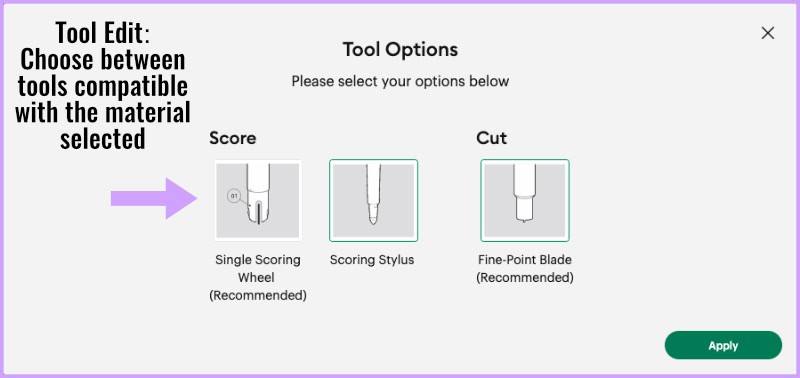
- Edit tools option: in certain situations, you can select an alternate tool for the Operation
- Tool change prompt: if you have multiple operations, Design Space will tell you what tool needs to be loaded next (“Coming up”)
- Press Go prompt: after your materials and tools are selected and you have loaded the mat, DS will prompt you to press the Go button on your Cricut (▷) to start the Operation
The Edit Tools option will show up in situations where you have a choice of tools. For example, if the mat has a Score Operation and you’re using a Maker, the default tool will be the Scoring Wheel. If you click Edit Tools, you can change that to the Scoring Stylus (I prefer the Stylus, personally!).
Once you’ve chosen your material and tools, you’re ready to actually create your project! Unlike previous steps in the Design Space workflow, there is no green button to click on the Make screen to start your machine. The next steps are finally going to take us away from the software and right to our actual Cricut!
We’re finally cutting!
Now that you’ve seen how the Prepare and Make screens plan a project, the best way to understand the workflow is to see it happen from start to finish. In the next tutorial, we’ll walk through your first complete Cricut project, from designing on the Canvas to loading the mat and pressing Go.
You’ll load your material onto your machine mat, load the mat into your Cricut, and watch the magic happen!
Your material will be placed on the machine mat corresponding to wherever objects are located in the mat preview, i.e. top left corner or wherever you moved stuff.
Loading materials on mats is another tutorial, but I will say that I always use a brayer or felted squeegee to firmly stick my cardstock/HTV/vinyl to the mat without any bubbles underneath. If you’re really unfamiliar with using machine mats, remember to remove the plastic cover from your mat before using. Replace the cover after you’re done to keep the mat clean.
How to load a mat in a Cricut Maker or Explore machine
After you have made the material and tools selection in Design Space, the load button on the machine will start flashing. Lay your mat underneath the guard tabs and gently push it into the grey roller wheels. When you feel like the full top edge of the mat is pressed against rollers, press the Load button. The machine will pull the mat under the rollers and then you will be ready to start cutting. Press the Go button when it starts flashing!
You need to leave enough space around your machine so the mat can move in and out from front to back. The Maker 3 measures the material to start with, so it will move the mat all the way back and forth before beginning the operation.
Loading and changing tools in the Cricut machine
It’s important to follow the tool prompts from Design Space. Design Space will tell you what tools to load first, then it will pause the machine to allow you to change the tool. After changing the tool, you’ll press the Go button to resume Making.
After Operations in Clamp A are complete (scoring/drawing) the machine automatically performs the cut without pausing or requiring action from the user.
What we’ll be covering next
Now that you’ve gone through the whole Design Space workflow, with a tour of the Canvas, Prepare, and Make screens, you’re ready to try your first Cricut Project from scratch!
- How to Download, Install & Log in To Cricut Design Space
- What Does Cricut Design Space Do? Understanding The Workflow
- The Canvas: Understand The 3 Zones
- The Prepare & Make Screens: Planning Your Cut ← YOU ARE HERE
- From Canvas to Cut: Your First Complete Cricut Project ← UP NEXT