
Design Space is the software you use to create projects and plan precise instructions for your Cricut cutting machine. This Beginner Series guides you through navigating the workspace to completing your first project, from the first click to the first cut. The series is part of our Mastering Cricut Design Space learning path.
This article will walk you through the basic steps for downloading and installing Cricut Design Space on a Windows or Mac laptop or desktop computer, then logging in and registering a new Cricut cutting machine.
Design Space is required to use any Cricut cutting machine including Explore, Maker, Joy or Venture models.
Why do you need to use Design Space with a Cricut Machine?
Cricut Design Space is the software that tells your Cricut machine what to cut, where to cut it and in what order. Without Design Space, your Cricut machine cannot cut or draw. This software lets you make projects from Cricut, from other Cricut users, or your own designs from scratch!
Step 1: Download and Install Design Space
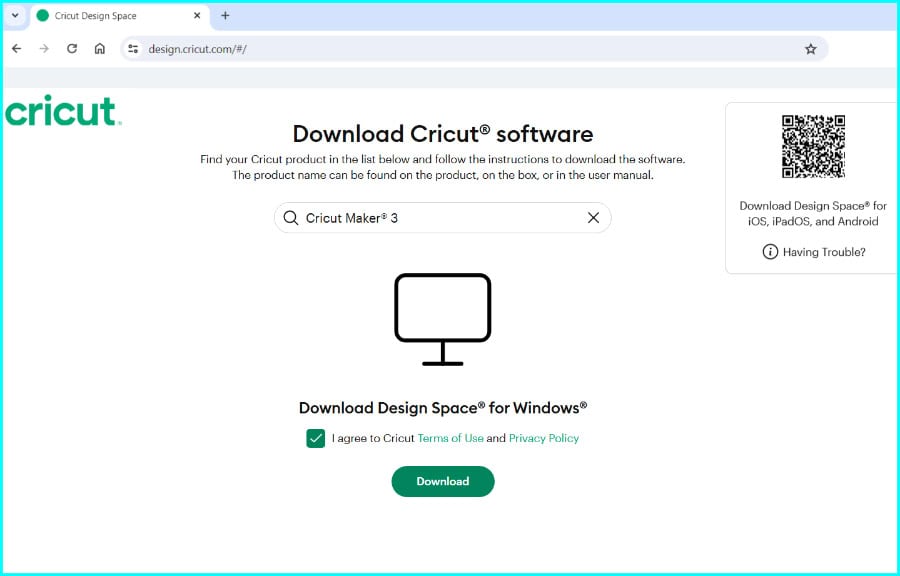
To download Cricut Design Space for Windows or Mac computers, open design.cricut.com in your web browser. The website will automatically detect whether you have a Windows or Mac machine and offer the correct software. Check the box to agree to the Terms of Service and then you will be able to click the Download button.
You may see a security message asking if you want to allow this app to make changes to your device, click Yes.
(The download file is quite large, it may take a minute or two for the download to complete, depending on your internet connection)
Windows: After the software package has downloaded (an .EXE file format, usually to the Downloads folder on you computer), click the file icon to open it and follow the prompts to install it on your machine.

Mac: After the software package has been downloaded, double click the DMG file to open a special file browser window, then drag the Cricut icon into the Applications folder icon to complete the installation.

(When Design Space is installed and you open it for the first time, it may run an update right away. This is normal and it should only take a minute or two.)
Step 2: Log into Design Space
When Design Space opens you will see a login screen. If you purchased your Cricut machine from cricut.com, you probably already created a Cricut account. Use the username and password from that account to log in.
If you don’t have an account, select “Create Cricut ID” to create a new username (your email address) and enter a new password.

After you are logged in you will be taken to the Design Space Home Screen. From here you can register your machine and start exploring projects. In the next lesson we’ll look at how the Cricut Design Space workflow turns your ideas into a finished cut project.

Step 3: Register your Cricut machine
Before you can use your Cricut machine, you need to register it. The process is fairly straightforward and if you follow the prompts in Design Space it should take a couple of minutes.
Make sure your machine is powered on (the power button will be lit).
If you are a new user, you may get a pop up screen asking you to register your machine immediately after opening Design Space, in which case you can just click “Set up a cutting machine”:

Otherwise, open the pulldown menu next to your profile picture in the top righthand corner of the Home screen. Select the Settings option.

In the Settings window, select the Machines tab option in the top row, then click the Start button next to New Product Setup.

In the setup process, Design Space will prompt you to
- select your machine
- connect the power cable and turn the machine on
- connect your Cricut machine to your computer via USB cable. (If your computer does not have a USB connection, you also have the option to connect via Bluetooth).
- All machines ***except Joy and Joy Xtra models*** come with a USB cable
- All machines have built in Bluetooth capability

When you have connected your machine to your computer, you will get a confirmation screen displaying the email address associated with your account. Once you check the box indicating you agree with Cricut’s Terms of Use and Privacy Policy, you can click the Activate button and your machine is ready to use!
Troubleshooting: Can’t download Design Space on a Windows 11 computer
If you can’t download Design Space from the Cricut website to your Windows computer, you probably have a Windows 11 machine in S mode. S mode does not allow you to download any software (app) that is not found in the Microsoft Store.
Design Space for desktop or laptop can only be downloaded from the Cricut website. There is no legitimate DS app in the Microsoft Store, even though there are many scammy look-alikes.
If you want to keep S mode enabled, you’ll need to use a different device to run Design Space. Otherwise, you can run the steps below to switch out of S mode. If you turn S mode off, you can only get it back by resetting your device to factory settings (i.e., you can’t just turn it back on).
To turn S mode off so you can download Design Space:
Open the Windows start menu (the Windows symbol on your keyboard or bottom taskbar) on your PC and use the following steps:
- Open the Settings menu. Look for the icon shaped like a gear wheel (⚙️)
- Select the Activation option from the list of settings. Look for the for the checkmark in a circle icon
- The Activation Settings window will show your system as active in S mode. You will have the option to to turn off S mode by clicking the “Open Store” link to the Microsoft App store.

- Inside the Microsoft App store, you’ll see a warning message about turning off S mode. Click the Get button to disable S mode.

- After clicking the Get button, there will be a short pause while your system switches off S mode. After the process is completed, you will see a confirmation window. You are now free to download and install Cricut Design Space (and other apps) on your Windows PC.

What’s next?
Now that you have successfully downloaded and installed Design Space, and logged in and registered your machine, give yourself a high five. Well done!
The next step is understanding how the software organizes every Cricut project from design to cutting. Continue to What Does Cricut Design Space Do? Understanding the Workflow to see how everything fits together..
Cricut Design Space Beginner Series
- How to Download, Install & Log in To Cricut Design Space ← YOU ARE HERE
- What Does Cricut Design Space Do? Understanding The Workflow ← UP NEXT
- The Canvas: Understand The 3 Zones
- The Prepare & Make Screens: Planning Your Cut
- From Canvas to Cut: Your First Complete Cricut Project
Thank you for such in informative article.
Thanks for the kind words, Helene! If you need a guide to the main features of Design Space, please also check out our new intro for beginners. – Ian