Design Space is good for many design functions, but if you want to make a photo collage, slicing each photo with the text or shape you want to fill is messy and time-consuming. I’m going to show you how to use a free, no signup program (PhotoPea) to create photo collages in minutes!
VIDEO: How to Make a Photo Collage for Cricut Print Then Cut (Free & Easy!)
STEP 1: Set up your project in Photopea
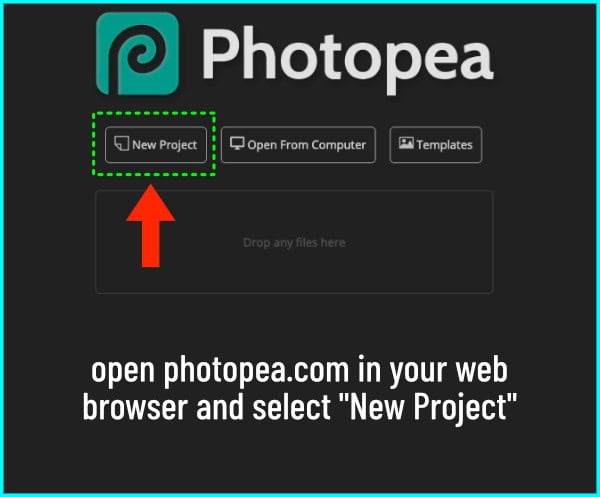
First, head over to photopea.com. On the Home page, click on New Project.
You’ll see a bunch of template options grouped by categories like social, print, photo, and more. These templates set up your canvas dimensions for you. For this collage, I’m going to pick FB Event Image — it’s 1920×1080 pixels, which gives me a nice wide canvas to work with.
On the right-hand side, I’ll give my project a name. Then I’m going to bump up the resolution to 300 dpi — that’s important! If you leave it at 72, your print and cut results might look fuzzy.
Last thing here: under the Background dropdown, I’m choosing transparent. Then just click Create, and we’re ready to work on the canvas.

Understanding the Photopea workspace
Once your canvas opens, you’ll see the grey checkerboard pattern — that means your background is transparent.
If you haven’t used Photopea before, it’s actually pretty similar to Cricut Design Space. You’ve got your toolbar on the left, your edit menu across the top, and your layers panel on the right.

STEP 2: Add and format your text
Now let’s add our text! Click on the Type Tool in the left-hand toolbar, then click anywhere on your canvas and type in your text.
At first, it’s going to look super tiny — that’s normal. You can fix that in two ways:
- Go to the top toolbar and type in a bigger font size:

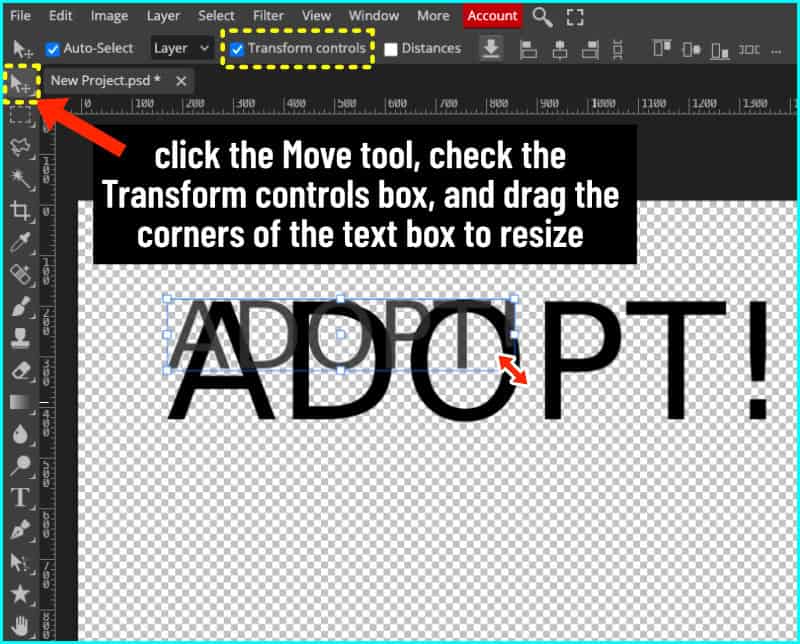
2. Select the Move Tool (it’s the arrow at the top of the left toolbar), check the Transform Controls box, and then just click and drag the corners to resize your text:
(The Move Tool lets you adjust the size and position easily. The little white boxes you see around the text are called handles — they let you scale or rotate the text however you want.)
The font that appears will be whatever you used last. For me, that’s something called Super Dream. You can choose from Photopea’s built-in fonts — there are hundreds — but I like using my own system fonts. To use your system fonts, first highlight your text by double-clicking or clicking and dragging.
There are 2 ways to use your own fonts:
If you’re using Chrome on a Windows machine, just click Local Fonts and then Allow. It’ll take a minute, but then all your installed System fonts will be available.

If you’re on a Mac or using Firefox like I do, Local Fonts might not work — so instead, click Load Font, and it’ll let you browse your computer to upload a font file directly.
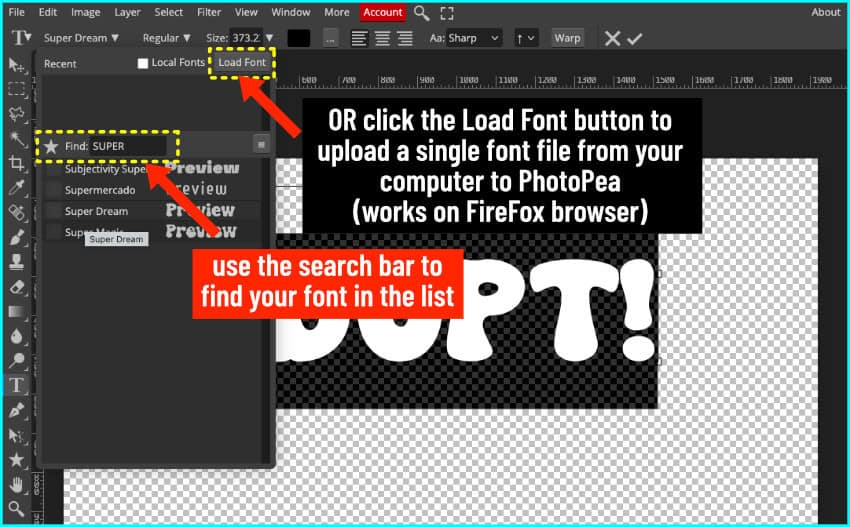
Once you’ve loaded your font, just start typing its name in the search bar to find and apply it.
STEP 3: Set up the clipping masks for your collage
Now for the fun part! We’re going to use a clipping mask to make our collage.
A clipping mask in programs like Photoshop or Photopea lets you use the shape of one layer to hide – or mask – parts of the layer above it. It’s like using a shape — in this case, our text — to cut a photo visually.
The photo isn’t really sliced like it would be in Design Space; it’s just being masked. Only what fits inside the shape is visible, but the rest of the photo is still there. The edges of the full photo in the example below are revealed by the blue box when the photo is selected.

But I don’t want to use just one photo. The whole point is to be able to use multiple photos to easily make a collage. So what I’m going to do now is divide my word into multiple pieces, each of which will show its own photo.
Option: Mask one letter at a time
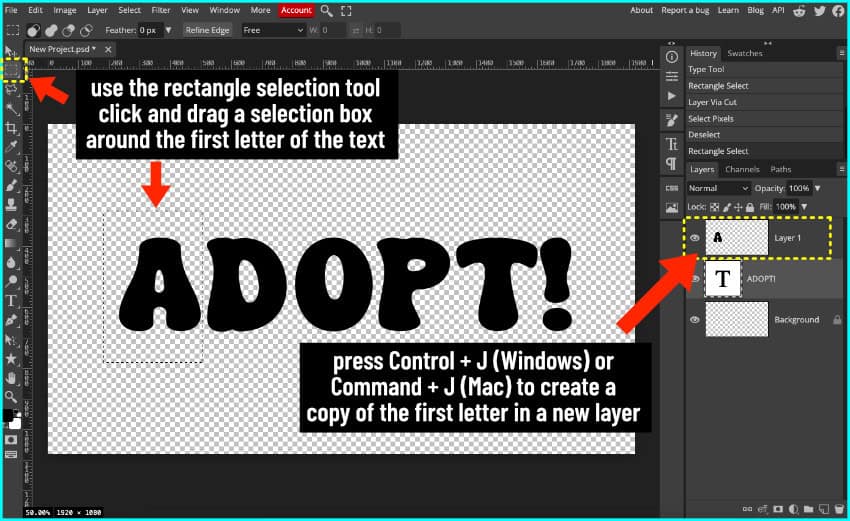
To start, I’m going to show you how to put a single photo into a single letter. Make sure your text layer is selected in the Layers panel.
First, click the Rectangle Select Tool from the top of the left toolbar. Then click and drag a rectangle around the first letter. You’ll see a dashed line around it — that’s your selection.
Now press Cmd + J (or Ctrl + J on Windows) to make a new layer via copy. You’ll see the new layer with just the first letter appear in the layers panel.
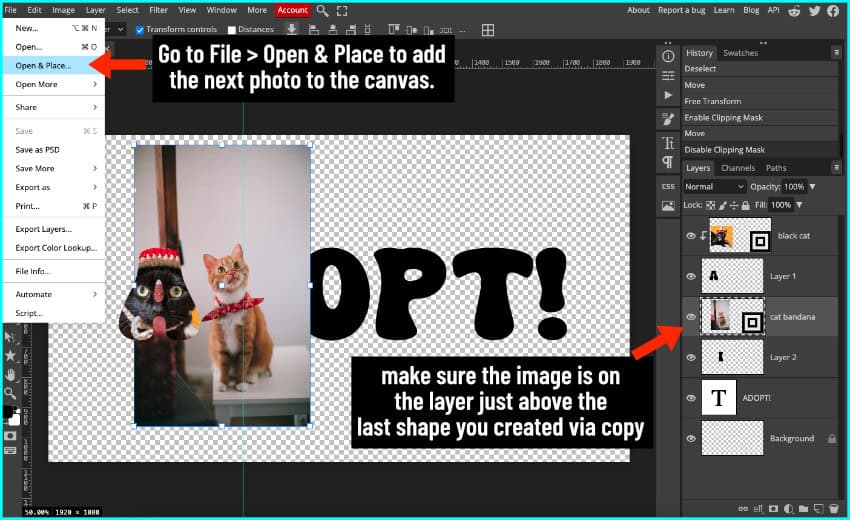
With that new layer selected, go to File > Open & Place, and choose your first photo.
When the photo opens, you can click and drag to resize it. Hold the Shift key while you resize to maintain the aspect ratio.
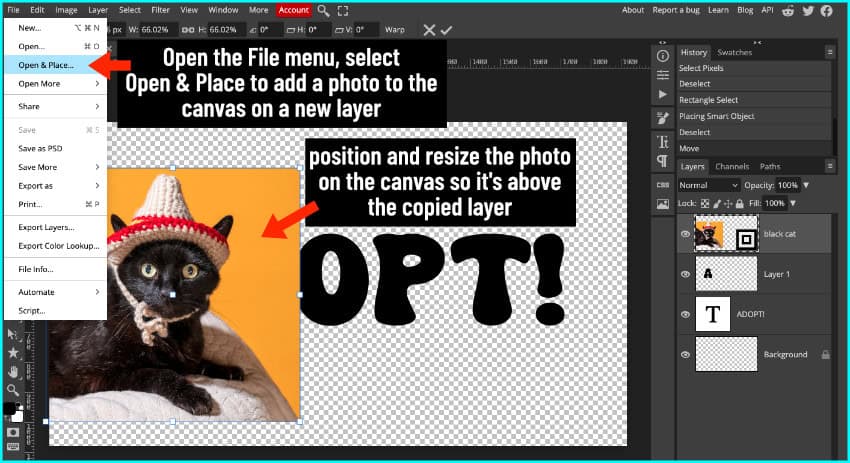
Position the photo over the letter, then right-click on the photo layer in the layers panel and choose Clipping Mask.

The photo is now being masked by the A, but you can click on the Move tool again and the box around the full photo will show you where it is. You can move and resize the photo however you like, because the whole photo is still there, just masked except for the part that shows through the letter.

If you want to do one photo per letter, just repeat that process for each one.
Option: Splitting a letter for multiple photos
Let’s say you want more than one photo in a single letter. Here’s how to do that:
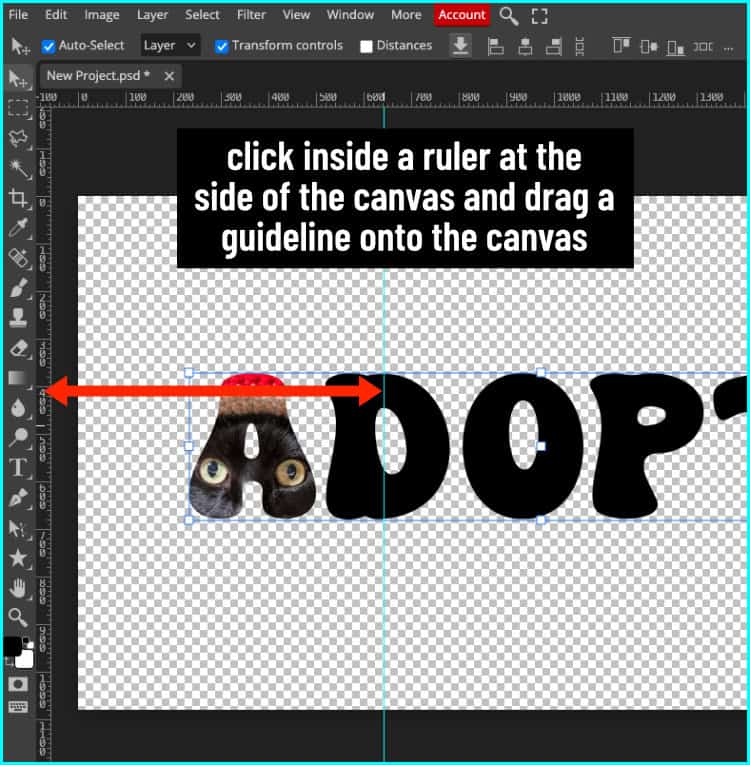
I’m going to split the letter D in half. First, make sure your rulers on the top and left side of the canvas are visible. If they’re not, go to View in the top menu bar and click Rulers.
Then click inside the left ruler and drag out a vertical guideline and drop it where you want to split the letter.
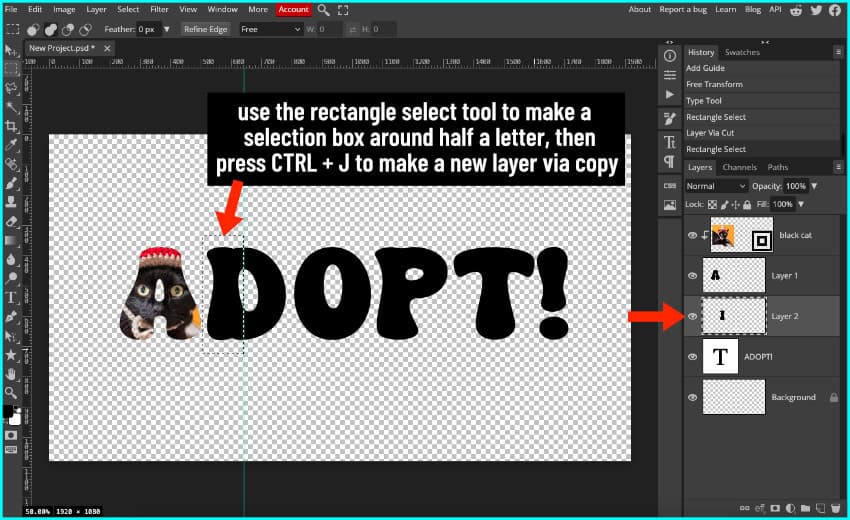
Now with my guideline in place, I’m going to grab the Rectangle Select Tool again, and drag it around the first half of the D. You’ll notice that the rectangle will have a tendency to stop at the guideline.
Now I press Cmd + J (or Ctrl + J) to copy that half of the D to its own layer.
With that new layer selected, go to File > Open & Place and choose the next photo.
Resize, position, then right-click and choose Clipping Mask.

Repeat the same process for the second half of the D — select the original text layer, click the Rectangle Select tool, and create a rectangle over the second half of the D. I press Cmd + J to create the new layer, then open the next photo from the file menu, resize and reposition it, and then apply the clipping mask.
Option: Fixing and customizing mask layers
Use the Paintbrush tool to edit your mask layer
If you want to edit a mask layer to show more of a photo, you can edit it using the Paintbrush tool. For example, I want to fill in the center of the O so it shows more of the orange cat’s face.
To begin, I select the Paintbrush tool and set the fill color to black.

I click the mask layer in the layers panel, then I click and drag the cursor over the part of the mask I want to fill in (the center of the O). The image unmasks (fills in) as I click and drag in real time, very direct and simple.

Create custom shapes with the Lasso tool
I can also create custom shapes to divide letters — like a diagonal split.
To do that, I’m going to select the original text layer, use the Rectangle Select Tool to select the P, and press Cmd + J to make a mask layer.
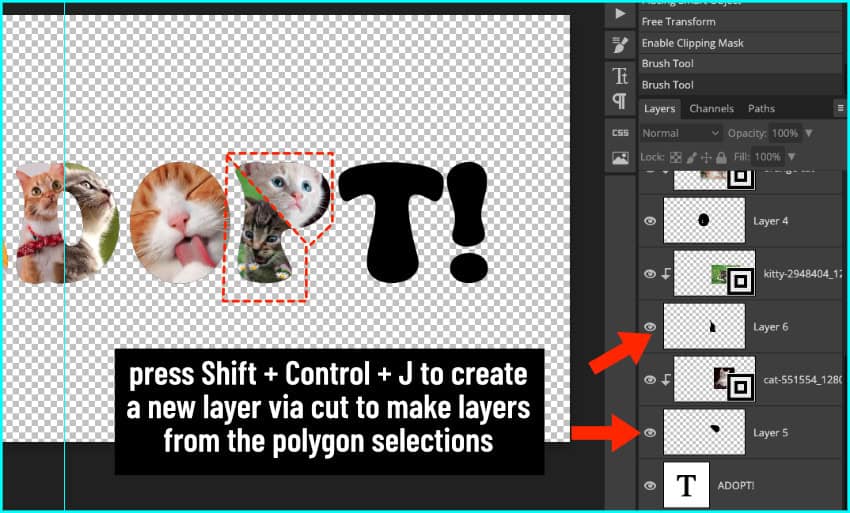
Then I choose the Lasso Tool, click the little arrow to expand it, and select Polygonal Lasso Tool. Now I can draw my own custom shape. I am going to use click-to-click to create my polygon shape. I click at one point outside the area I want to enclose then click at the next point around the area, drawing a line between every 2 points I lay down, going around the whole area. When you get back to your original point, you’ll get a dashed line defining your selection shape.

Instead of Cmd + J to create this new mask, press Shift + Cmd J to create a new layer via cut. Now you can see the 2 new shapes dividing the P in the layers panel.
With these 2 new layers, I can add 2 photos to a single letter shape.
STEP 4: Export your collage for Cricut
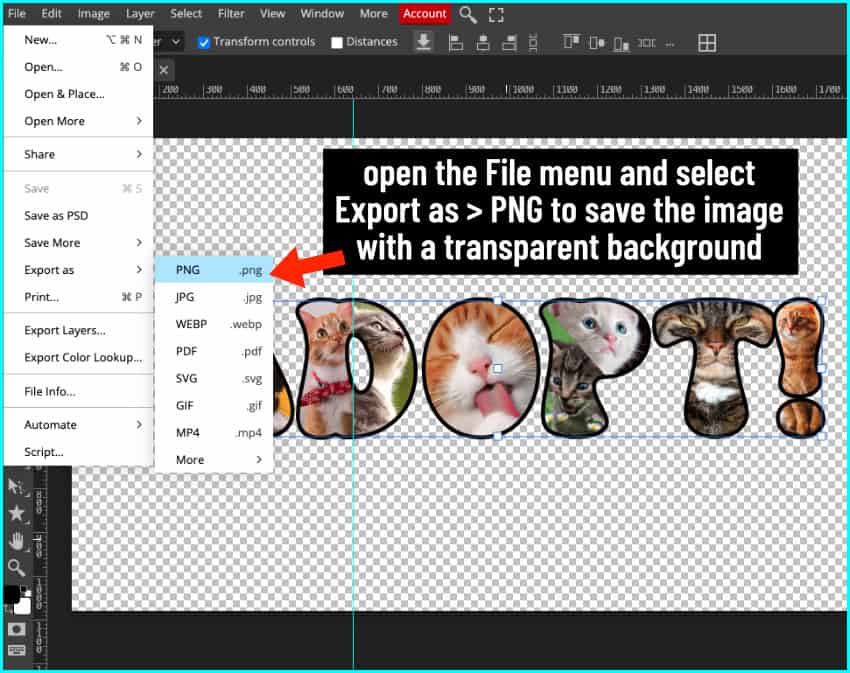
Once you’re happy with your collage, it’s time to export. Go to File > Export As > and select PNG — this will keep the transparent background intact, and now the personalized photo collage is ready to upload to Cricut Design Space, or whatever contour-cutting software you use.
Before you go…
And that’s how you can make a multi-image collage using Photopea. You can use your collage images in Cricut Design Space, Silhouette Design Studio, with your Siser cutter, or even for sublimation and DTF projects.
If you’re looking for more PhotoPea and design tutorials, you might be interested in checking out these articles: