
One of the most popular craft projects people want to make with their Cricut is a vinyl decal using a personal photo, often for a pet memorial or gift. This intermediate tutorial will teach you how to convert your photo to an SVG cut file with 2 key features:
- looks good – no smudgy, unrecognizable faces or haunting black holes for eyes!
- is an actual cuttable file, not a garbled mess of tiny fragments that is impossible to weed
This will take a little more time than 1-step online tools, but spending time creating your cut file means way fewer hassles as you cut, weed, and create your physical project. Plus, the results are so much better! I want to show you how to get really great looking graphics that you’ll be proud to gift or confident to sell.
Steps for Transforming a Photo to an SVG file for Cricut
Note: You will get the best results if you use a desktop or laptop (either Windows or Mac). The recommended software (photopea.com) can be used on mobile devices, but I can’t guarantee you will get the same results.
These are the basic steps I will cover (you can click on a link to navigate to that section):
- Select your image
- Remove the background
- Use filters in a photo editor to create a stylized, cuttable image (multiple steps)
- Convert pixel image to vector image and save as SVG
- Import SVG into Cricut Design Space and cut!
Free tools I will use to convert a picture to SVG
- photo background remover
- Photopea (free online photo editor)
Video: Turn Photos into SVG files that actually look good!
Photo quality influences SVG results
The best cut graphics start with good photos. Really good quality images (high contrast, good lighting, high resolution) can be converted fairly easily into single layer cut files (black and white) or multi-layer SVG files that look great.

But as we all know, often the photos we have available are older, faded or poorly composed. Especially if you’re creating a memorial for a pet or loved one from a snapshot.
Lower quality images often need more TLC. A lack of detail, low contrast, and bad lighting can make it difficult to turn an image into a simple black and white vector. In these cases, you might need to create multiple layers to capture highlights, midtones and shadows to make the image recognizable.
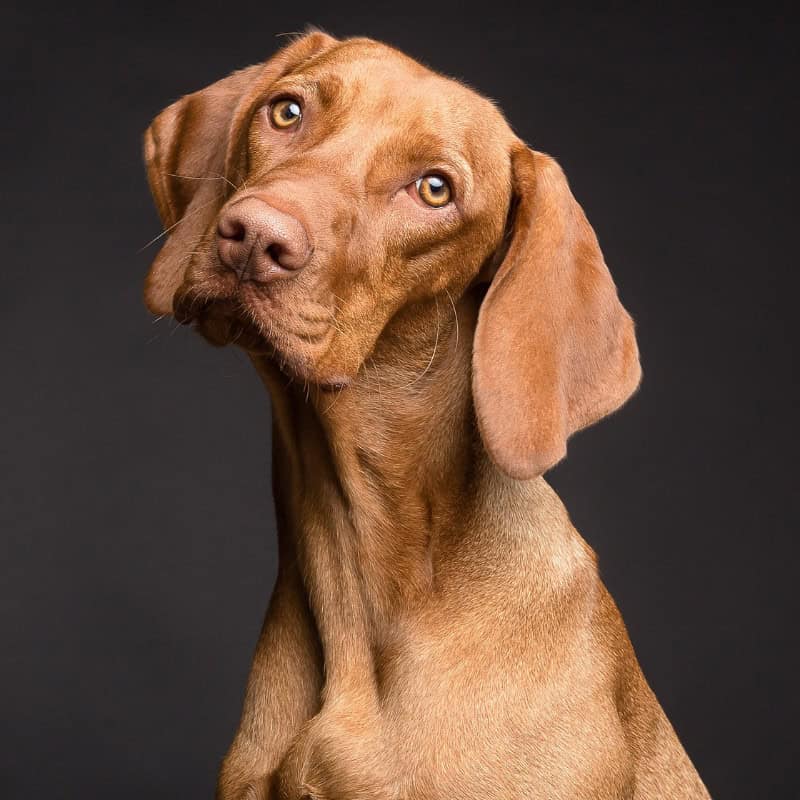
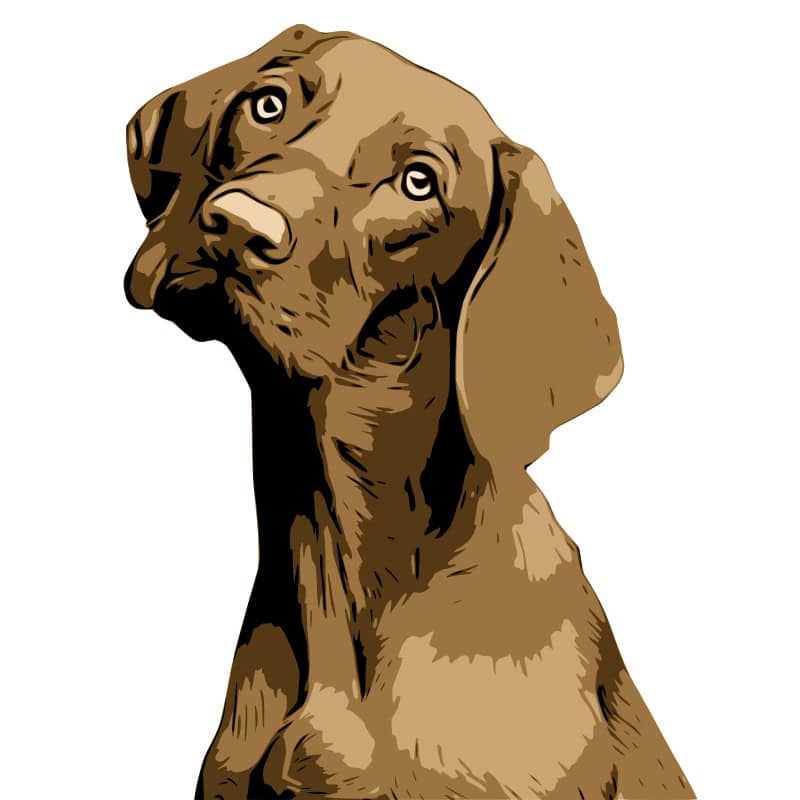
For this tutorial, I am going to use a selfie (the same one I used in my review of online image-to-vector-converters). It’s not the greatest photo I’ve ever taken, but I think it’s a pretty fair example of the kind of everyday photo you will be using for your own projects.
I’m going to take you through the steps to turn one of your photos into either a 2 color or multi-layer SVG.

Remove the background from the photo
The first step in preparing your photo to create a cut file is removing the background. There are a lot of websites that do this with one click, however most have some kind of limitation. Expect to be asked to create an account, pay a fee or have a limit on the number of images you can process per day with a free plan. For more info, check out my review of background remover apps.
After doing a lot of these image conversions, these are the only background removers I use:
- Adobe Express (free Adobe account required, free high resolution download available) – I usually use this or the Photopea tool
- Photopea object selection tool (freemium feature, must watch ad to use it more than once every 2 hours) – this feature lets you use the full size image for your conversion
- pixelcut.ai background remover (reduced resolution PNG download available for free, membership required for high resolution download)
- remove.bg (low resolution option available for free)
Sites like Canva and PicMonkey have this feature as well. Whatever service you use, follow the instructions and be sure to save the edited image as a PNG file with a transparent background.
Create your cuttable image using Photopea
Photopea is an alternative to Adobe PhotoShop, and it has some terrific pixel to vector tracing tools that I have recommended in many of my other tutorials. Photopea really flies under the radar…not a lot of people in the crafting world talk about it, but it’s totally free with NO signup, and NO downloading the software.
I love it, it’s my favorite photo editing tool.
The steps I am going to take in Photopea are not difficult, and each step will allow you to make adjustments that best suit your specific image. The values for each step I’m using in this tutorial aren’t universal; different images, different sizes may require different values.
This process will take some experimentation to get the best cuttable image. Don’t be afraid to use the UNDO function to fix mistakes!
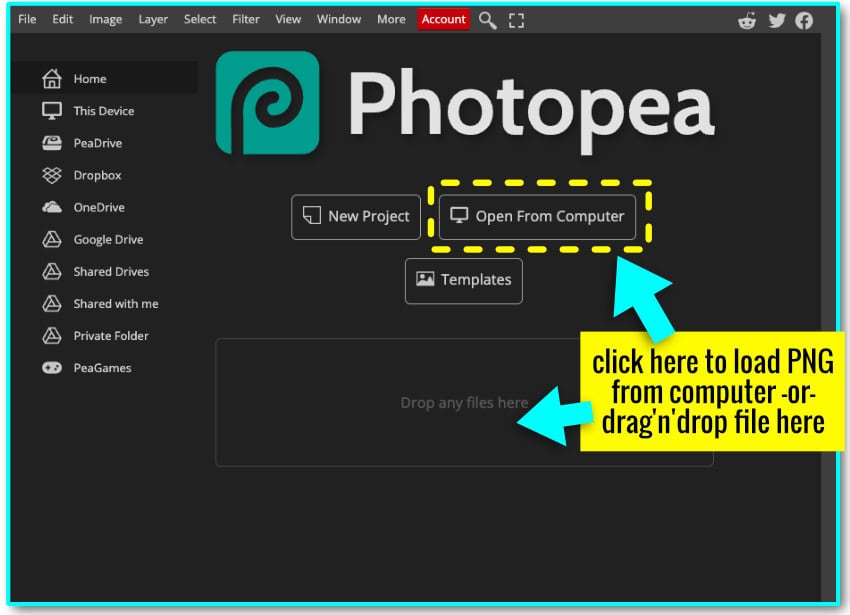
First, upload the PNG file with the background removed from the previous step:
- Click the Open from Computer button on the home screen
- OR use File > Open in the menu bar
Some tips to make Photopea easier to use during this tutorial
First time using Photopea? Here are a few features of the work area to be familiar with:
- Useful tools in the Left toolbar menu:
- Move tool (arrow) – Top of the left hand toolbar. Use it to click and drag objects on the canvas.
- Hand tool – Click and drag to move the canvas to get a better view
- Zoom Tool – Zoom in to get a closer look at your project
- Alternatively, Open the View menu in the top tool bar, and select Zoom in or Zoom out.
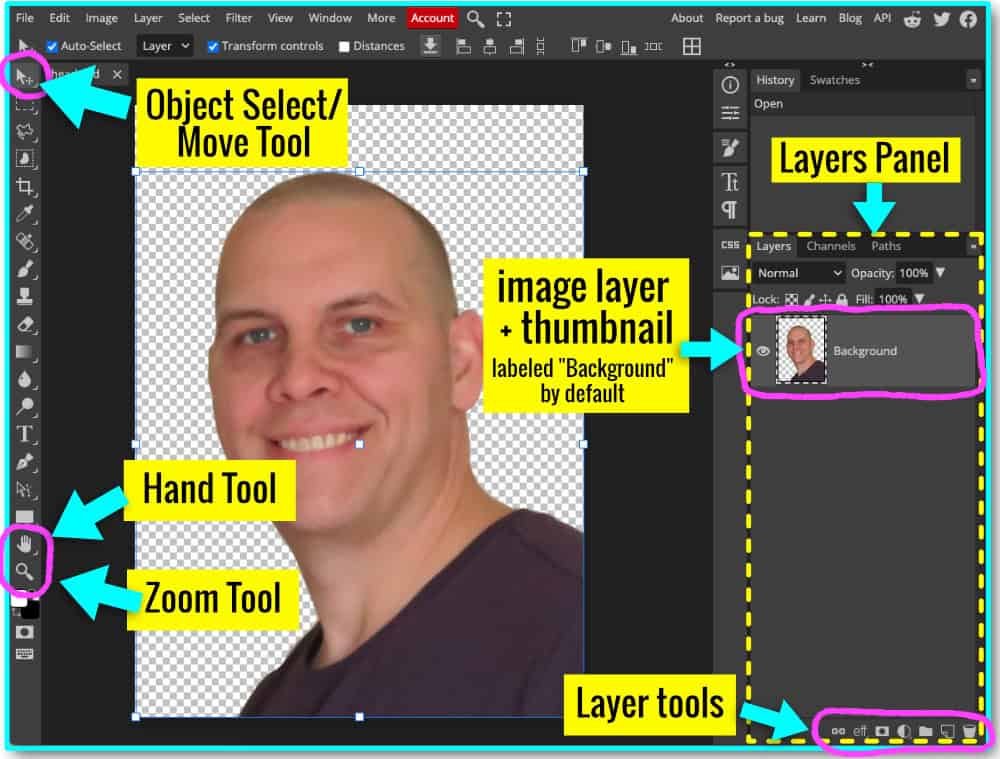
- Layers Panel – Right side of Screen
- the main image will be the first layer added
- the image will be labeled “Background” by default
- the row of icons at the bottom of the Layers Panel are helpful tools, including new layer, delete layer, etc. These functions will be used in the tutorial
If you open a settings window and it blocks your view of the image, click and drag the top of the settings window (the title bar) to move it out of your way.
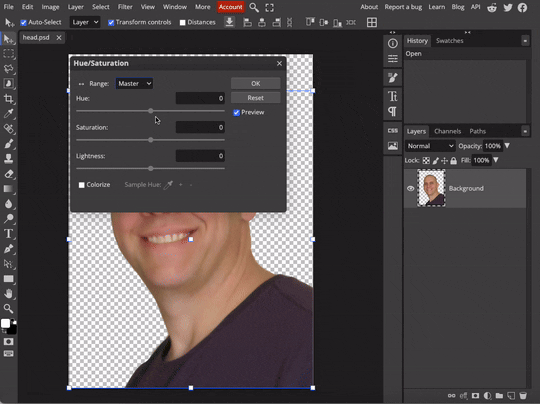
Image size adjustment
For this tutorial, you get better results with larger/higher resolution images. Normally you would never increase the DPI of a photo you are editing, but for our purposes here, this is the first step to getting a better cut file result from a low resolution image.
After you’ve opened your PNG file:
- Click on Image in the top menu bar
- select Image size
- change the DPI to at least 150
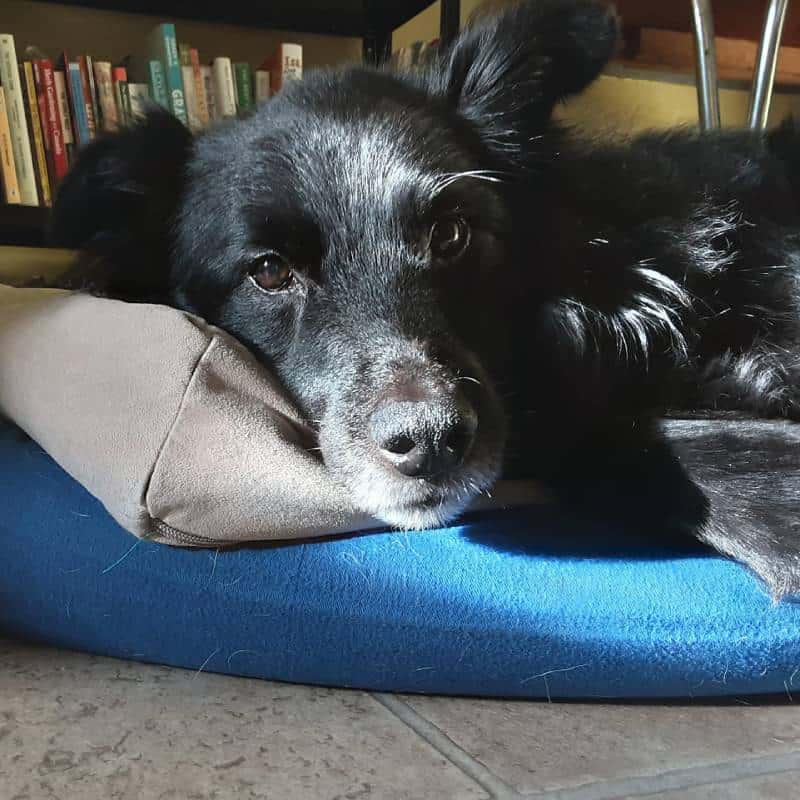
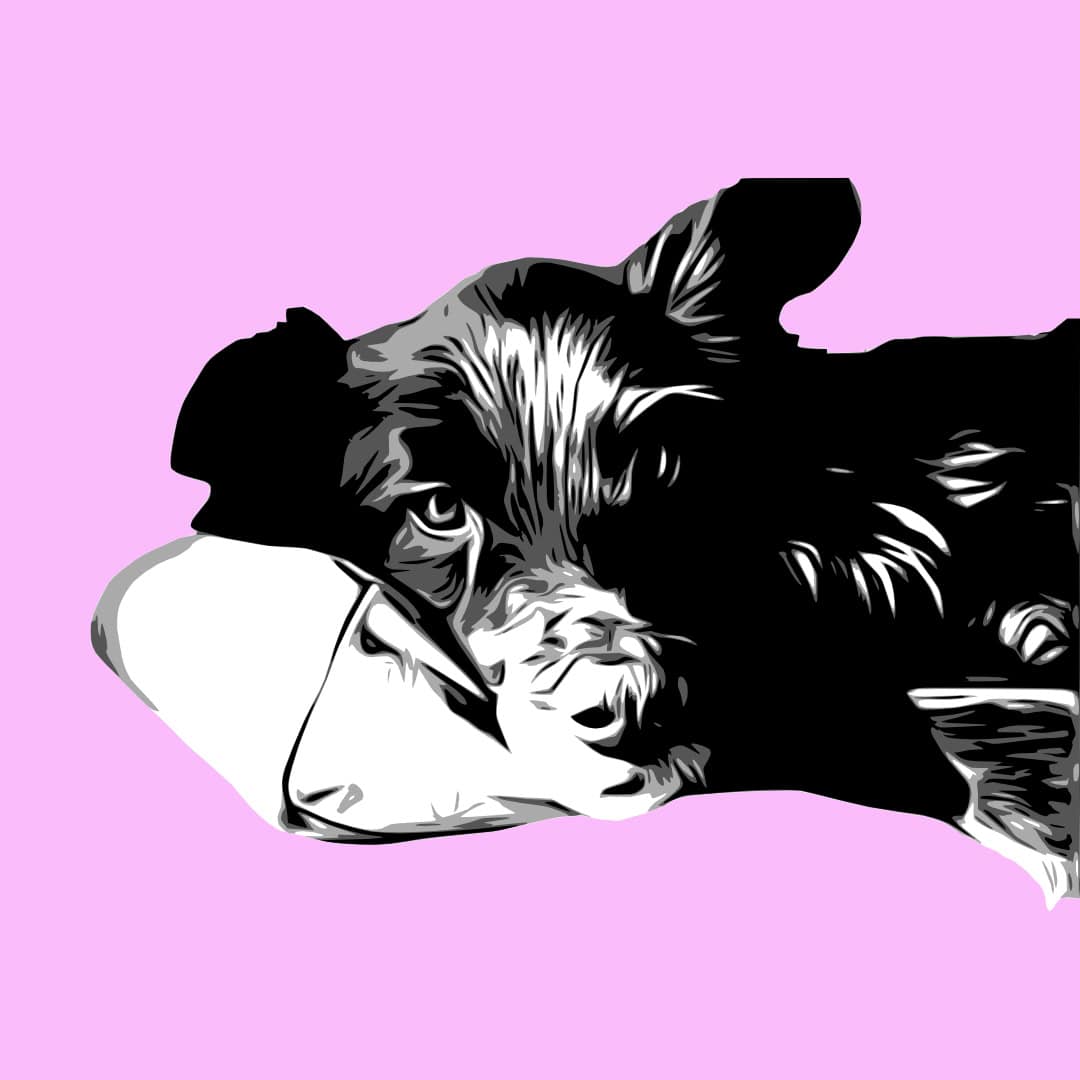
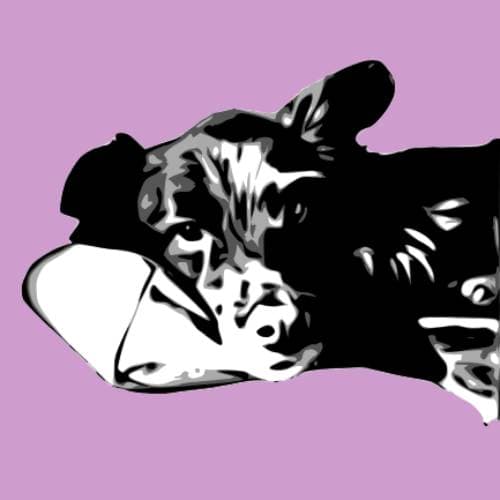
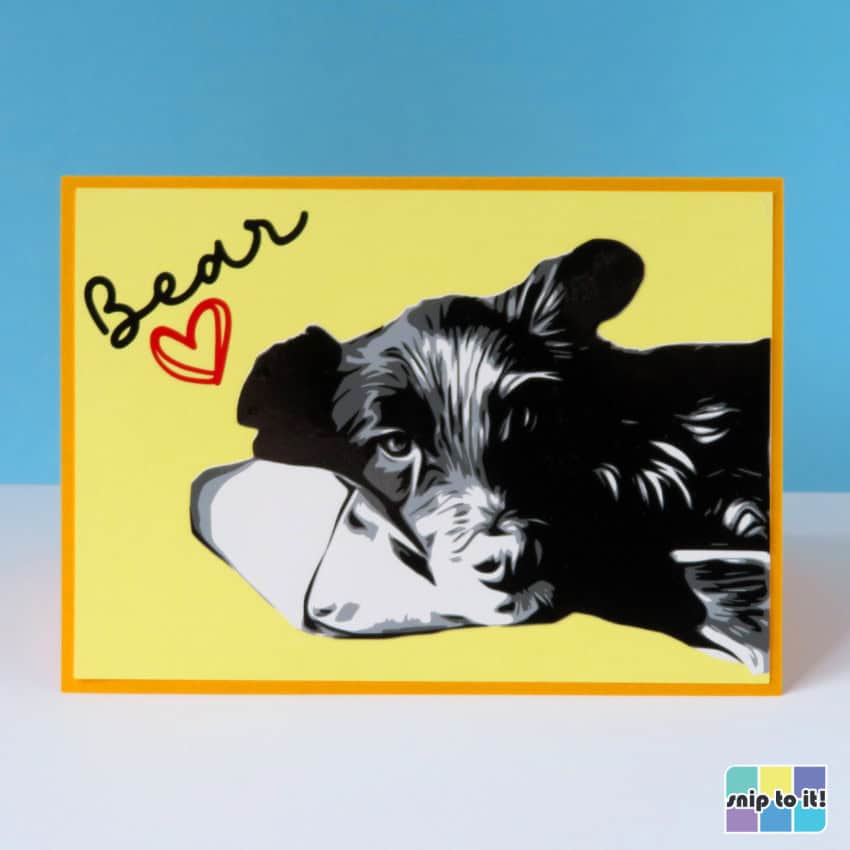
The photo of me that I’m using has a resolution of 180 dpi. An image from the web has a resolution of 72 dpi. For this tutorial, increase the dpi to at least 150. Here’s a demonstration using a photo of my friend’s adorable dog Bear. After removing the background with remove.bg, I was left with a small, low resolution image. By increasing the resolution to 150 dpi, I was able to get a much more detailed vector image.
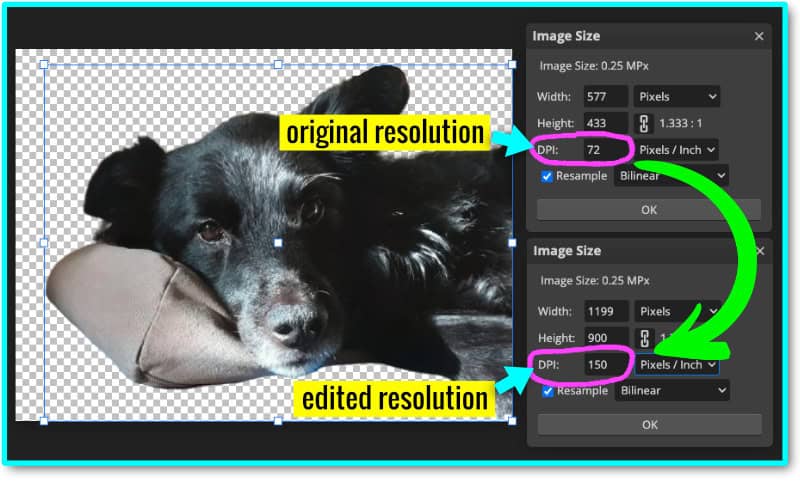
Here is that low resolution image at both 72 dpi and resized to 150 dpi, showing the difference in the final results when the images are converted to SVGs:

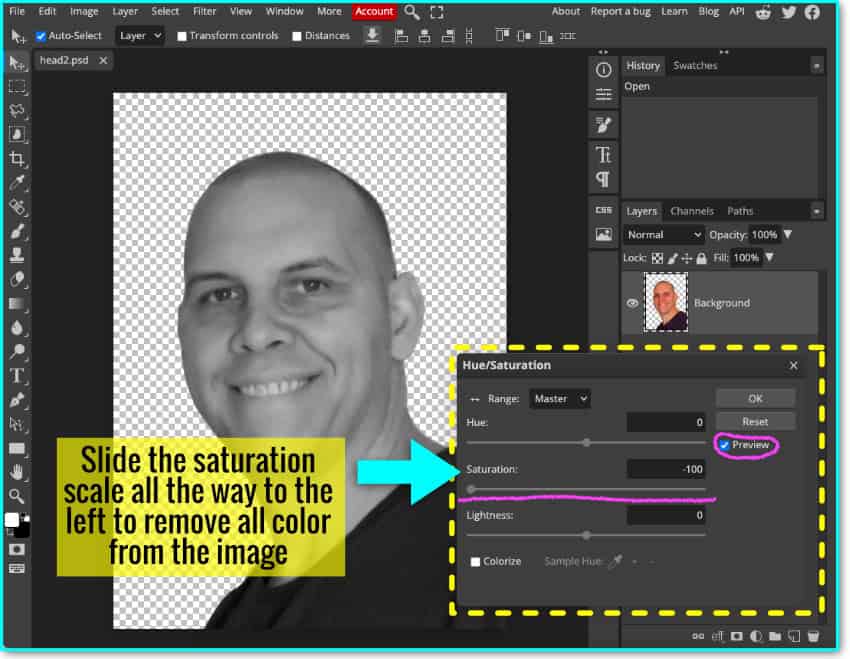
Hue/saturation adjustment (make your image black & white)
The first edit I’m going to make is to desaturate the image to remove the color:
- Select Image > Adjustments > Hue/Saturation
- drag the Saturation slider all the way to the left (–100)
- check the preview box to see the changes to the image, then click OK
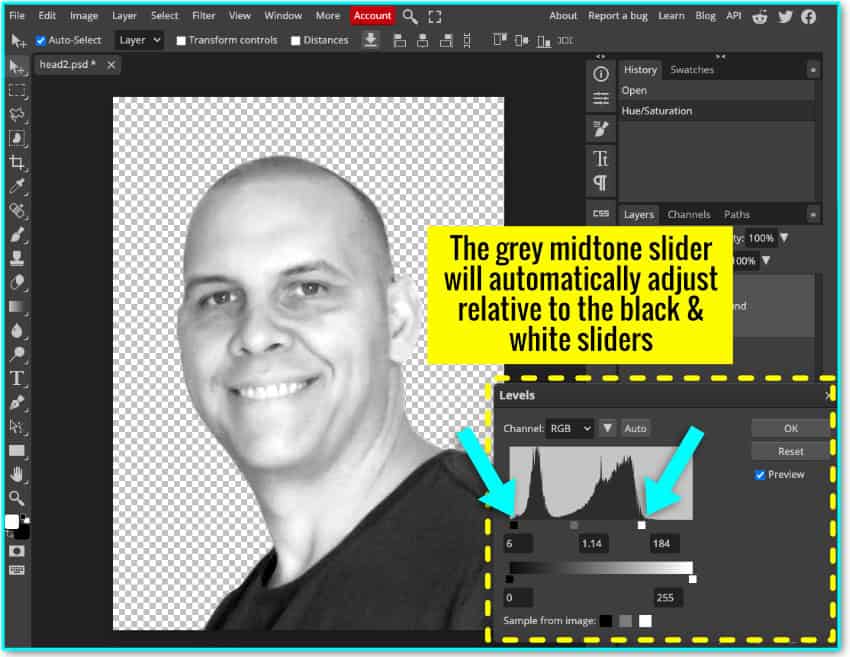
Levels adjustment
Next, I am going to adjust the Levels settings:
Adjusting Levels is a more fine-tuned way of adjusting Brightness and Contrast. You can make the dark portions darker, the light portions lighter, and adjust the midtones as well. If you have never used the Levels adjustment, take a moment to slide everything back and forth to see how it affects your image.
- Open Image > Adjustments > Levels
- you will see a graph (histogram) that indicates hue distribution. There is an adjustment bar with 3 sliders under the graph.
- the black slider (left) adjusts the intensity of the shadows
- the white slider (right) makes the highlights more intense
- the grey slider (middle) adjusts midtones
There is a second adjustment bar below the histogram. There is no need to adjust these values.
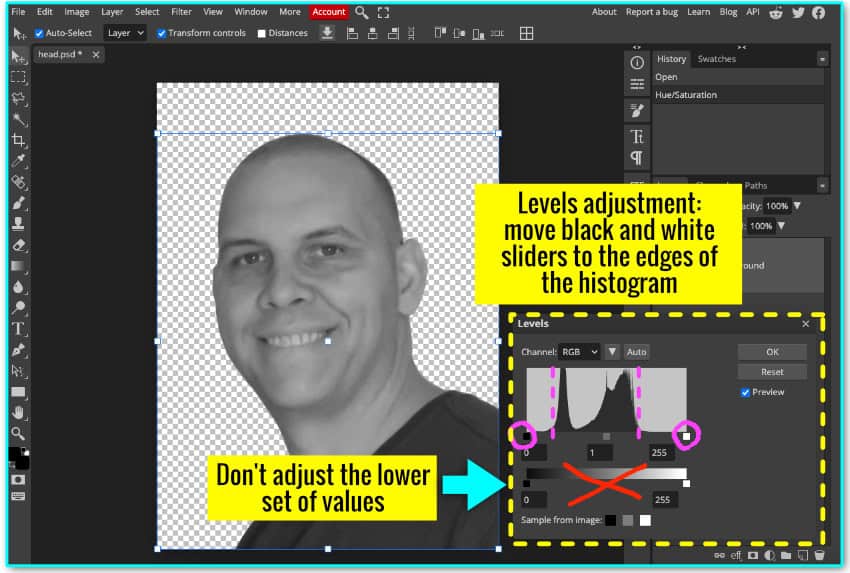
Adjust the levels of your photo:
- move the white slider to the left until it lines up with the start of a steep spike on the graph
- move the black slider to the right until it also matches up with the start of a steep spike
- the grey slider in the middle will automatically move with the other adjustments, no need to move it yourself
This will intensify the black and white tones in your image.
Convert photo to Smart object
Before I start adding style filters to the image, I am going to convert the image layer to a Smart Object. This will allow me to apply filters and adjustments non-permanently.
- right-click the image layer in the right-hand layers panel
- select Convert to Smart Object
Alternatively, you can open the Layer menu in the top menu bar, click the Smart Object option, and then select Convert to Smart Object.
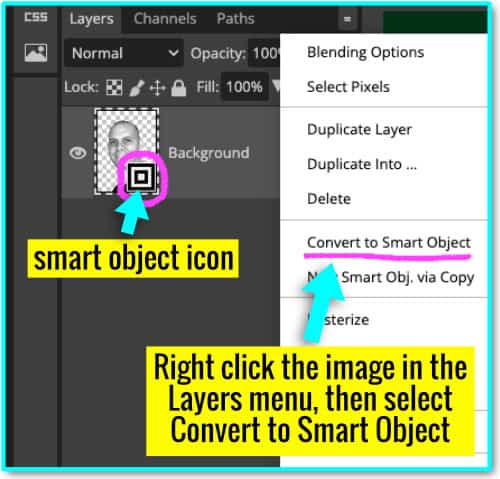
By converting the image to a Smart Object, every filter I apply going forward can be adjusted and readjusted at any point in the design tutorial to get it just right. For example, if I follow all the steps and end up with an image that is too blurry, I don’t have to redo the process from the start to fix that. I can double click any of the adjustments I’ve made to make the correction to the image.
Apply Artistic filters
In order to transform this photo into a 2–, 3– or 4–color graphic, I am going to apply a few filters. The filter settings work for my image based on the size and resolution, and you can use them as a starting point for your image. If your image is very large or very small, you may need to adjust the settings to get the same effects.
Oil Paint
Open the Filter menu in the top toolbar. Go to Filter > Stylize > Oil Paint. This filter will smooth out the appearance of the image.
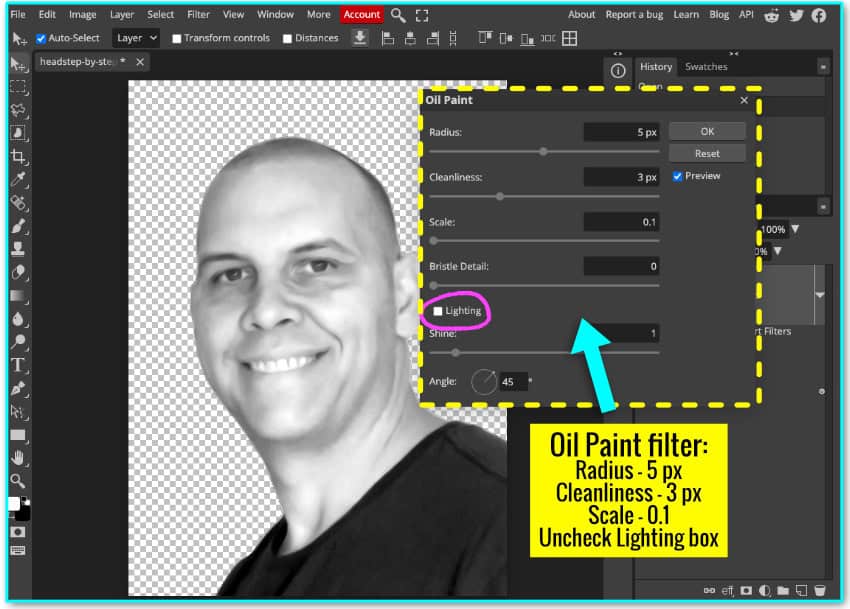
Inside the Oil Paint settings, uncheck the Lighting box and use these values:
- Radius: 5 pixels
- Cleanliness: 3 pixels
- Scale: 0.1
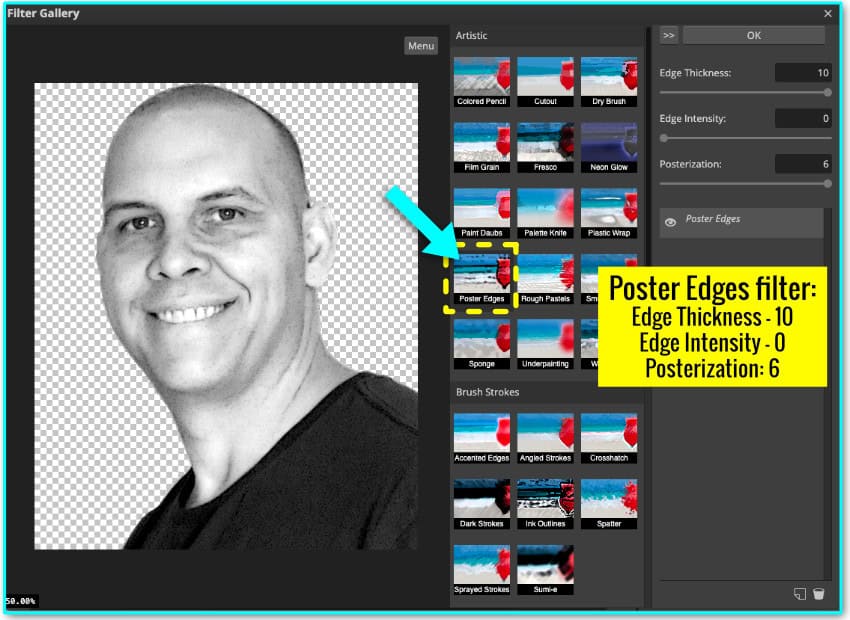
Poster Edges
Open the Filter menu, select Filter Gallery and then select Poster Edges. Use the following settings:
- Thickness: 10
- Intensity: 0
- Posterization: 6
This filter intensifies the edges and lines in the graphic.
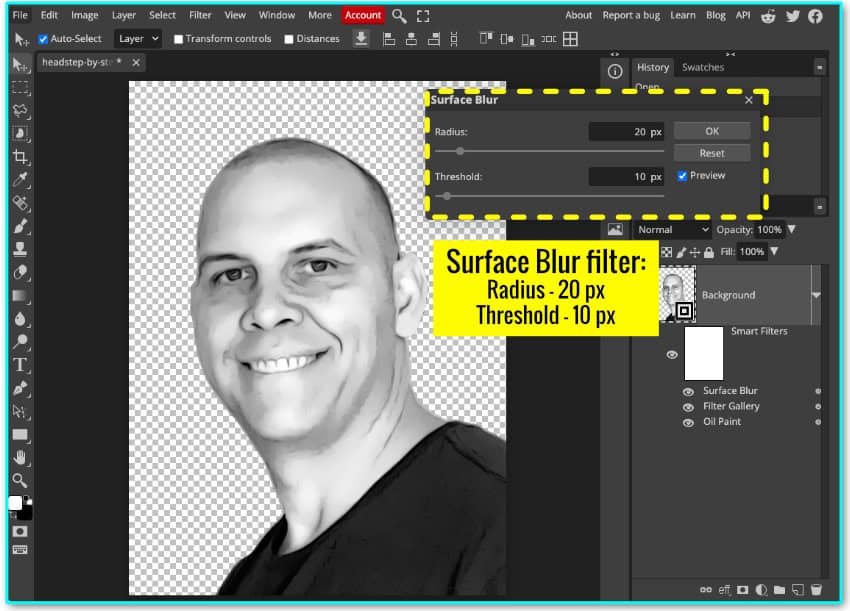
Surface Blur
Open the Filters menu, Select Blur > Surface Blur. This will smooth out the texture of the image. Enter the following settings:
- Radius: 20 px
- Threshold: 10 px
Duplicate Oil Painting filter
Next, I’m going to duplicate the Oil Paint filter. Open the Filter menu, select Stylize > Oil Paint and use the same values as the first step.
- Radius: 5 px
- Cleanliness: 3 px
- Scale: 0.1
- uncheck Lighting box
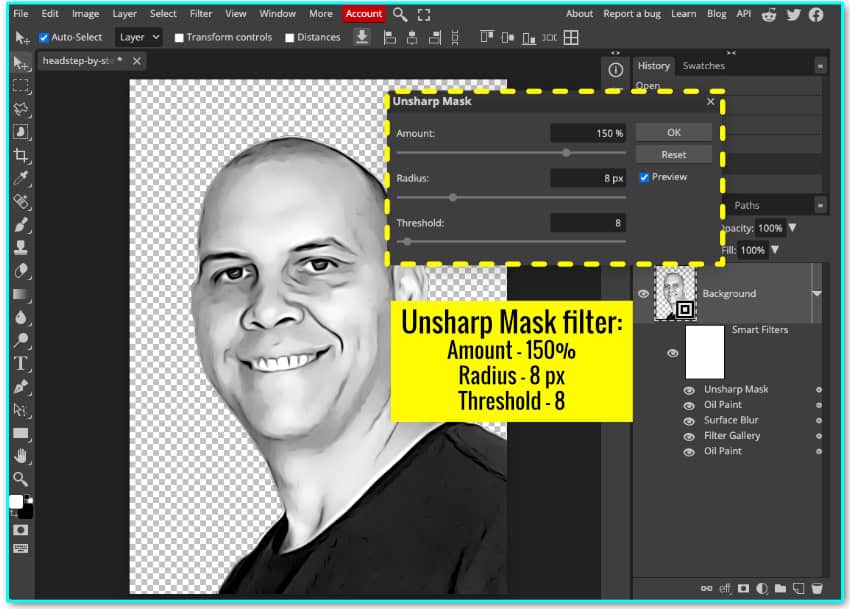
Unsharp Mask
Open the Filter menu, Select Sharpen > Unsharp Mask. Enter the following values:
- Amount: 150%
- Radius: 8 px
- Threshold: 8
At this point, I would recommend saving this image. Open the File menu in the top edit bar and select Save as PSD. This will save the image and all of the adjustments made as a PhotoShop document, keeping all the layers intact (jpg and png images merge all the layers).
Create vector Layers and making final edits
The image is now ready for final adjustments and touchup edits. We are almost done!
At the bottom of the Layers menu, there is a row of icons representing various functions for editing and organizing layers.
- Link Layers
- Layer Effects
- Raster Mask
- Adjustment Layer (needed for the next step of the tutorial)
- New Folder
- New Layer (needed for the next step of the tuorial)
- Delete Layer
Create 2 new adjustment layers
Adjustment layers are another way you can apply color and tonal edits to the image in a non-permanent way. Adjustment layers differ from Smart Objects in a specific way:
- Adjustment Layers apply non permanent color/tonal adjustments to ALL layers underneath them
- Smart Objects allow non-permanent edits to a specific layer
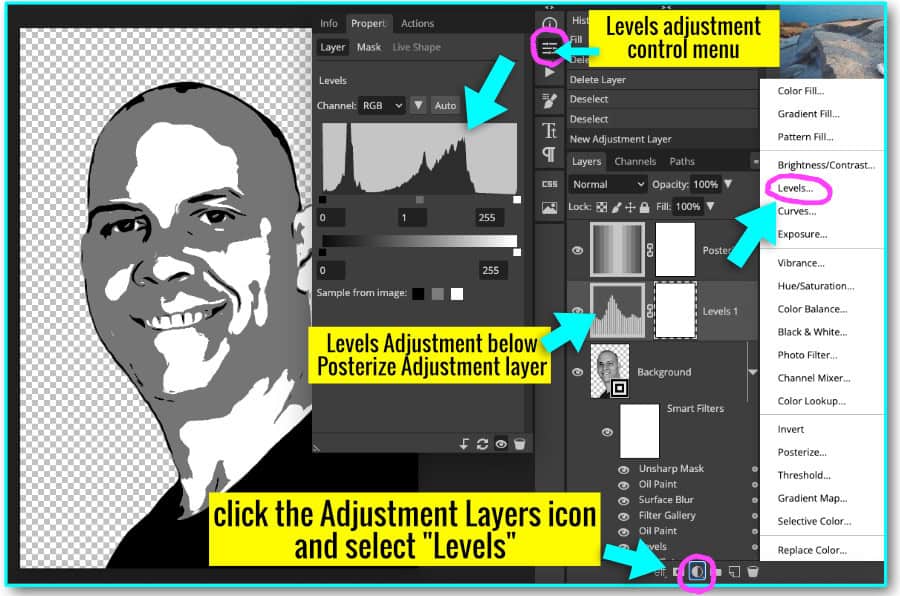
First, click the Adjustment Layer icon and select “Posterize” from the popup menu.
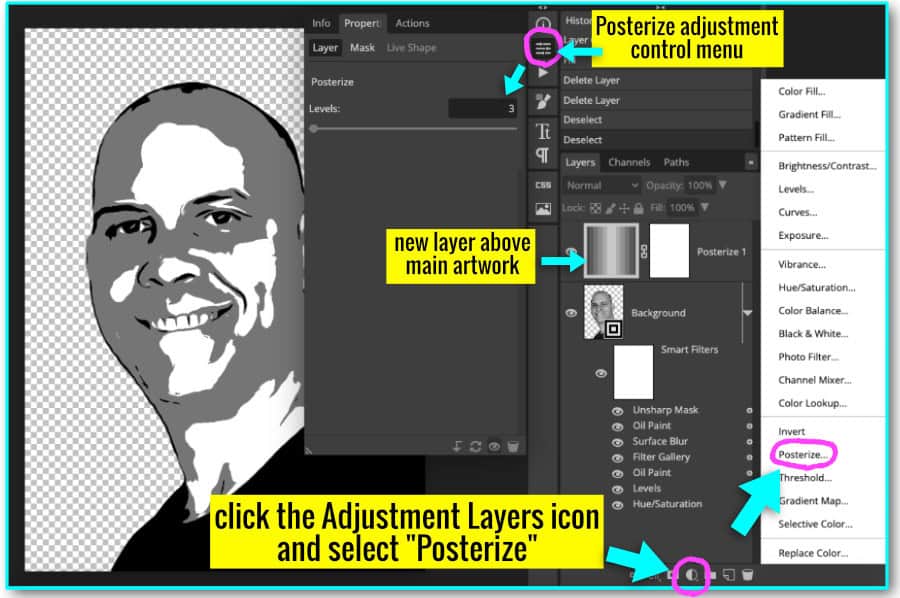
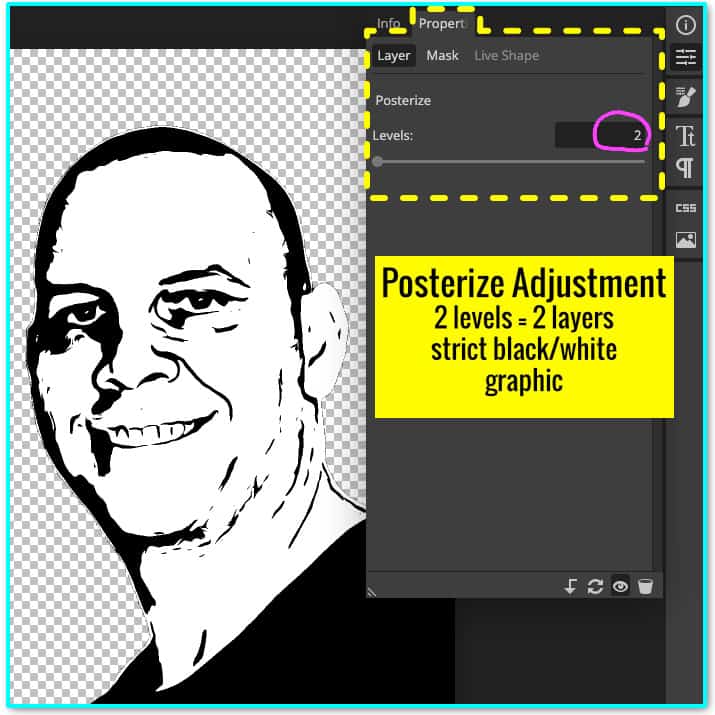
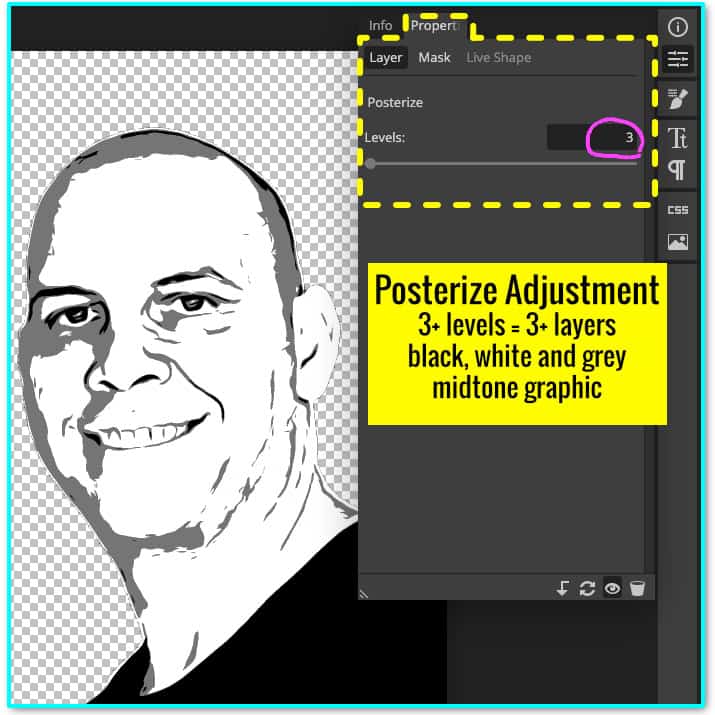
Using Posterize to create multiple cut layers
When you add an Adjustment layer to your project, PhotoPea will open the Properties panel you you can adjust the controls. When you have the Posterize control window open, the only control option is to select the number of levels.
Note: in this context, the Posterize tool refers to “levels” in the sense we would refer to “layers“. This usage of “levels” is not related to image contrast.
For our black and white image, this means you can set the number of levels and get a strict 2 color black and white graphic. Or you can set the number of levels to 3 (or more) to get black, white and grey layers representing mid-tones. My recommendation: choose at least 2 or 3 layers for people, and 3 or 4 for pets (fur adds complexity).
Fine tuning the Levels Adjustment layer
After selecting the posterize settings, create a new Adjustment layer.
- Select the original artwork Smart Layer in the Layers Panel (the one labeled “Background”)
- Click the Adjustment Layers icon at the bottom of the Layers Panel and select the “Levels” option from the popup menu
- Note: the Levels Adjustment layer is underneath the Posterize adjustment level
The Levels Adjustment Layer has the same setup as the first Levels adjustment we used in the tutorial, but in this step, I’ll be using it to adjust the amount of solid black, white and grey (if more than 3 layers are used). Thanks to the Posterize filter, there will be no gradients being adjusted, only solid color shapes.
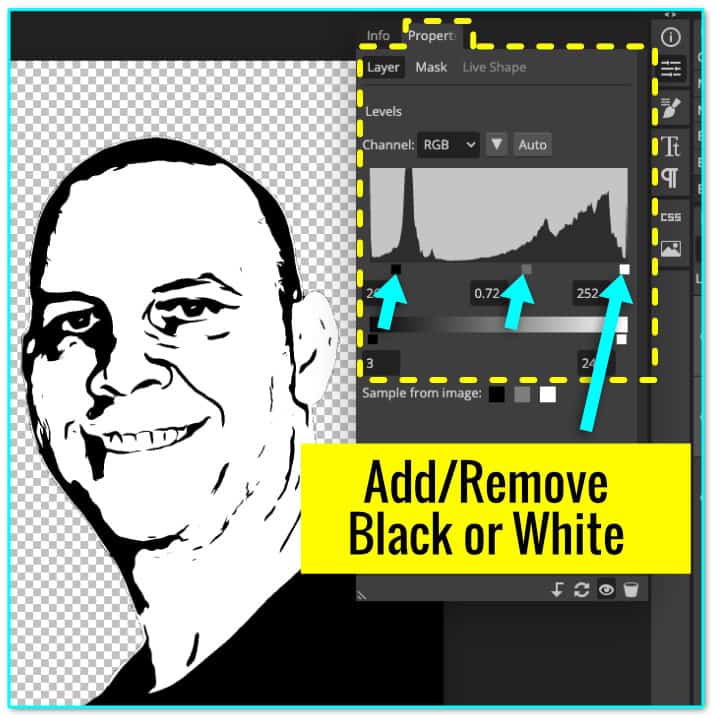
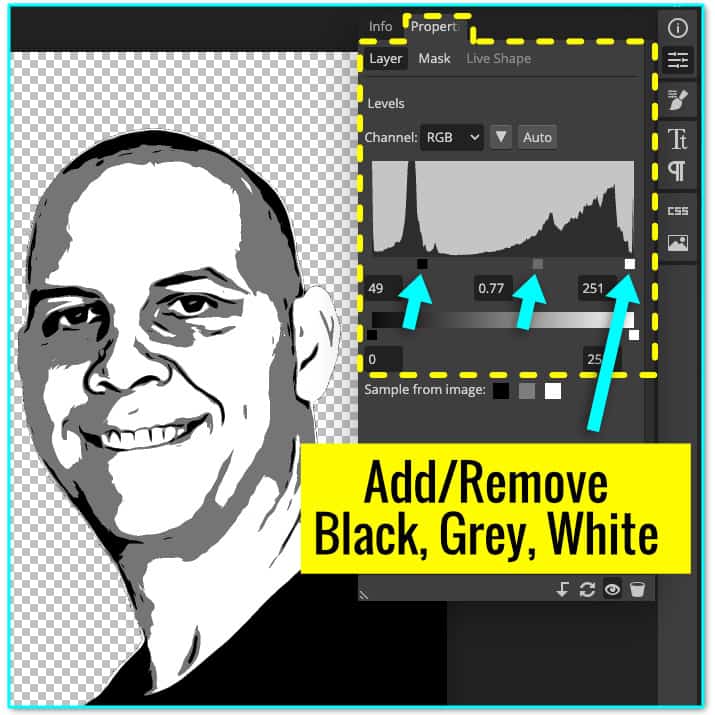
Move the black, white and grey sliders back and forth until you get the right balance of shadows, highlights and midtones.
Optional: Create an Overlay layer for final edits and cleanup
This is the touch-up step to clean up speckles and rough edges, making it easier to cut and weed the image. This is optional: if you don’t wish to do any cleanup of the image, click here to proceed to the vectorizing step.
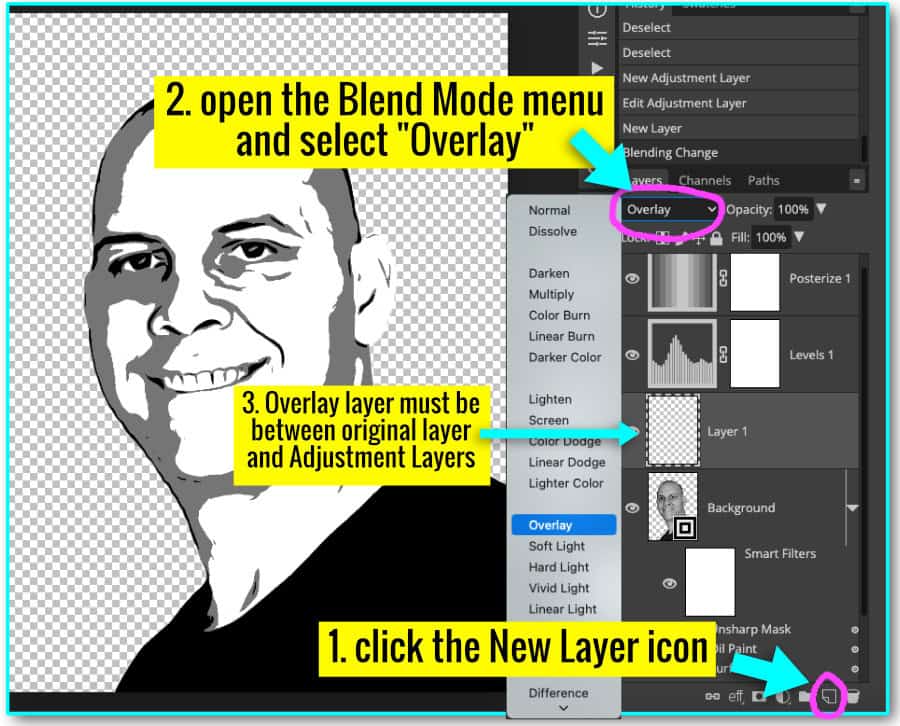
I’m going to create a new layer that will allow me to make touchups without permanently changing my base image. Instead of deleting speckles, etc., I’m going to apply the paintbrush tool on this new layer to cover any flaws or blemishes that need to be corrected.
- Select the original image layer in the Layers Panel (the Smart Object labeled “Background”)
- Click the New Layer icon at the bottom of the Layers panel
- At the top of the Layers Panel, open the Blend Mode pulldown menu (labelled “Normal” by default) and select “Overlay”
- The new Overlay layer (called “Layer 1”) must be between the original image and the two adjustment layers
After you have created the new layer (“Layer 1”), right-click it in the Layers Panel and select “Clipping Mask”. This will ensure that any paintbrush edits you make to this layer won’t “color outside the lines” of the original image and bleed into the transparent background.
In the left hand tool bar, select the Paintbrush tool. In the edit bar at the top of the window, change the Flow setting to 5%. Using the Paintbrush on the Overlay layer, I can paint over speckles, rough edges or other areas of the graphic I’d like to lighten or darken before I’m finished.
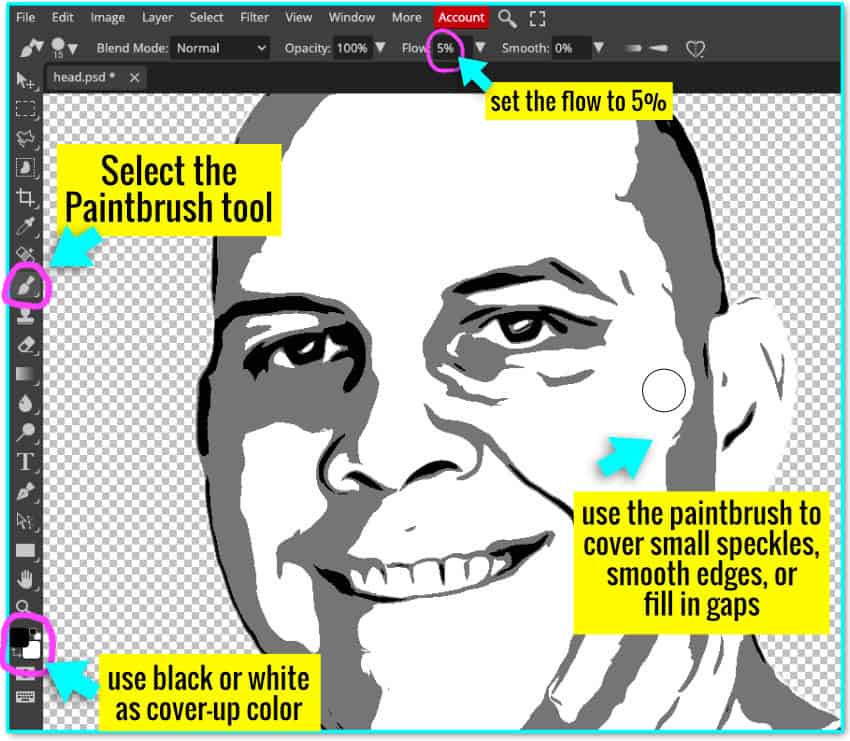
Use the color selector in the left toolbar to select black or white as the application color. Paint white over any section you want to make lighter, use black to paint over any area you want to make darker. (This process is easier to understand when you watch the video that goes with this tutorial)
Adjust the brush size using the ” [ ” or ” ] ” square bracket keys.
When you have finished your edits, don’t forget to save!
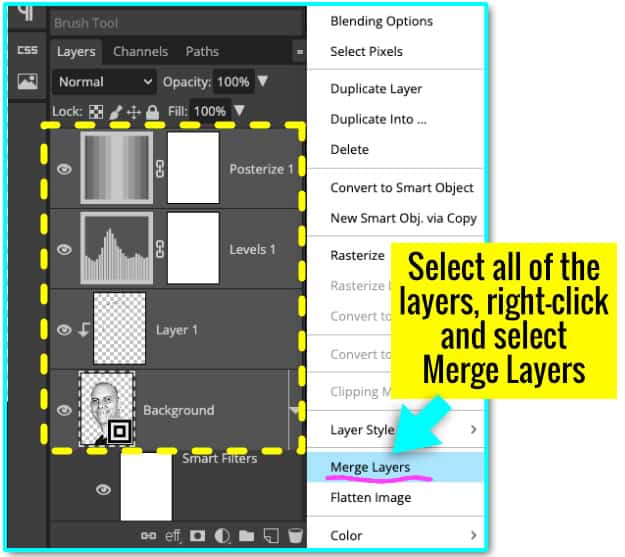
Merge the Layers into a single image
In order to convert each color into a layer before creating my SVG, I must first create a single image. Select all of the layers in the Layers Panel, then right-click and select Merge Layers. This will combine every layer into a single image but retain the transparent background. (note: all of the editable layers go away at this point!)
Converting image to vector
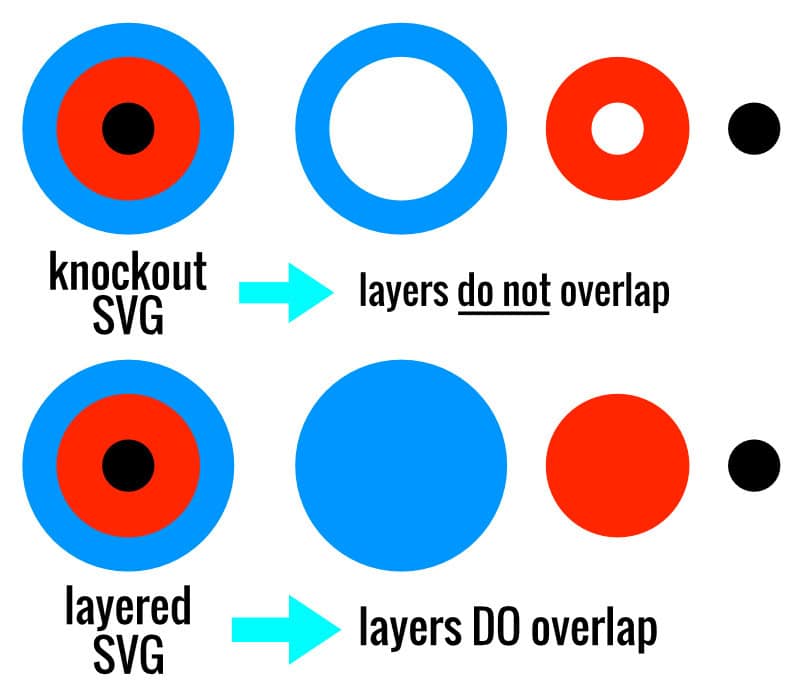
Now that I’m finished editing, I’m ready to convert the pixel image to a vector file. As part of this process you will choose to create either:
- a knockout-style SVG where no layers overlap (i.e. the pieces fit together like a puzzle)
- OR a layered SVG where each layer is complete and the cut pieces stack on top of one another
I’m going to convert each color (e.g. all of the black, all of the white, all of the grey) into its own vectorized layer, one at a time. There are 3 basic steps in this process:
- select all areas of a certain color (black, white, grey, etc.)
- during this step, you will choose to create a knockout or layered vector
- convert the selected areas to a vector path
- fill the vector path with the matching color (black, white, grey, etc.)
The steps for the first, black, layer will be the same for both SVG types (knockout or layered). The steps for subsequent color layers will differ depending on vector type. I will walk you through the steps for the black layer first, then I’ll take you through creating the rest of the layers for each type of SVG.
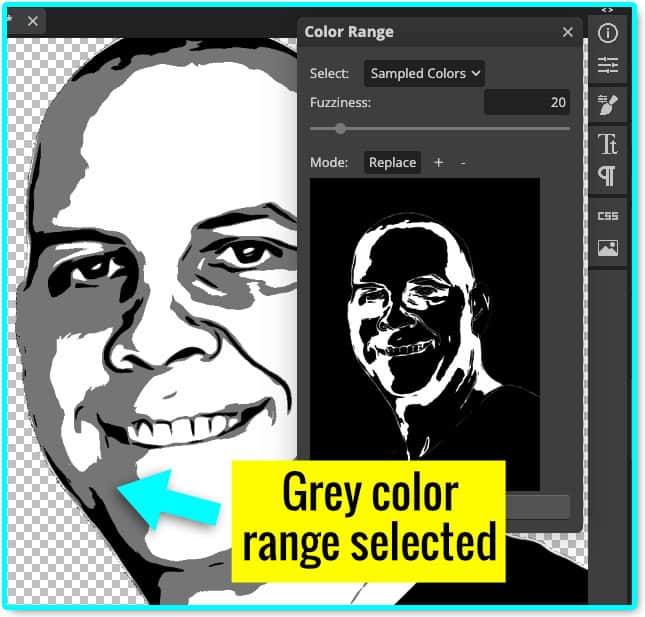
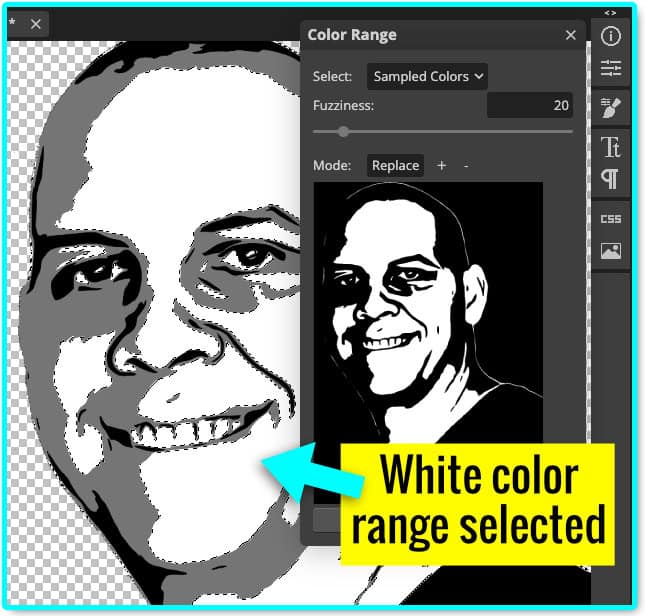
1. Open Color Range selection tool
Click on the single, merged, image (labeled “Posterize 1” in my screenshot below) in the Layers panel and open the “Select” menu in the top menu bar
- Select Color Range.
- In the “Select” pulldown menu, choose “Sampled Colors”
- Click on any black area of the image (In the preview window, all of the selected areas will display as white on a black background.)
- The other values (Fuzziness and Mode) do not need to be adjusted
- Click the OK button

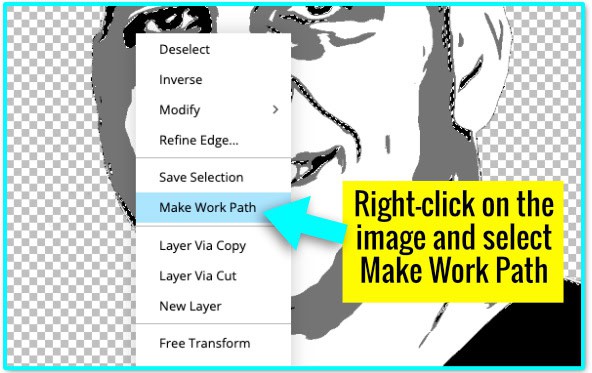
2. Vectorize layer with Work Path
All of the black areas of the image will now be selected (surrounded with a dashed line)
Note: You may still have the paintbrush tool active at this time. Make sure you have the Rectangle Select tool active from the left hand toolbar. (Second option from the top, underneath the Move tool arrow)
Right-click on the image and select Make Work Path from the popup menu. The dashed selection line will change to blue.
3. Fill the path with the matching color
Click the Adjustment Layers icon at the bottom of the Layers panel and select Color Fill
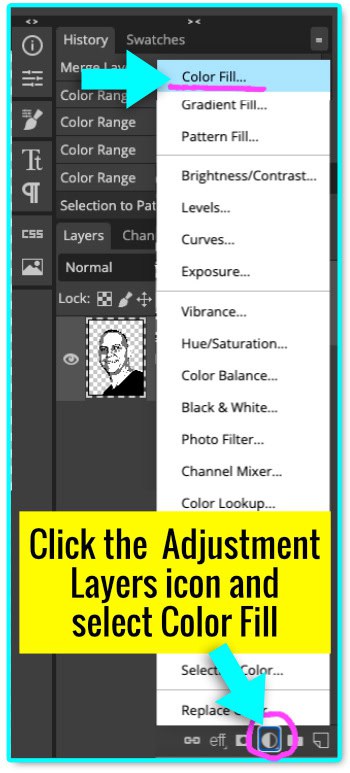
The color selector window will open next. Click on the black swatch in the color presets, or click any black area of the image to select the color. Click OK when finished.
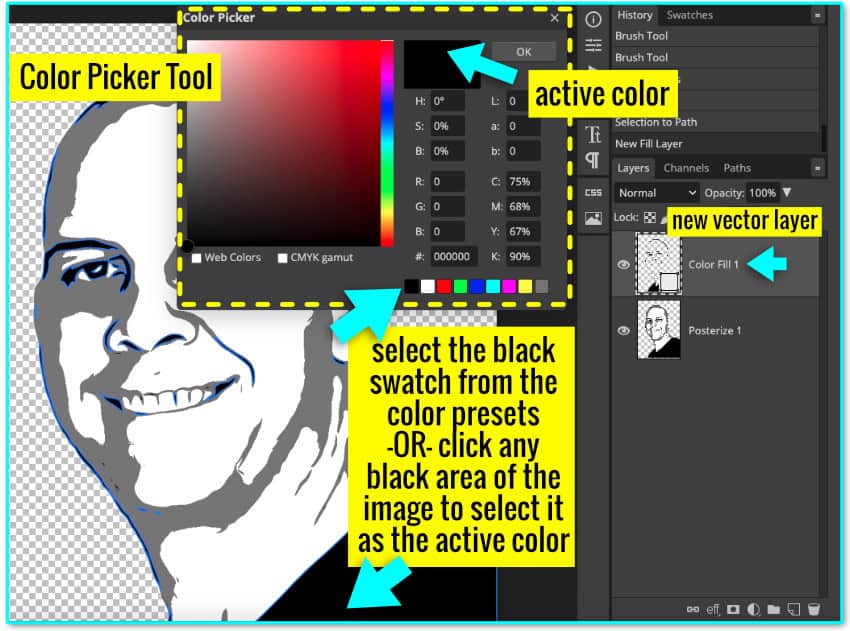
A new vector layer containing all of the black areas of the graphic will appear at the top of the Layers Panel.
Remaining steps to create a knockout SVG
Repeat steps 1-3 to create layers for white and each shade of grey. This will create a knockout SVG with no overlap between the layers.
Proceed to exporting your SVG.
Remaining steps to create a layered SVG
To create the grey layer, make sure the single image is selected in the Layers panel and open the Color Range selector. The last color selected (black) will be shown as the default selection.
In the settings box, change the mode setting from “replace” to “+“. This will add another color to the previous selection. Click the cursor over any grey area of the graphic. All of the grey areas will be added to the black areas to make a new, larger selection area. Click OK to close the Color Range tool.
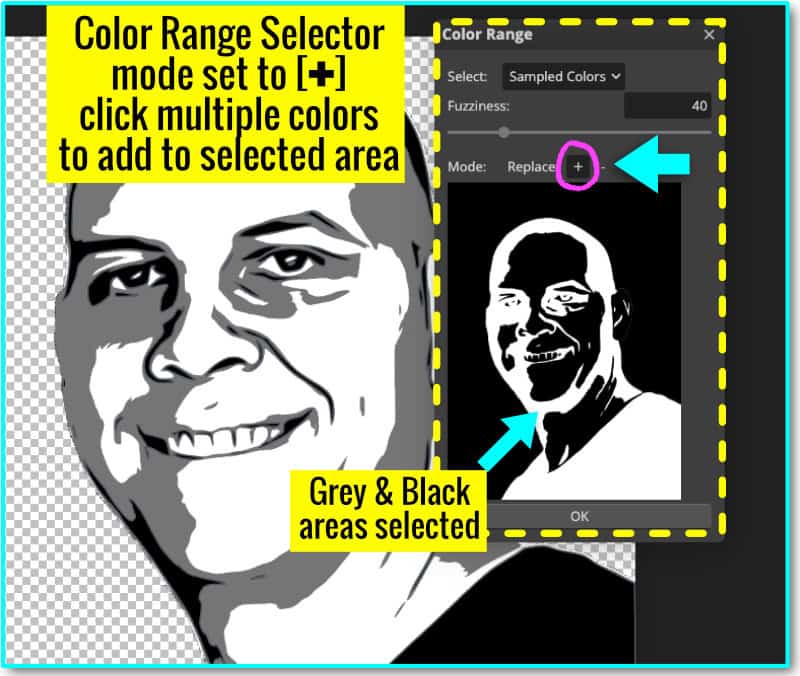
- Right-click on the graphic and select Make Work Path
- Click the Adjustment Layer icon and and select Color Fill
- When the color picker window is open, click any grey area of the graphic to select that color and create a new grey vector layer
Now you have a grey vector layer that also overlaps all of the areas in the black layer. When the black layer is on top of the grey layer, there will be no gaps.
Repeat this for the white layer. Open the Color Range Selector, click anywhere in the white area to add it to the total area selected, then create a Work Path and fill with white.
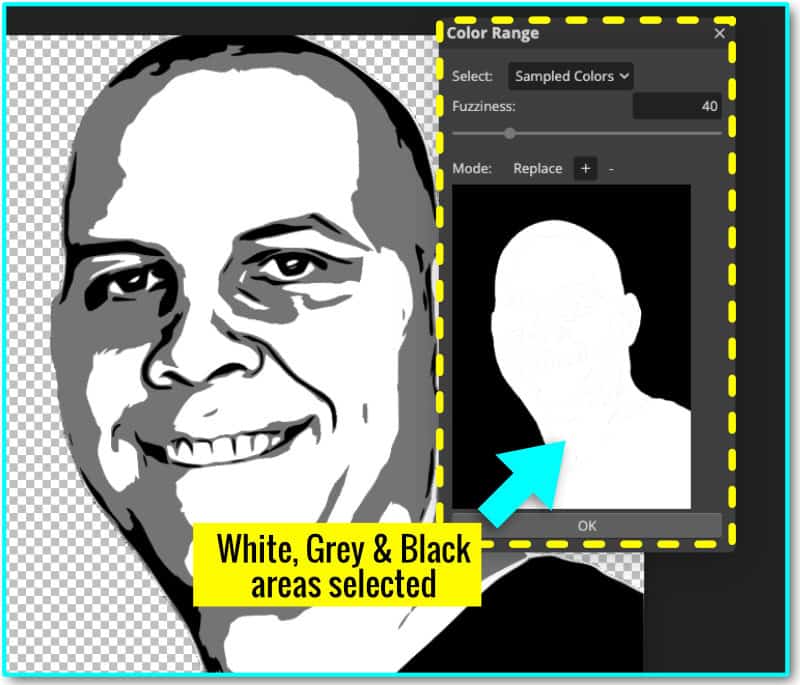
Export as SVG file
You should now have one layer for each color in your image. In my case, I have 3: black, grey and white. These layers are all vector paths. I also have the merged pixel layer in Layers panel. Delete this pixel layer (trash can icon in the lower right corner of the Layers panel).
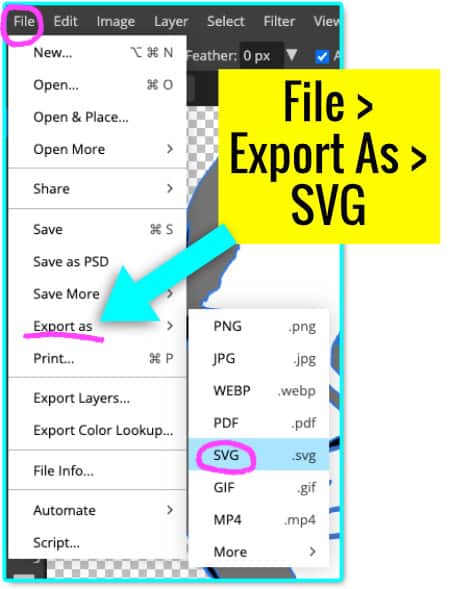
Open the File menu in the top menu bar and select Export As > SVG. Your photo has now been fully transformed into a vector SVG file, ready to cut out of vinyl, HTV or cardstock with your craft cutter!
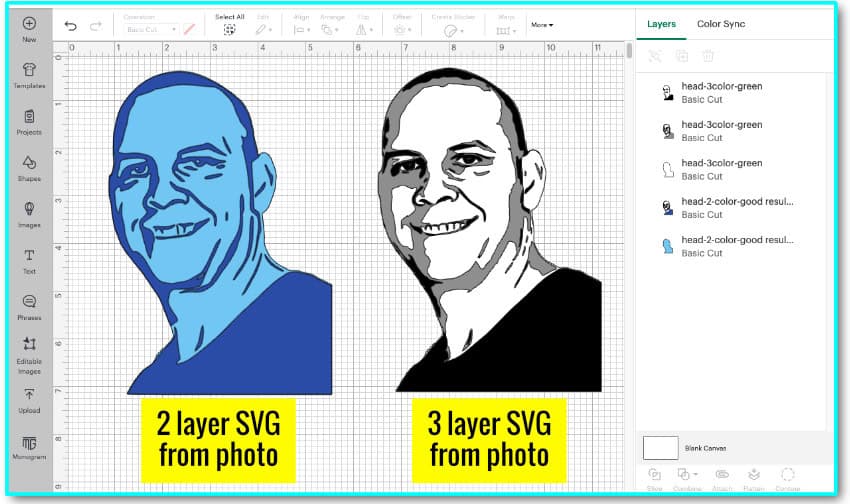
Open SVG file in Cricut Design Space
Now this SVG file is ready to import and cut in Cricut Design Space. Simply open a new canvas, click the upload icon and follow the prompts to add the file.
And here’s what the file looks like when it’s cut out of vinyl and weeded.
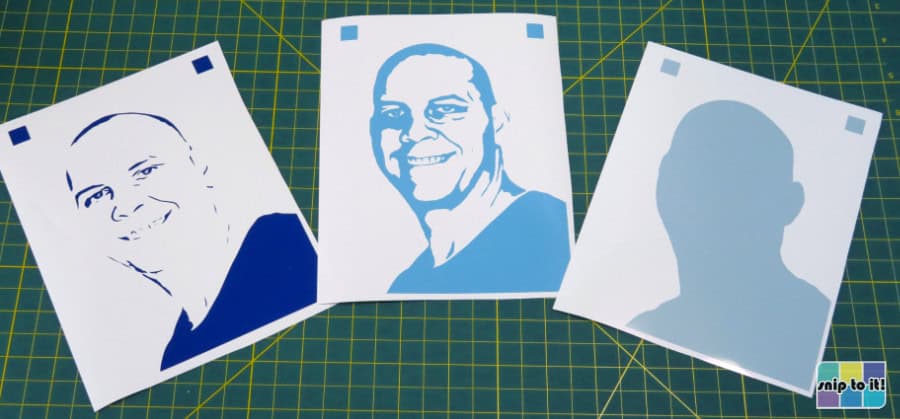
Finally, here’s the final graphic fully assembled and mounted on cardstock. Sure, I probably would’ve done myself a favor if I edited the teeth and the eye highlights to show the white cardstock underneath, but you can see how true to life this graphic is!
And as a bonus, here’s the 4 layer graphic of Bear in glossy vinyl mounted on cardstock.

You can cut converted photo SVGs out of adhesive vinyl to decorate tumblers, mugs, suncatchers, or picture frames. These are great ways to create pet memorials for friends and family.
You can also cut the files out of HTV to make t-shirts, bags or hoodies. You can even cut these graphics out of cardstock to make layered shadowboxes or cards.
This may seem like a long tutorial, but trust me, the results are worth it. I would rather spend my crafting time on crafts rather than on the computer, but learning how to make your own cut files from photographs will let you create more meaningful and standout projects.
If you are making projects to sell, knowing this technique can be a big benefit. You can make personalized projects for clients or get the jump on the competition vectorizing popular characters from a movie, TV show or meme.
Before you go…
I want to thank you for reading to the very end of this tutorial. If you’re interested in other design tutorials that will help you level up your Cricut game, check out these articles:


I think I will like this
I think I will like this . Looks like fun
Hi Eva! Thanks for the reply. We had fun creating this tutorial. Personalized SVGs from photos look great on mugs, tumblers, t-shirts and make great gifts. Let us know how your project turns out!
Thank you for sharing the background removal website. In fact, the background removal function of the website I use is also very easy to use.
https://www.imgkits.com/background-remover
Thanks for sharing the link Jingel! Is there any way to test it without creating an account to sign in?
What a beautifully curated blog! It’s like a daily dose of motivation.