This article is part of our Mastering Cricut Design Space learning hub. It is part of our series on the tools and techniques of the Canvas.
The Contour tool in Design Space allows you to hide selected cut lines in a layer. This tool is indispensable for modifying images to create custom designs, but it is the worst-named tool in DS!
You might be saying, yeah, what is Contour anyway? What’s the deal with that circle thing stuck waaaaaaay down in the bottom right hand corner of my screen?
Contour should be called “Hide” or “Customize cuts” or “Edit Image“. This tool lets you edit and remove cut lines from images so you can master creating custom designs right in Design Space.
I’m going to show you 6 different ways to use Contour to make custom designs!
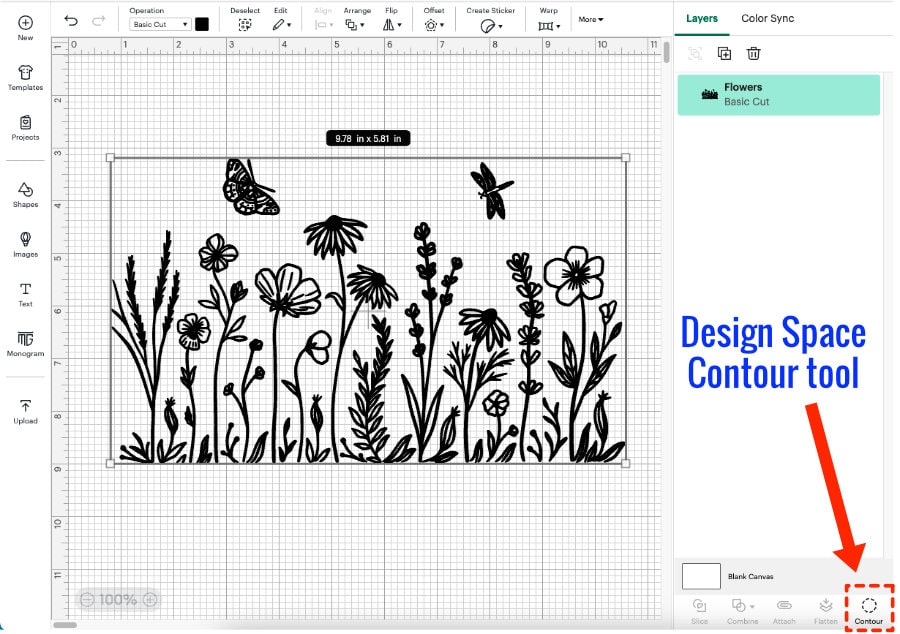
The Contour Tool: where to find it and how to use it
As I said, Contour is that weird little dashed circle wedged all the way down at the bottom on the Layers panel. You can click Contour to edit any single-layer image or shape (like an offset). If you’ve got a multi-layer image you’ll have to Ungroup (or Detach, if necessary) before you can edit any of the layers.
Also, you can’t use Contour directly on any image you’ve created using Unite, Subtract, Intersect, or Exclude, anything you’ve Flattened (or on Print Then Cut images), or text. So, now that we’ve got exclusions out of the way, let’s investigate how we can use the tool to create designs!
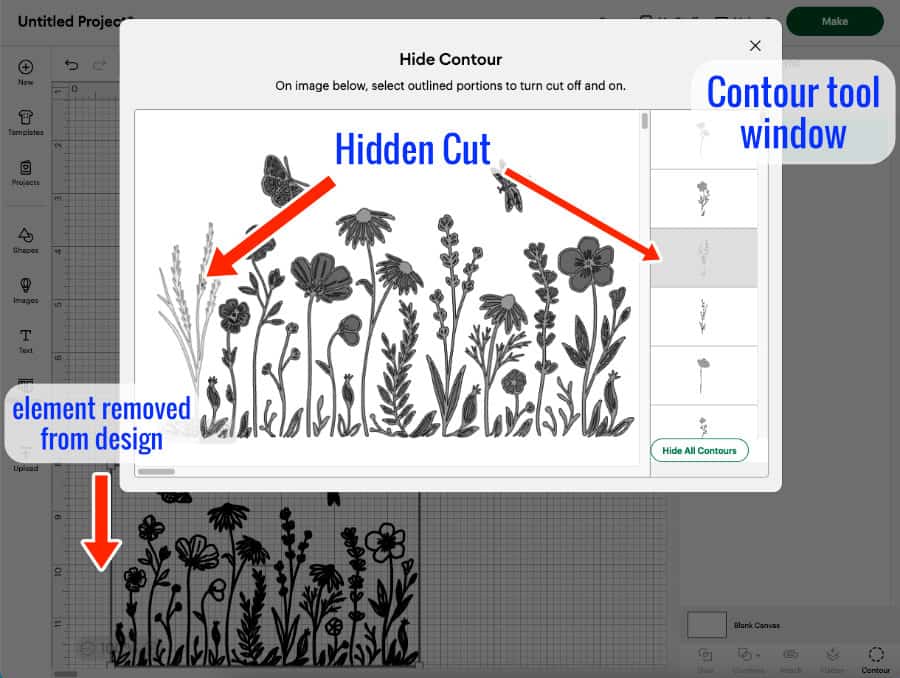
In my example, I’ve chosen a single layer image, clicked Contour, and the Contour tool window pops up. This window shows the image plus a list of each of the different cut shapes down the right-hand side, arranged from largest to smallest.
The idea is simple: to hide part of the layer, click on that part either in the image or in the list. The part you selected will show as greyed out (lighter grey) in the Contour window and will disappear from the Canvas.
So now that we’ve reviewed the basic function of the Contour tool, let me highlight some cool applications!
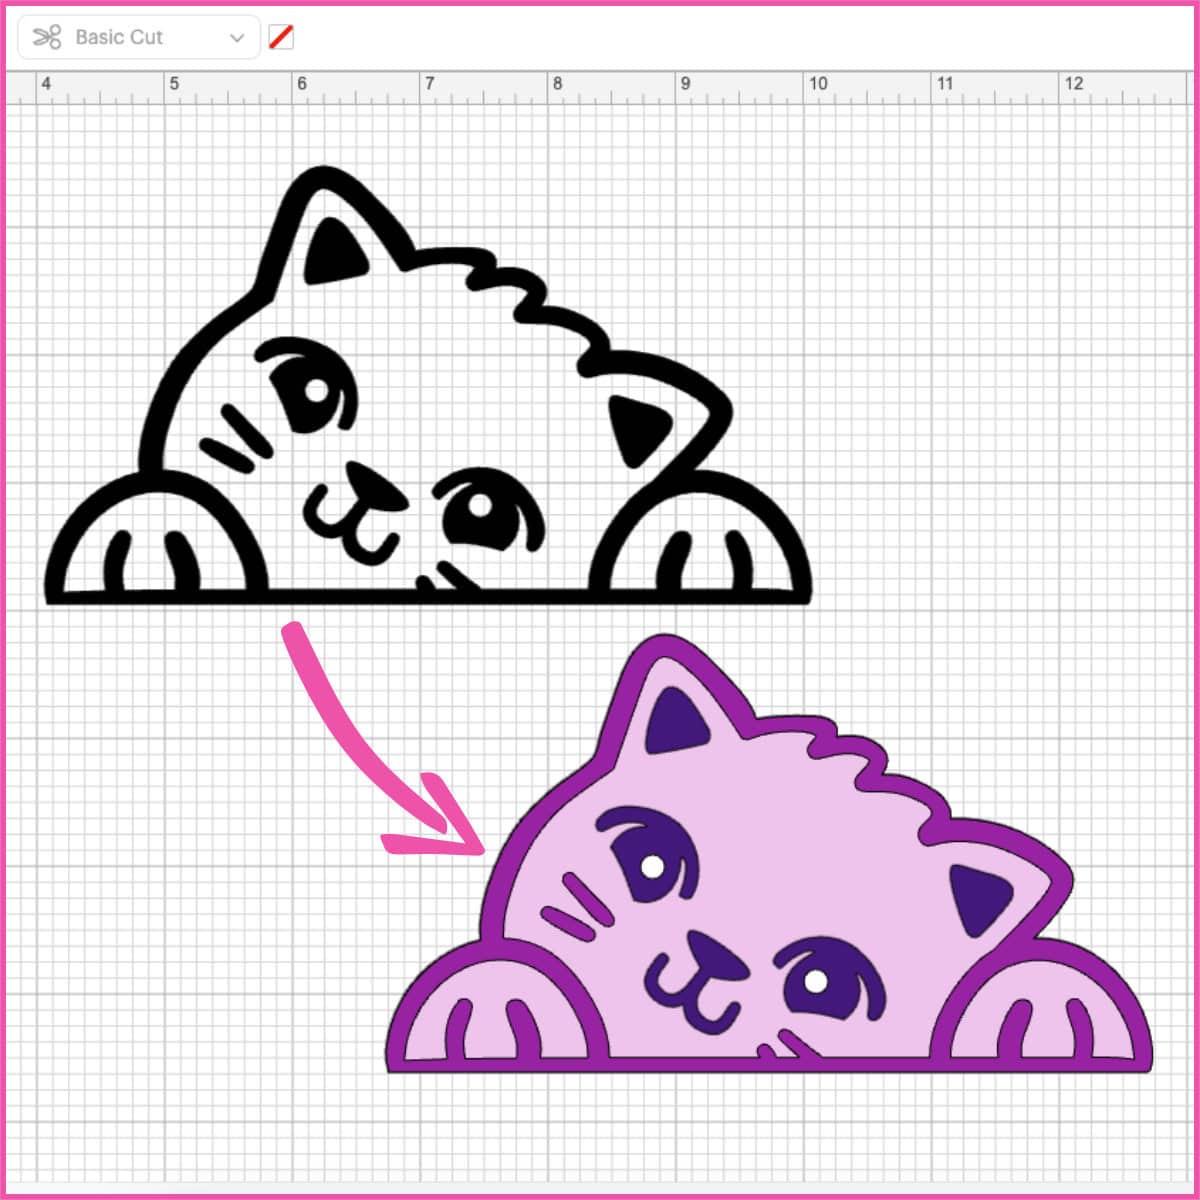
1. Make multi-layer (multi-color) images
Adding layers to images is my favorite use of the Contour tool, and I use it all the time to create designs using dingbat fonts, as I covered in my article about using the Offset tool. Once you master making multi-color images using Contour, you’ll be able to use a massive amount of different source images for your projects!
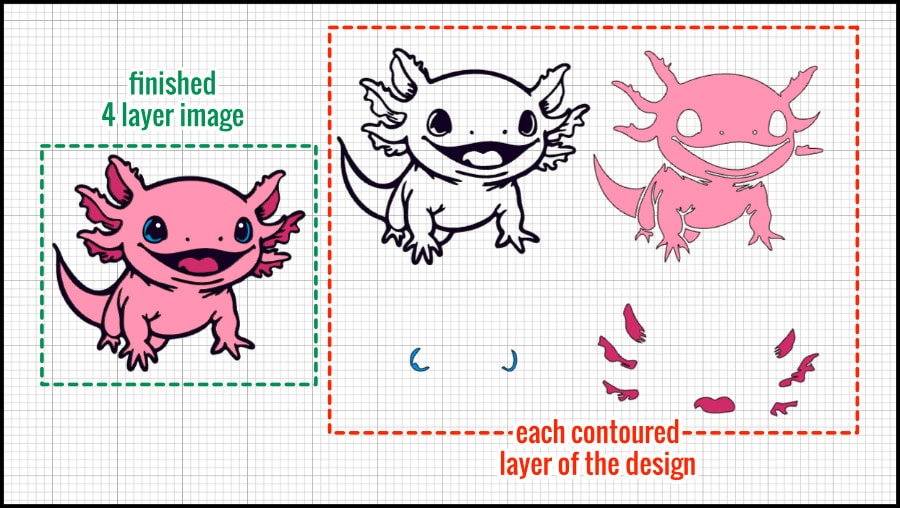
As an example, I’m going to turn this adorable single layer axolotl image (#M505E53BA, by artist Oats Tiu) into a 4 color/4 layer image using Contour.

First, I make 3 duplicates of the single-layer image, one for each of the colors I want to add.
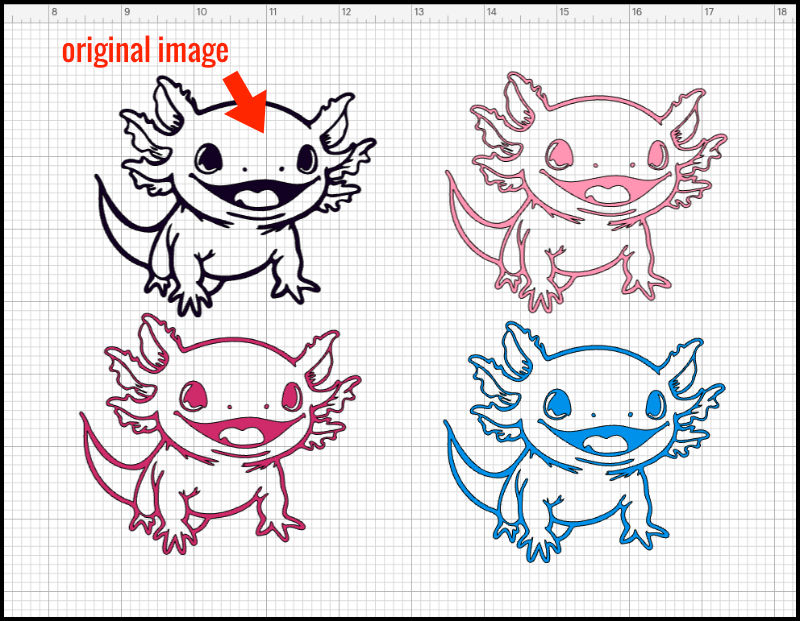
The original image is my outline layer, which I cut out of black vinyl for my card project.
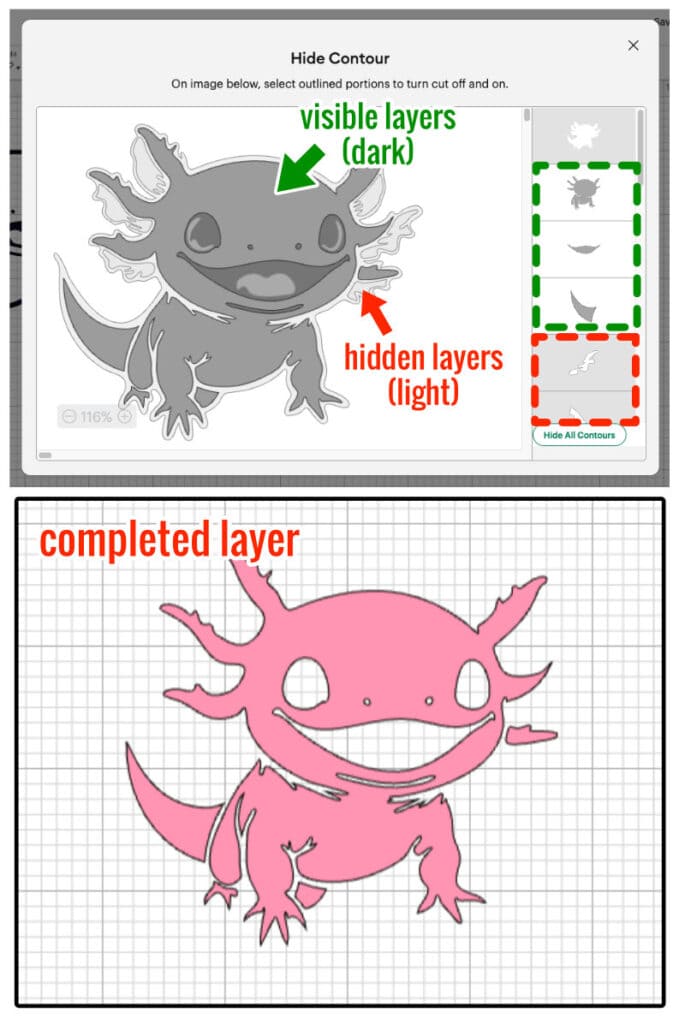
If you want to create a solid base layer for your image, you can open the Contour tool and select “Hide All Contours” which will hide all the cut lines except the largest cut. In this case, that leaves us with the outermost cut line around a solid shape.

The next layer is the pink body fill. I select the image, click Contour, and select Hide All Contours. Then, I add back the pieces I want in my pink layer by clicking each of them – this will turn them dark grey in the Contour window. Notice that I have to include the cut lines around the eyes, nose, and mouth so the black outline layer can show through. I finish by clicking to hide the outline layer.
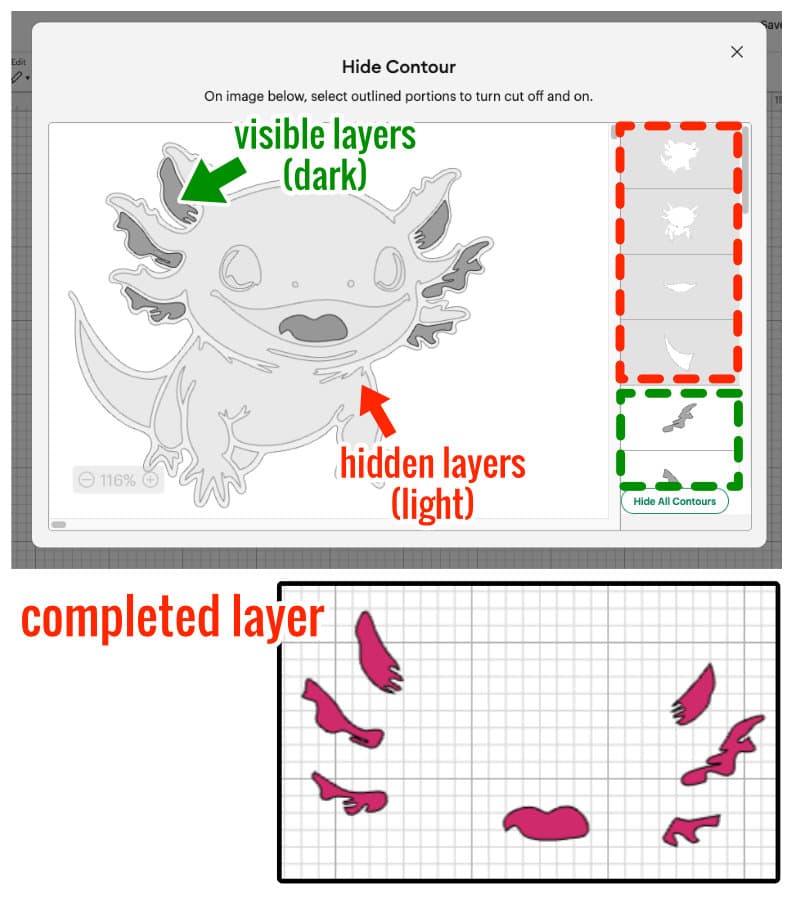
The dark pink layer will just include the gills and tongue. I open the Contour window, select Hide All Contours, and add back the gills and tongue, and also remembering to hide the outer cut line at the end.
For the final layer I hide all the cut lines except the blue eye highlights.
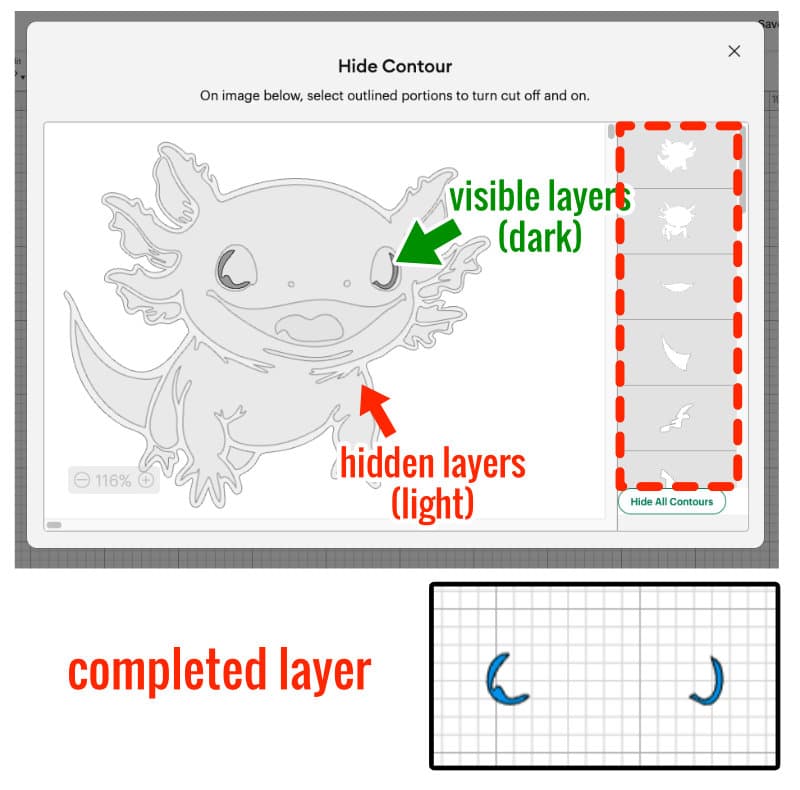
Once my 4 layer image was finished, I added 2 little white circles as highlights for the eyes. So cute!
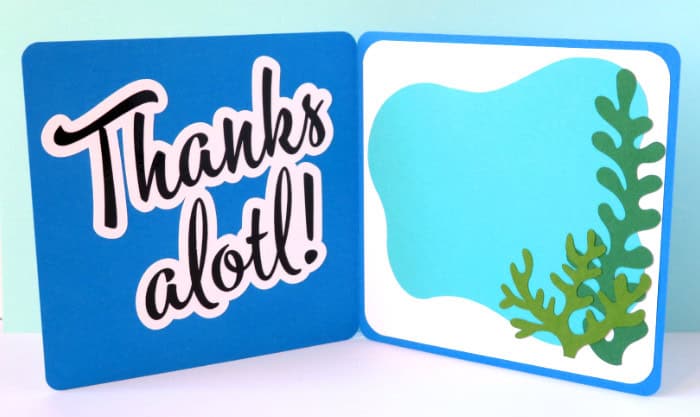
I used the axolotl to make a thank you card. If you’d like to make the project, this is the Design Space link.

2. Customize SVGs
Sometimes you just need to tweak a design to make a perfect project. Lots of images already include a sentiment or name, but what if you want to personalize it?
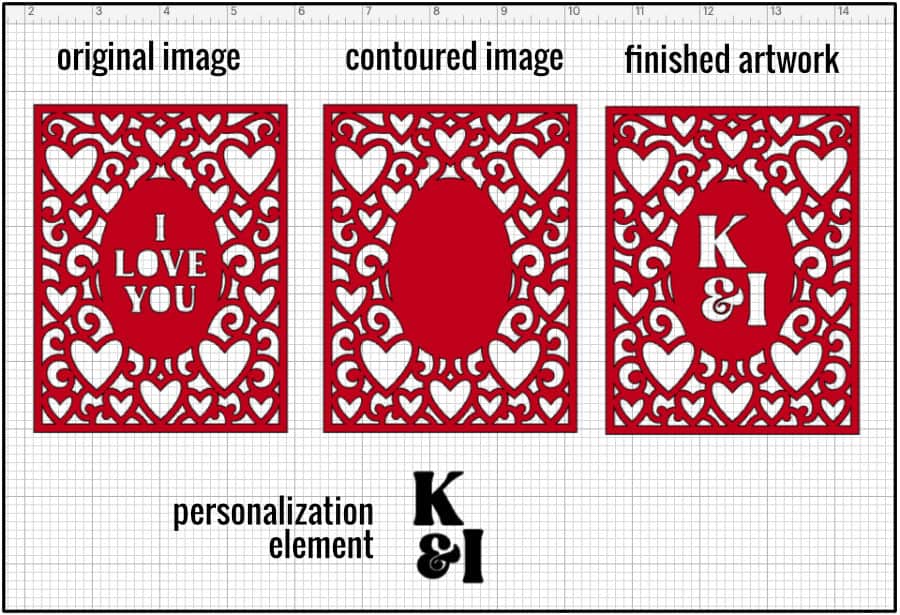
In this example, I removed “I love you” from this frame so I could include our initials (K&I for me and Ian) to make a Valentine’s Day card (white & red foil cardstock).
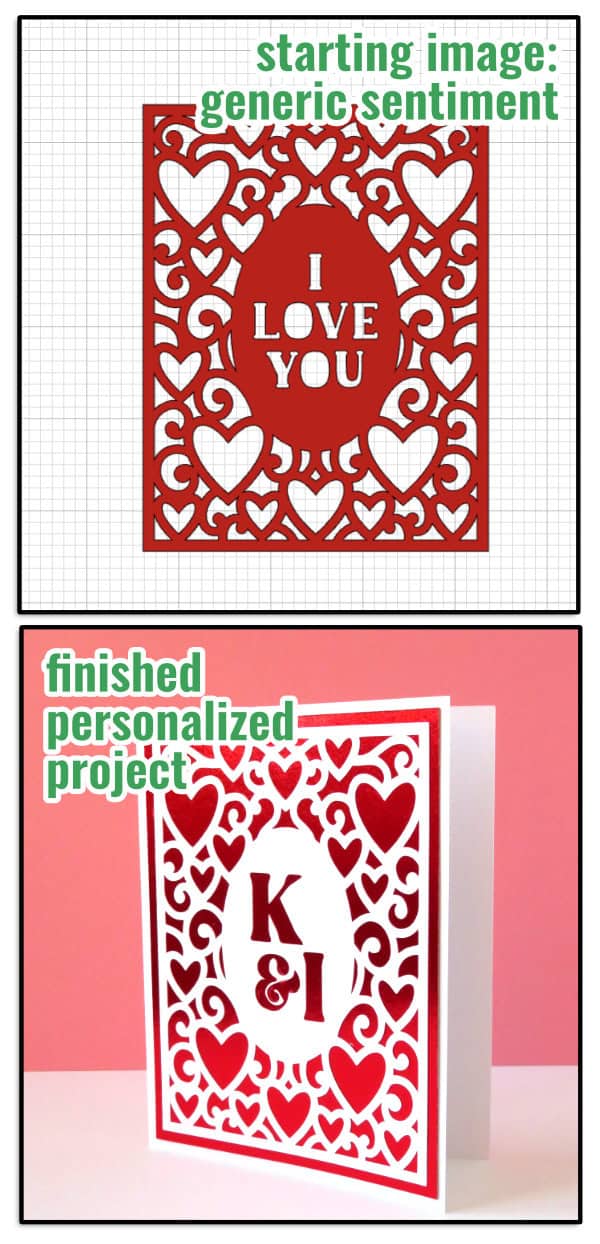
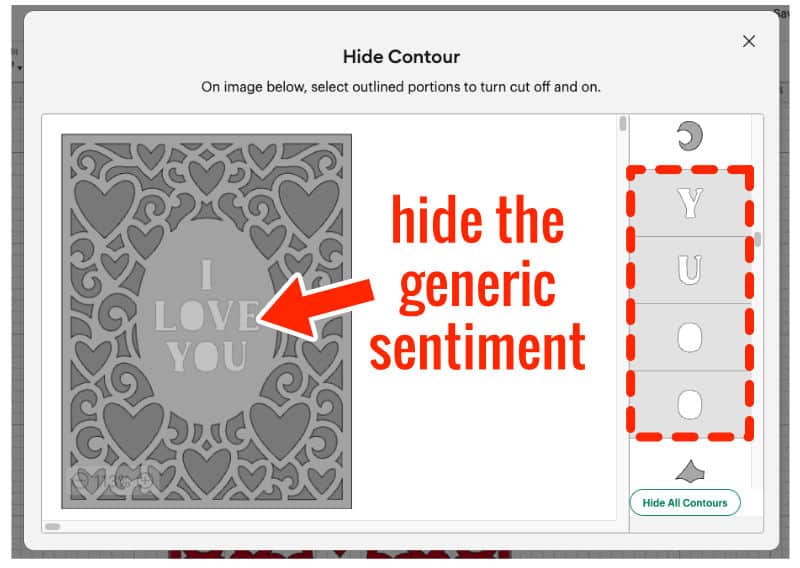
To start, I open Contour and click to remove each letter from the frame.
Then I just use Subtract from the Combine tools menu to cut K & I out of the frame.
There are so many images in the Cricut Design Space library that can be tweaked and personalized this way. To me, the great benefit of owning a Cricut is being able to personalize projects, and this is an incredibly easy way to achieve that!
3. Create Solid Backgrounds
One of the best uses of the Offset tool is creating layers underneath text or images for projects like cards, cake toppers, or stickers.
If you want to create an offset around an image or text, chances are there will be holes in the offset. All you need to do is hide all the contours and you’ve got a solid layer!
For this cake topper, I actually just hid a few cuts from the black offset layer:

But if you want a completely solid layer, just click Hide All Contours. Especially if you are creating a background offset for a sticker, you will need to hide all the contours so there are no internal cut lines.

4. Combine & Create new images
Contour is a particularly important tool if you want to create your own designs in Design Space using multiple source images.
For example, fancy text with lots of ligatures is super popular, but it can be tricky to master choosing and using fonts to create those text effects. Instead, you can use the fancy text someone else has designed, and edit it to combine with whatever images you like.
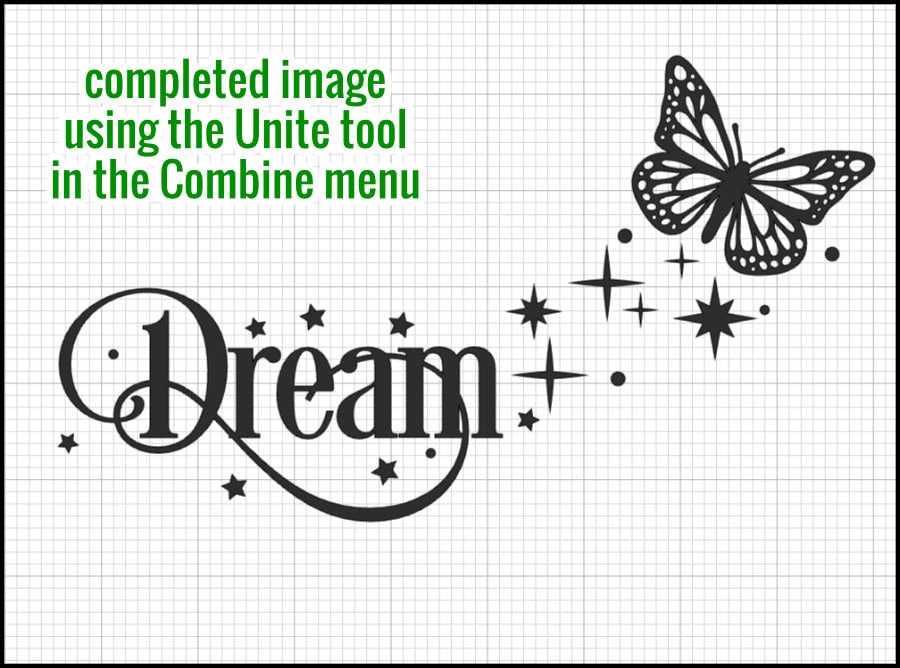
I’m going to combine the word “Dream” with this butterfly image.
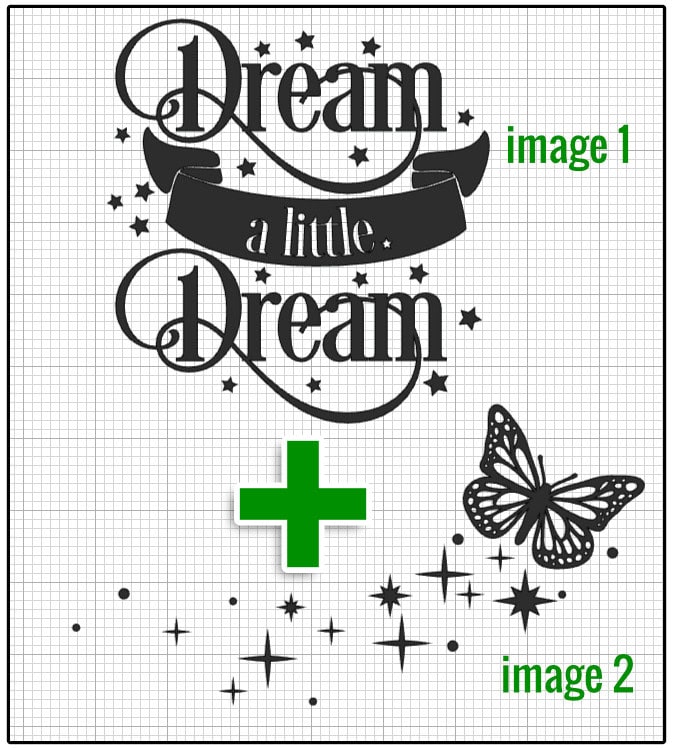
First, I use Contour to remove everything but Dream and a few stars:

Then, I place my images together so I can see what parts of the butterfly trail I have to remove. I do 2 things to make editing the butterfly image easier:
- change the color of the butterfly image so I can see the overlapping pieces
- move the images to the bottom corner of the Canvas so I can see the pieces disappear as I click them in the Contour window
I remove all the extra stars from the butterfly trail.
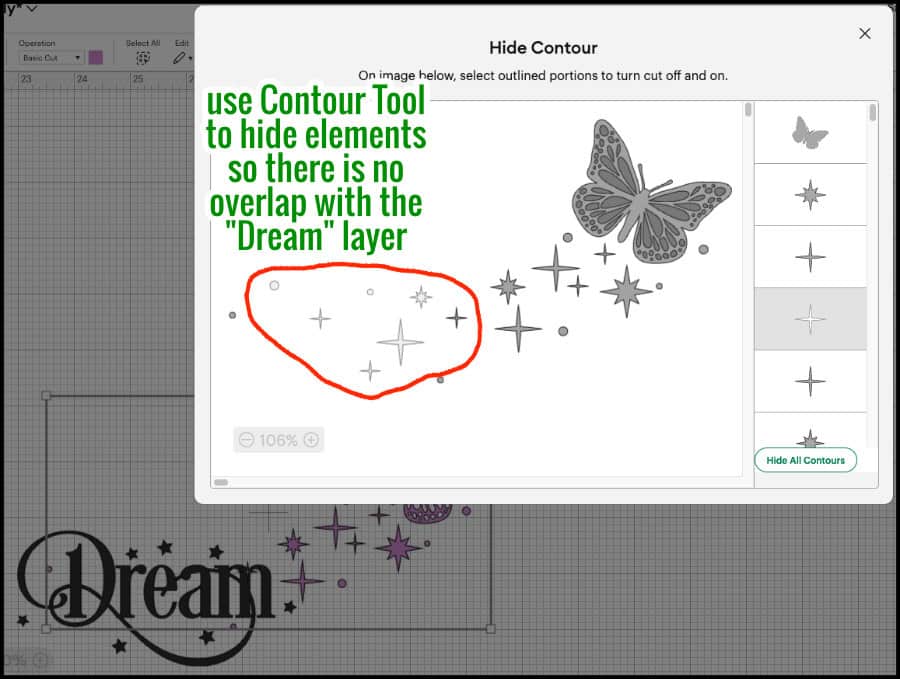
Once all the overlapping pieces of both images are hidden, I position the images the way I want them and use the Unite tool to combine them (you can also Attach).
I combined this image with an an open book (I created an offset of Dream/butterfly, then subtracted the offset from the book image) and made a tote bag!
🎶 Butterfly in the skyyyyyyy, I can go twice as hiiiiiiiiigh…🎶

Take a look! It’s in a book! Thank you so much, LeVar Burton! The Design Space project is here.
5. Simplify your cuts
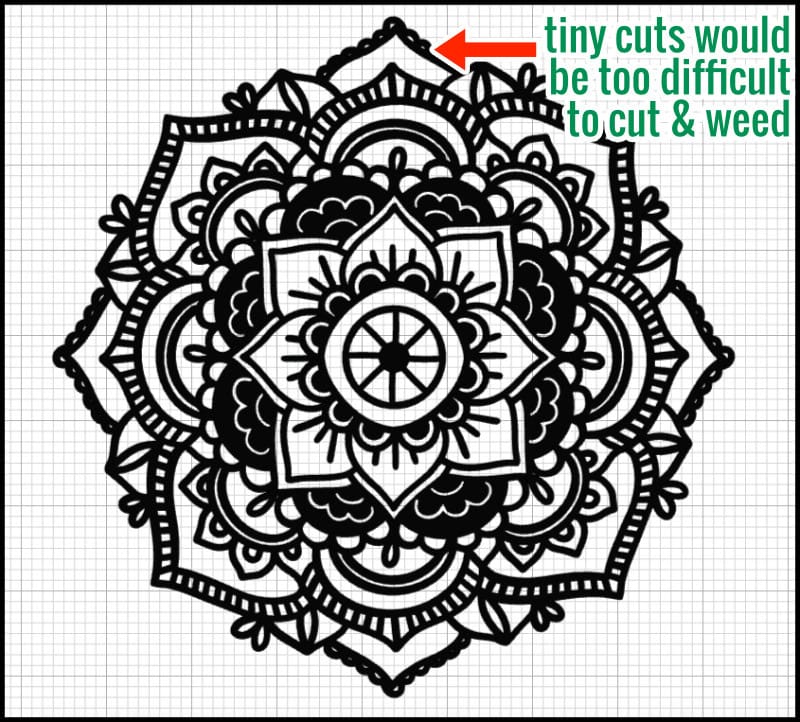
The Contour tool is a great way to simplify complex images to make them easier to cut, especially if you want to use an image in a smaller size.
This mandala has a lot of tiny holes around the edges, so I’m going to use Contour to hide all those little cut lines.
You can increase the zoom in the Contour window to make it easier to see what you’re doing.

6. Create multi line type designs like cut + draw
Sometimes you want to draw, foil, deboss, or engrave instead of using an image as a cut file. You can use Contour to separate the artwork you want to draw from its base layer to create a project with multiple line types.
For this example, I’m going to make some bookmarks from single layer cut files. I want to cut the bases but draw or deboss the artwork.
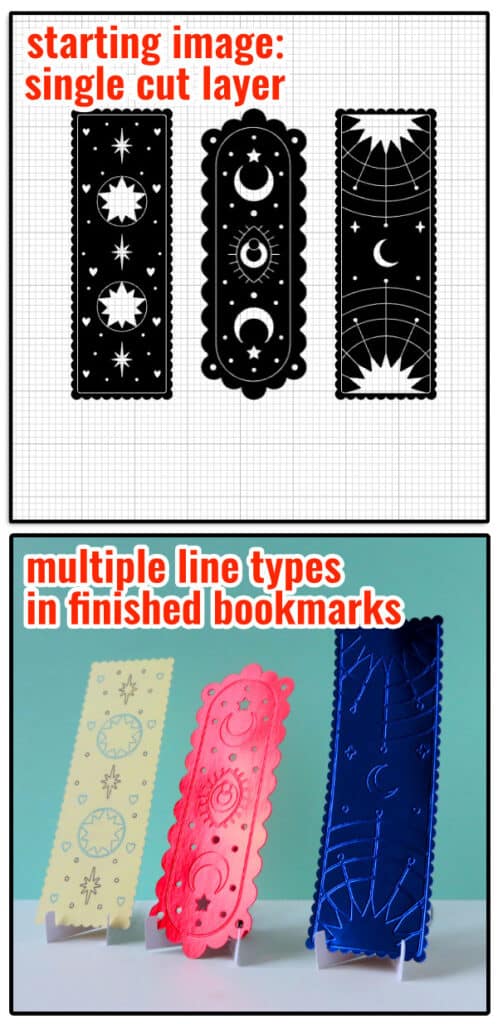
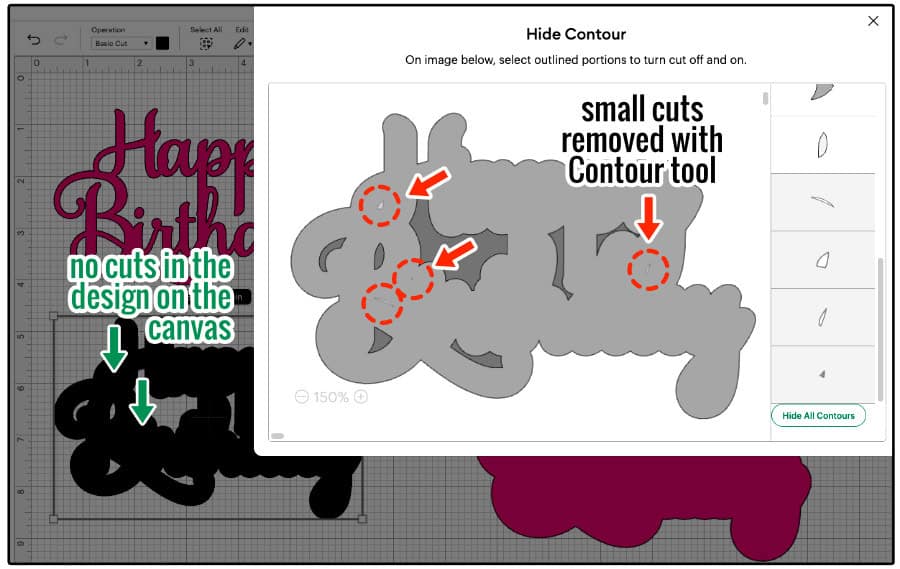
First, I duplicate the image, and Hide All Contours on the first copy to create the base layer. Then for the second copy, I just hide the outermost cut (at the top of the right-hand list).

Change the Operation to Draw (and choose pen/foil/deboss/etc.) for the artwork layer. Center and Attach the 2 layers, and you have your finished project!

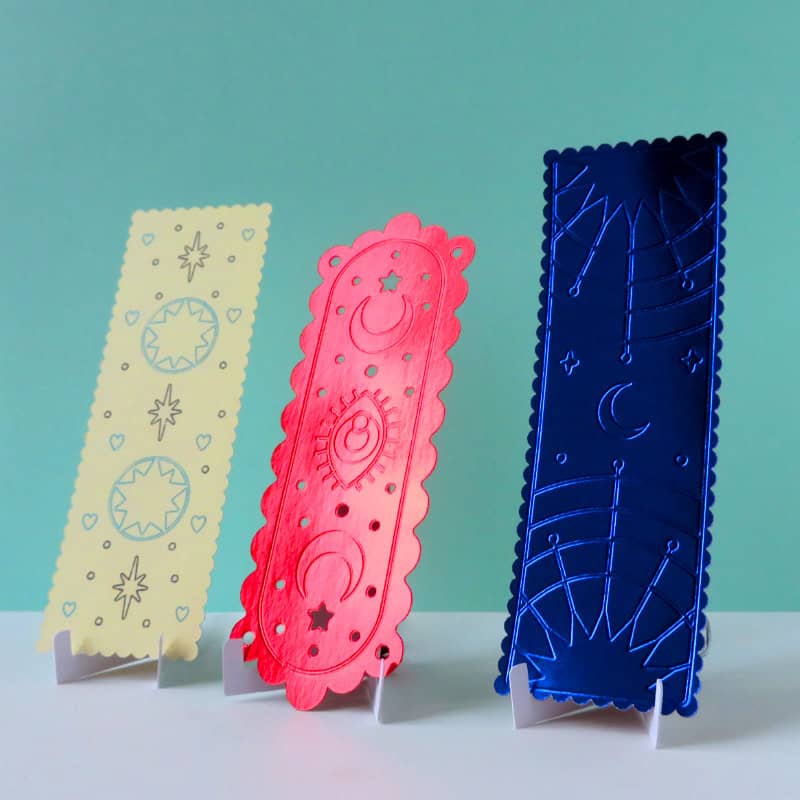
To add different colors, duplicate the Draw layer and hide all the draw lines except the ones you want for each color. Each color gets its own layer, just like making a multi-layer cut file.
In my example, I debossed the blue foil bookmark. For the red foil bookmark I kept some internal cut lines (dots and stars) as part of the base layer, and I also debossed those cuts so they would have a beveled edge. For the cream bookmark, I created 2 color pen layers (black & turquoise).
Keep reading (and learning) about Design Space tips
I hope you found this spotlight on the Contour tool helpful! Do you have any favorite tips I missed? Let me know in the comments! For more about using Contour to layer images, or using Contour’s best buddy Offset, check out our other articles: