
This tutorial is part of the advanced techniques section of the Mastering Cricut Design Space learning hub.
I’m sharing a simple but really helpful trick for getting close-to-perfect placement of your cardstock layers.
A reader recently asked how she could get better results aligning and assembling her cardstock layers despite having a hand tremor (thanks for the question, Jill!). My own mom has hand tremors which make handcrafting very challenging, so this is an important topic for me personally.
In this tutorial, I’ll show you how to use score lines or drawn outlines in Cricut Design Space to take the guesswork out of assembly. Using guidelines won’t steady your hands, but it provides a visual bullseye to place our layers, taking the guesswork out of alignment and spacing.
Creating guidelines for cardstock placement: overview
Basic steps:
- Duplicate the layer(s) you want to outline
- Go to Operation and select Score (or Draw > Pen)
- Position the duplicate layer overtop of the base layer
- Select the score lines and base and Attach
- Click Make, and now you’ve got your outline to guide you
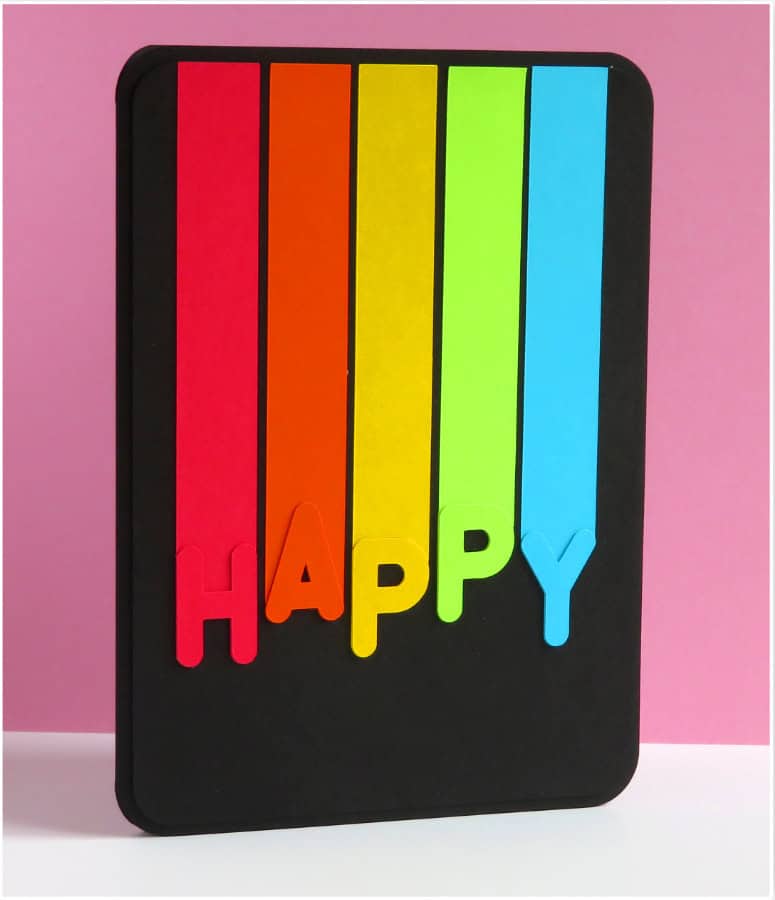
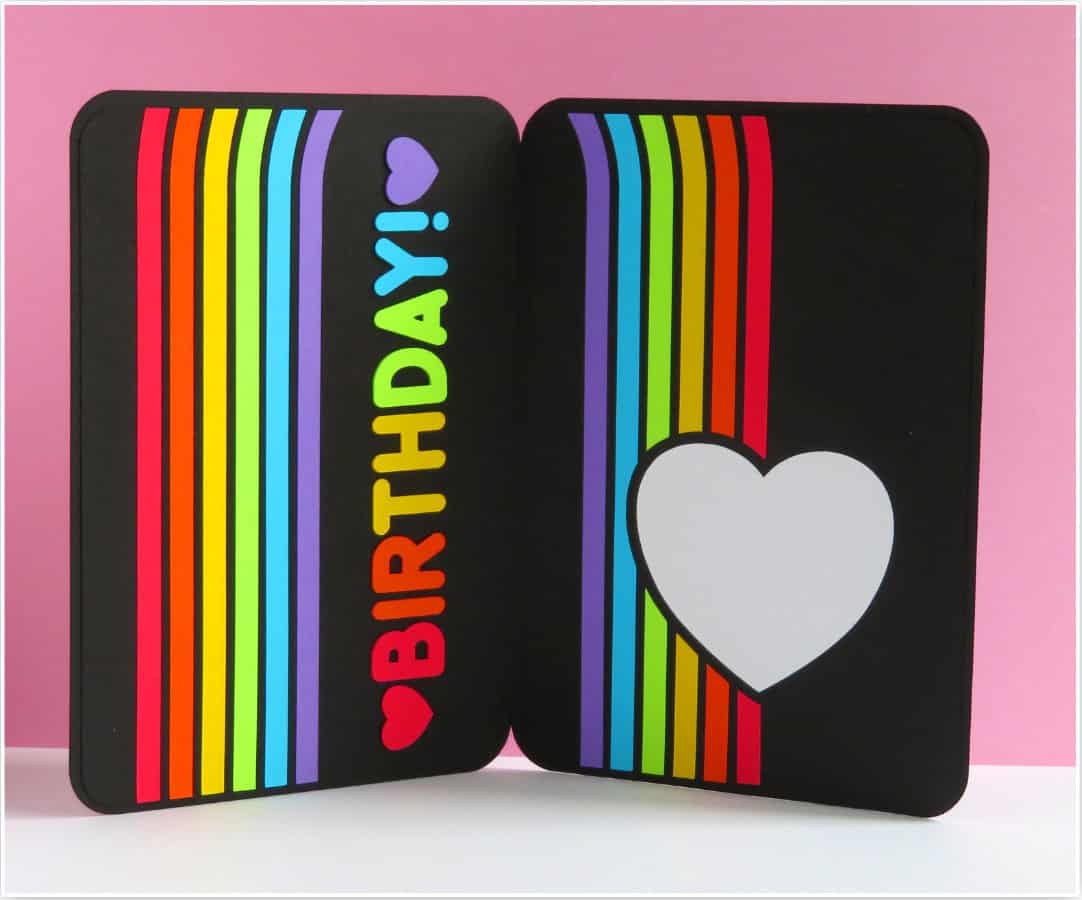
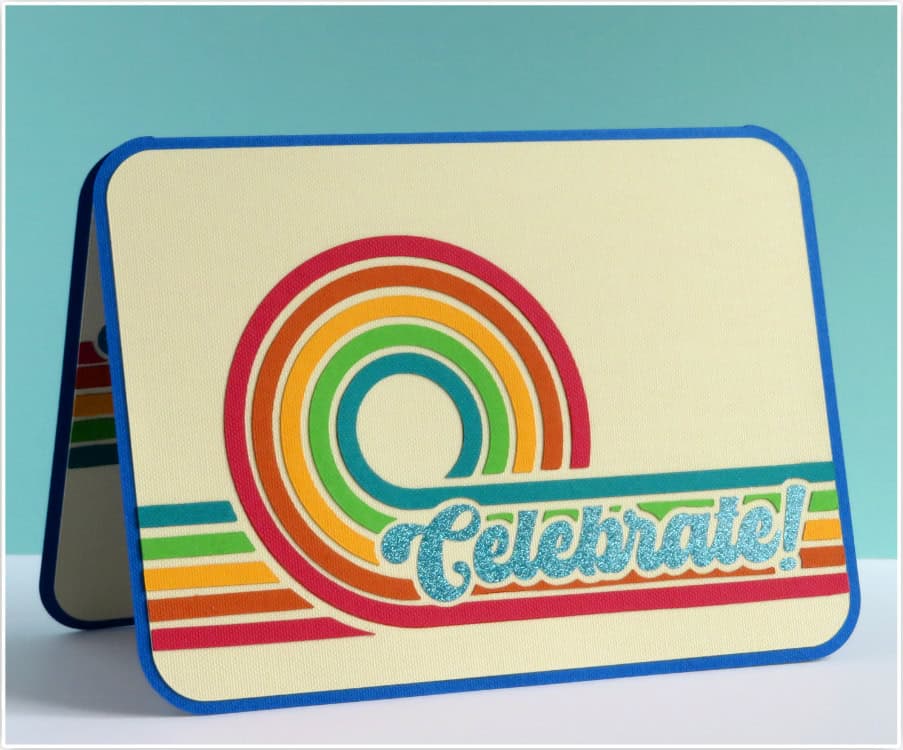
I’ll be demonstrating this technique (for both score lines and pen lines) using 2 different birthday card designs that you can get for free from our site. Both these cards have text and stripes that make them difficult to assemble without some kind of guide – it’s tricky to maintain the spacing!
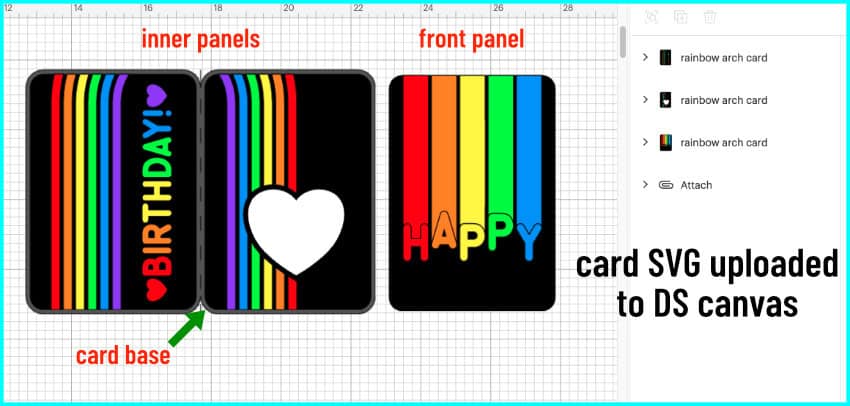
Using our rainbow/retro birthday card SVGs
- Get the file from our Resource library
- Open Design Space, open up a blank canvas and click Upload
- Click Upload Image, then browse or drag and drop the downloaded file; follow the prompts to the Image Details screen then click Upload to add to the canvas
- The file comes in as a group, so select the whole thing and Ungroup
- Inside the main group are 3 subgroups: the card base, the front panel, and the inner panel
- In the card base group, and change the middle line to a score line and Attach to the card base
- Now you’re ready to add guidelines to the panels by following the tutorial
Using score lines as a guide
First, I’ll show you how to create score lines to guide layer placement. We demonstrated this technique for our eclipse card tutorial, but it’s helpful for all kinds of projects.
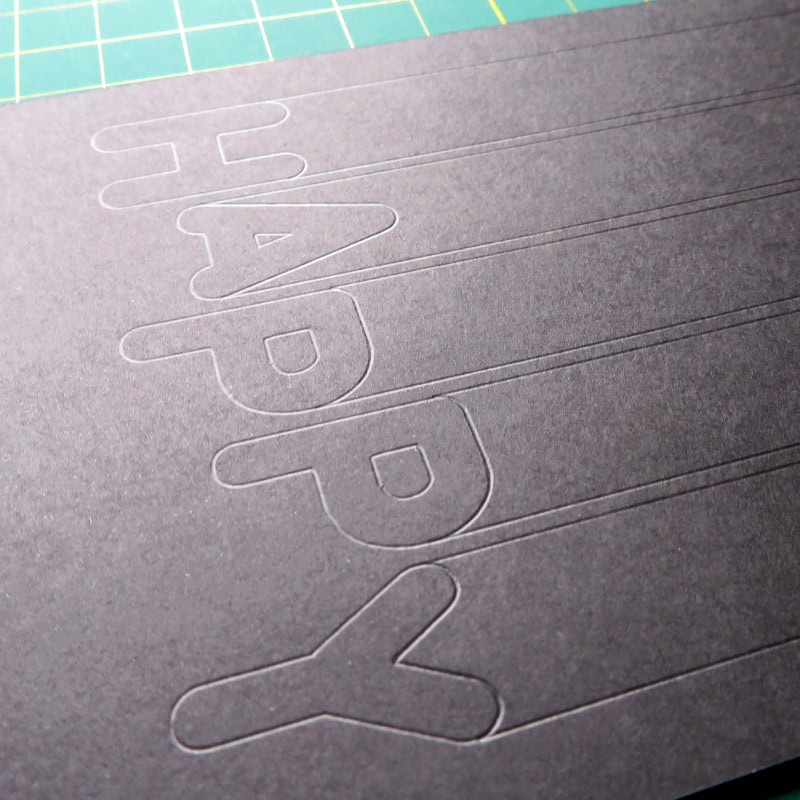
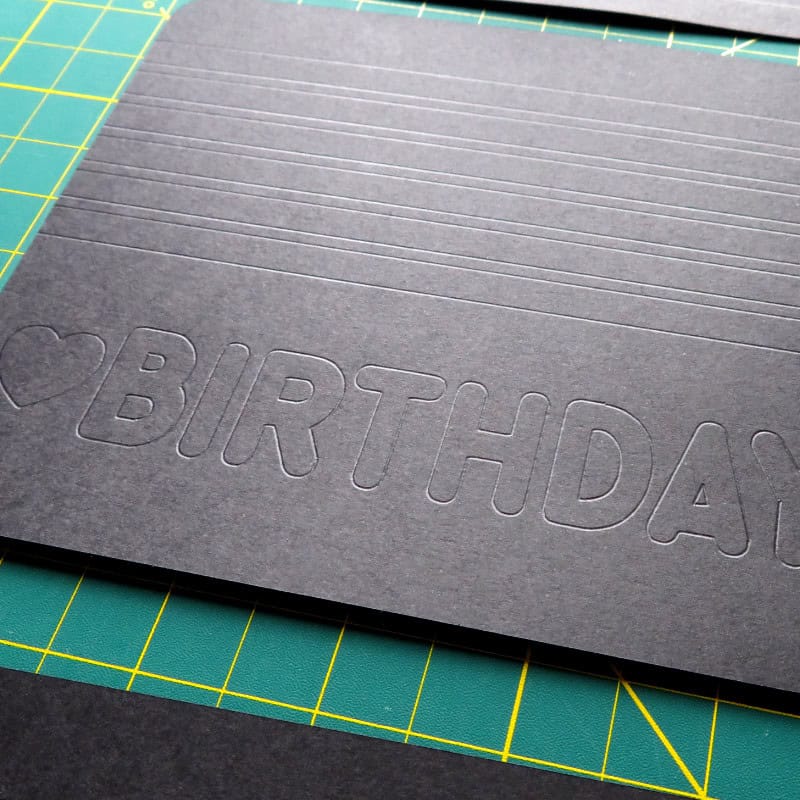
I’ll be using this rainbow birthday card design on a black background as my example. Score lines are great for using on dark or patterned cardstock when pen won’t be practical.
The design consists of a card base with attached middle score line and 3 panels (front and 2 inside). Each panel is its own group. I’m going to score guidelines on each panel to show where I need to place my text and all the rainbow elements.
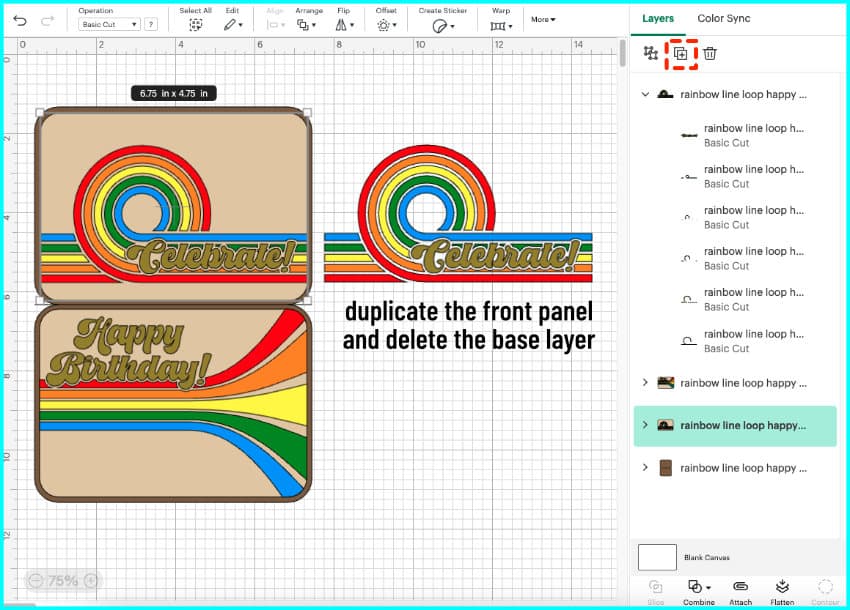
First, I need to duplicate everything I want to create guidelines for. Starting with the front panel, I click on the panel to select the whole group, then I click on the Duplicate icon.
I only need one base panel for the front, so I select the duplicated group, click the Ungroup icon, and delete the extra base panel.
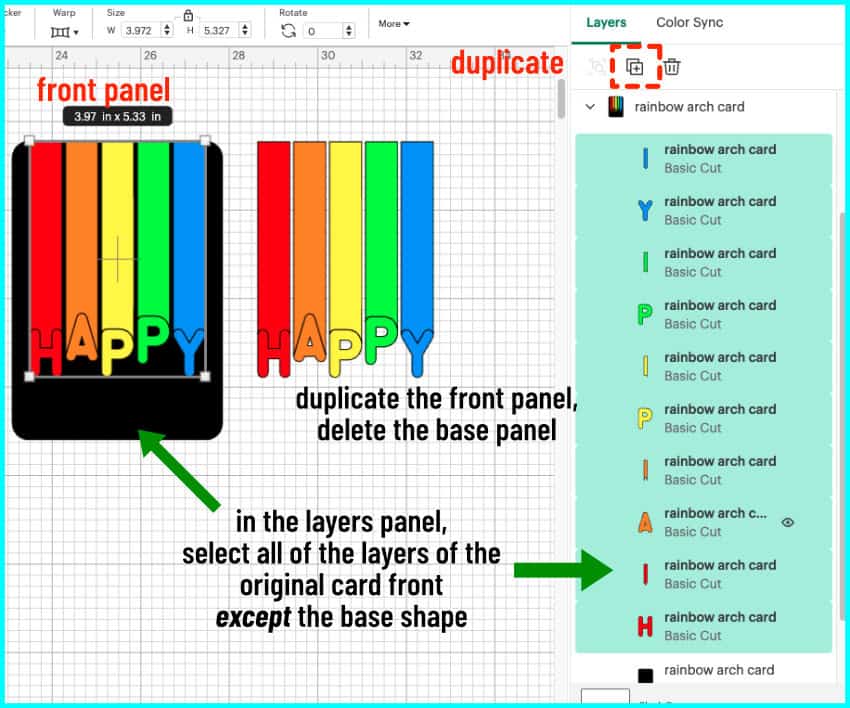
I’m going to keep my original panel grouped to keep everything in alignment. I’m going to select all the lettering and stripes for my scored outline. So I click the arrow to open the group in the Layers panel, then hold the shift key and click to choose everything but the base panel.
Next, I open the Operation menu and select Score. Going back to the layers panel, I click the main group so that all the score lines and background panel are selected then click Attach.
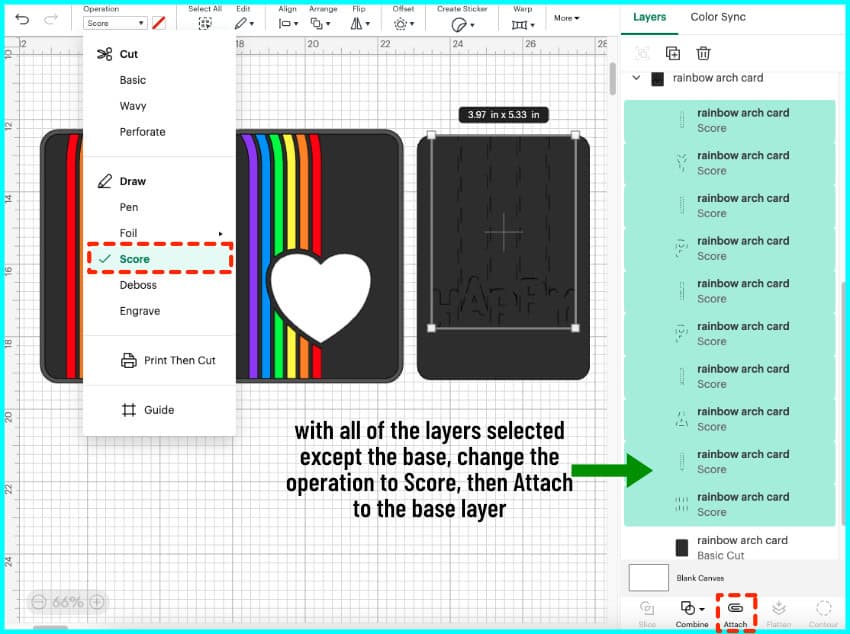
I’m going to repeat this process with my other 2 panels. So, I duplicate, delete the extra base panel, then select all the lettering and rainbow pieces and switch the operation to score. I select the whole group and attach.
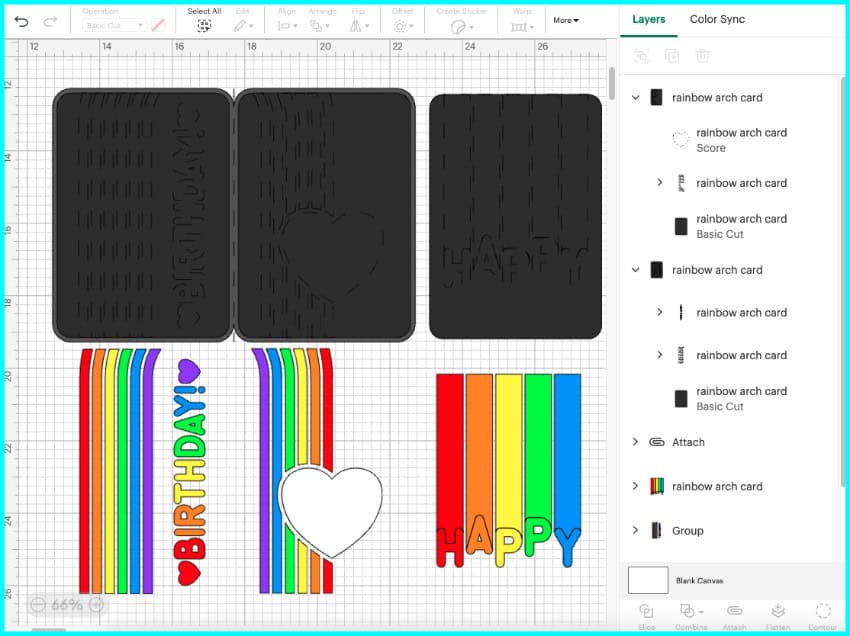
So now all my panels have score lines and are ready to Make!
(Need a bit of extra help? Read our tutorial explaining how to use the Design Space Attach tool.)
I’m cutting everything out of 65 lb cardstock and just using my Scoring Stylus to mark my guidelines. If you have trouble seeing score lines, the second part of this tutorial where I draw guidelines on lighter cardstock may be better for you.
Assembling using score lines
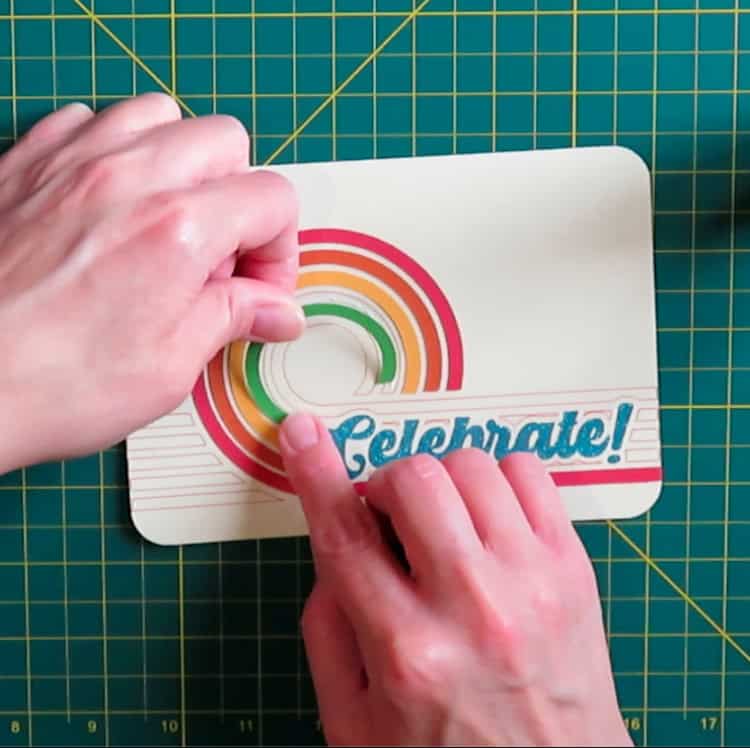
So now I have everything cut, you can see my base panels have these score lines on them to act as a template to guide me in my placement. This is especially useful to keep pieces spaced evenly and keep cardstock letters straight.
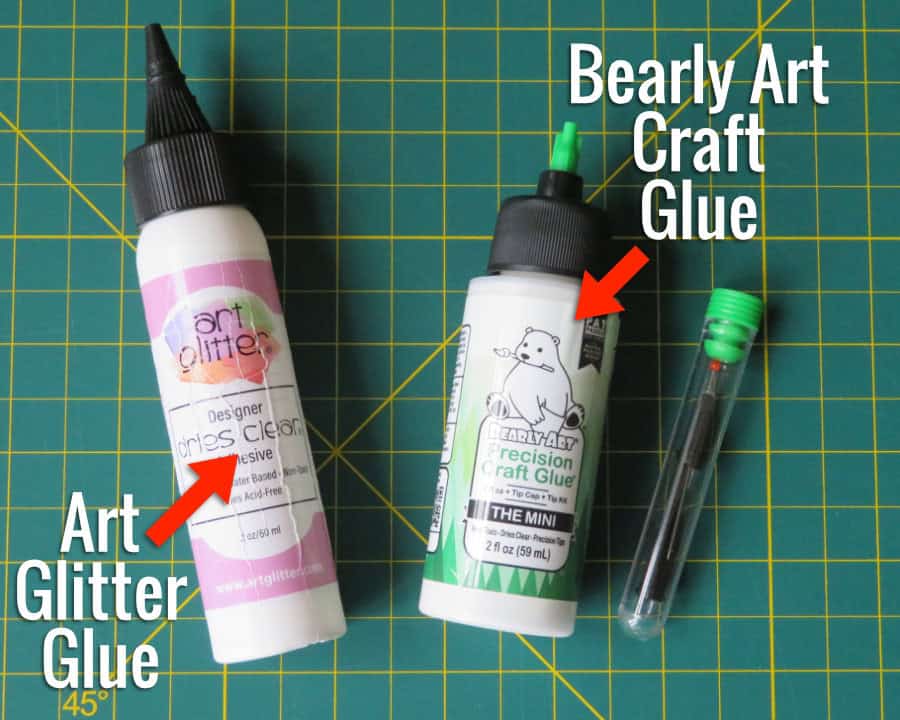
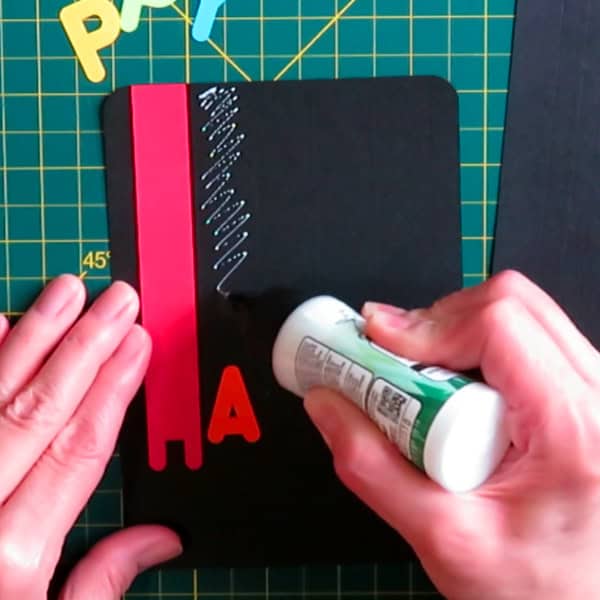
If you have shaky hands, arthritis, or just like to be more precise, you’ll find that glue is better to use than tape runner for placement because it gives you a little more leeway to move pieces around after you put them down. I’m using the Bearly glue with the metal tip for these cards.
I put glue on the base within my guidelines, then put the cardstock piece down and slide it into place.
All done! It takes so little time to assemble a card like this (with over 70 little cardstock letters and stripes!) when you use guidelines!
Using pen lines as a guide
The second way to create guidelines for placing your layers is to draw them instead of scoring. You can do this 2 ways:
- make a duplicate of your design and set the Operation to Draw
- make a small negative offset (inset) of your design and set the Operation to Draw – this creates a smaller outline that won’t show around your design elements
Using a negative offset = better results
These 2 panels were drawn using a regular Cricut Fine Point pen, which is 0.4mm. The top panel was drawn directly from a duplicate, but the bottom panel was drawn using a very small negative offset.
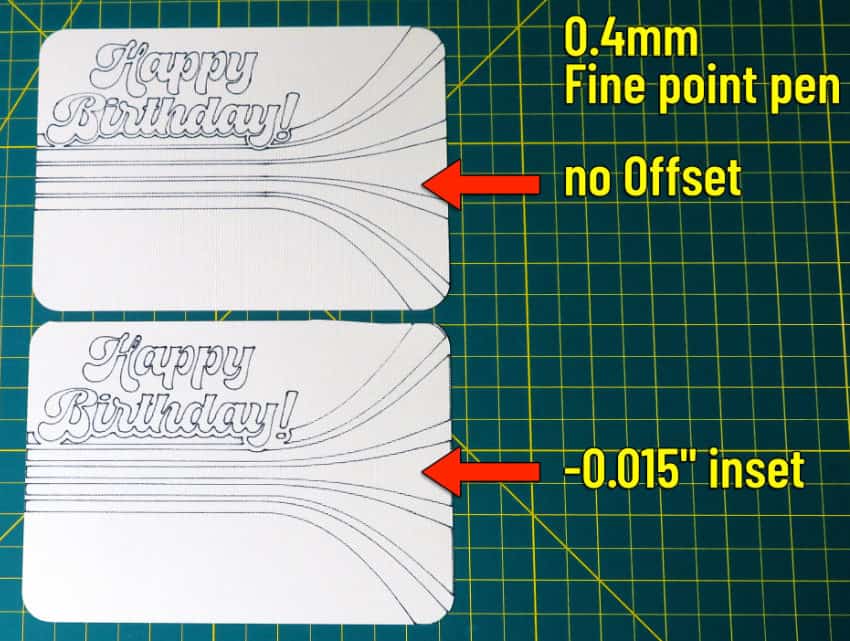
After completing the panels with cardstock, you can see the difference in the 2 different drawn guides. The panel that was drawn directly shows a faint ink line around each design element. The panel with an inset guideline doesn’t have the same problem.
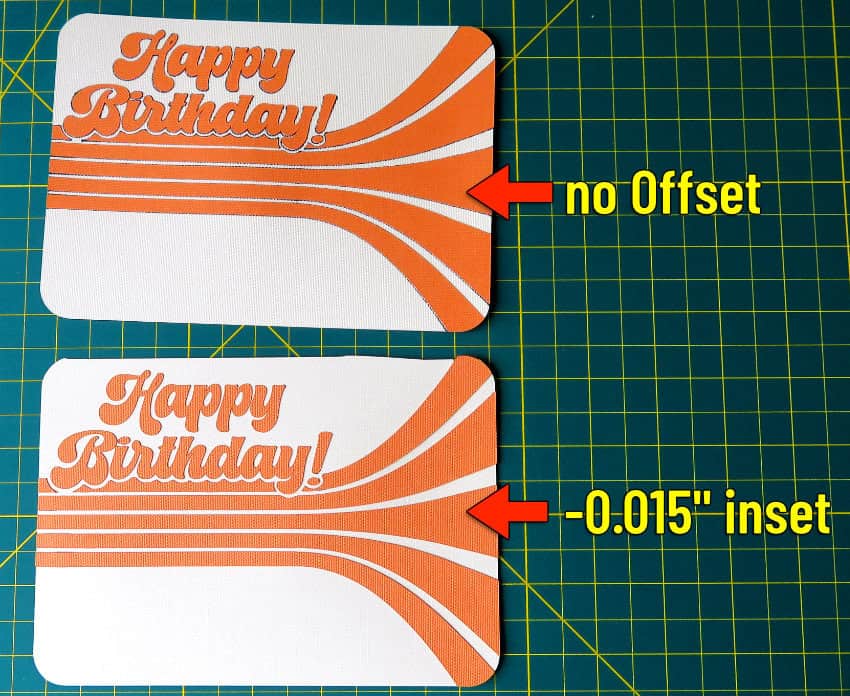
For my card, I’m going to draw an inset and I’m also going to use an Extra Fine Point (0.3mm) pen to draw those guidelines, because I don’t want any ink showing around my design.
Creating a pen guideline
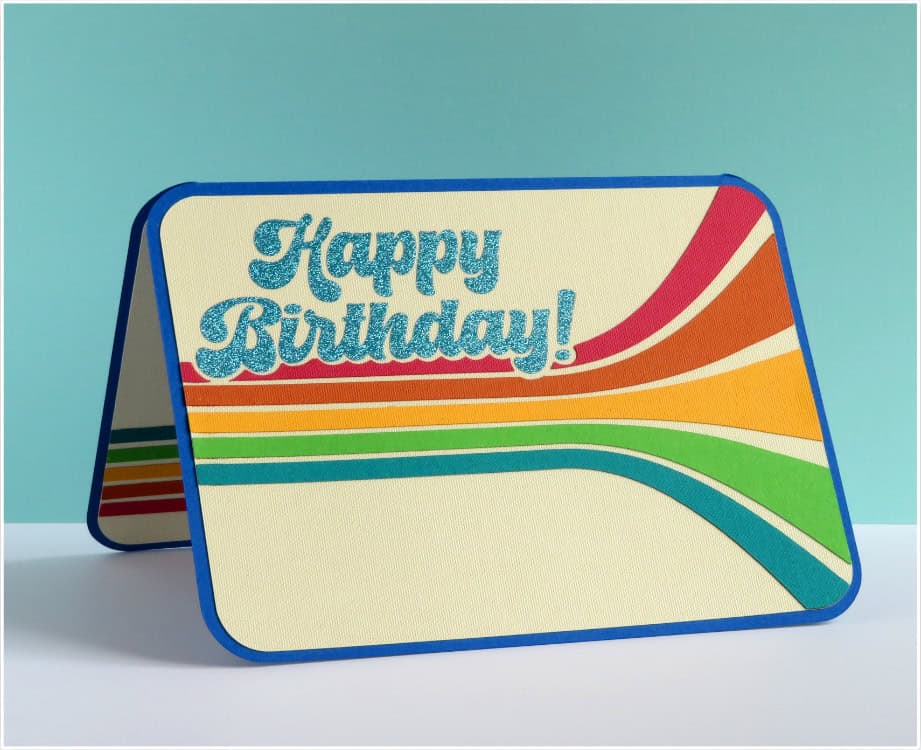
I’m going to create a drawn guide for the layers of this retro roller rink birthday card. The pen will show up nicely on the cream cardstock I’m using for the base panels.
The panels for this card are grouped, like the rainbow card SVG. I’m going to select the front panel and click duplicate, then delete the base panel from the duplicated copy.
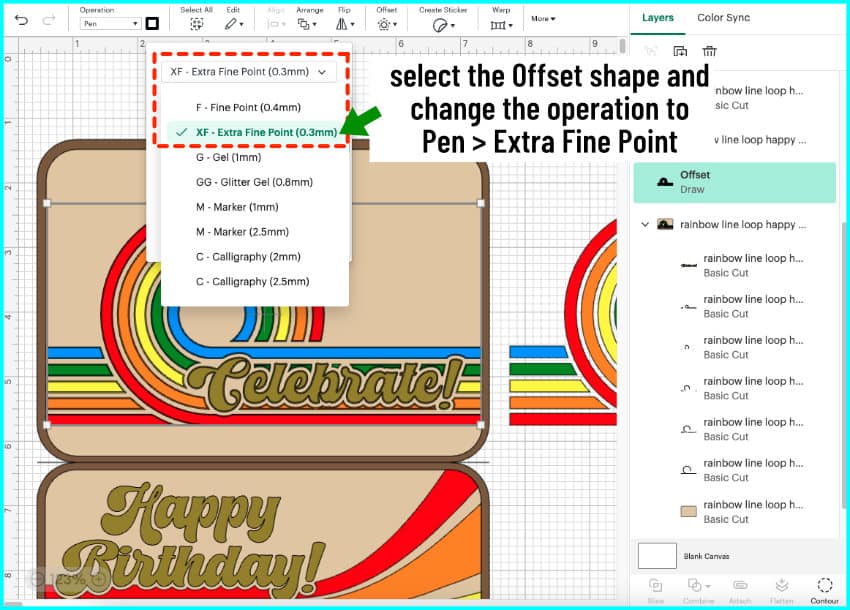
Now I’m going to zoom in on my front panel, go to the Layers panel, and select all the design elements except the base.
Next, I open the Offset tool and I’m going to set a very tiny offset of -0.015” and click Apply.

With the offset selected, I open the Operation menu and click Draw > Pen. I click on the box next to the Operation menu and choose XF – Extra Fine Point (0.3mm) from the pulldown menu, then select the color I’m using (Burnt Orange).
You can color match your pen to the design if you like, but I’m keeping it simple with one color, using a pen I have that isn’t too dark.
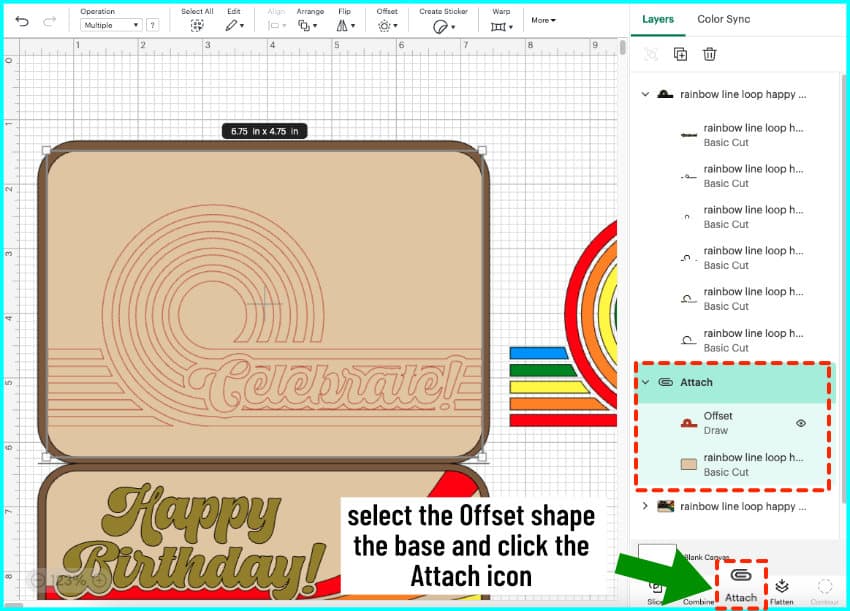
Now I’m going to ungroup that panel, and delete everything except my new offset and the base panel. Now I select the offset and base panel, and click Attach.
I’m going to repeat the process for the inner panel. I select the panel, click duplicate, and delete the base panel from the copy. I select the original group, click everything but the base panel, then open the Offset tool and set my offset to -0.015”. You’ll notice that the offset tool will already be preset with your last value.
I change the operation for the offset to Draw, then I go to the Layers panel, ungroup, and delete everything except the base panel and offset, and then I select those and Attach.

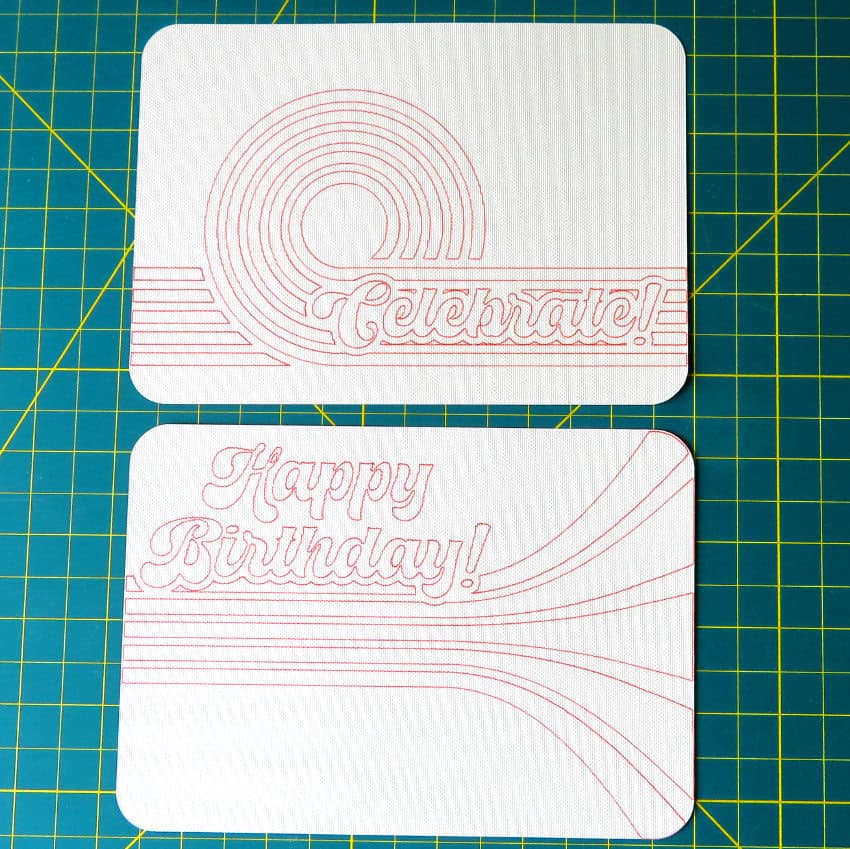
Now it’s ready to Make!
I’m using 80lb textured Cricut cardstock for everything except the lettering, which will be cut from Siser EasyPSV Glitter in Aqua.
Assembling using pen lines
If you have low vision like me, you may find a drawn guideline to be way easier than scoring.
For doing designs like the rainbow loop de loop, I love being able to just slot my pieces in and they have the correct spacing, it really takes all the guesswork out of placement.
Again, the inset gets completely covered by my cardstock pieces. It makes assembly a lot faster as well.
Before you go…
Scored or drawn guidelines can make it easier for all of us to assemble our cards. No need to carefully align or measure anything while you’re assembling! But as my mom always tells me, sometimes you just have to embrace chaos and expect imperfection. Your challenges are part of who you are, and they influence the personal stamp you put on your work, which is the whole point of handmade, isn’t it?
I’d love to hear from you, especially if you have a disability that makes projects a challenge and would like to share your tips for making crafting easier. Leave us a comment below!
Before you go, you might want to check out some other Design Space tips and tutorials:

