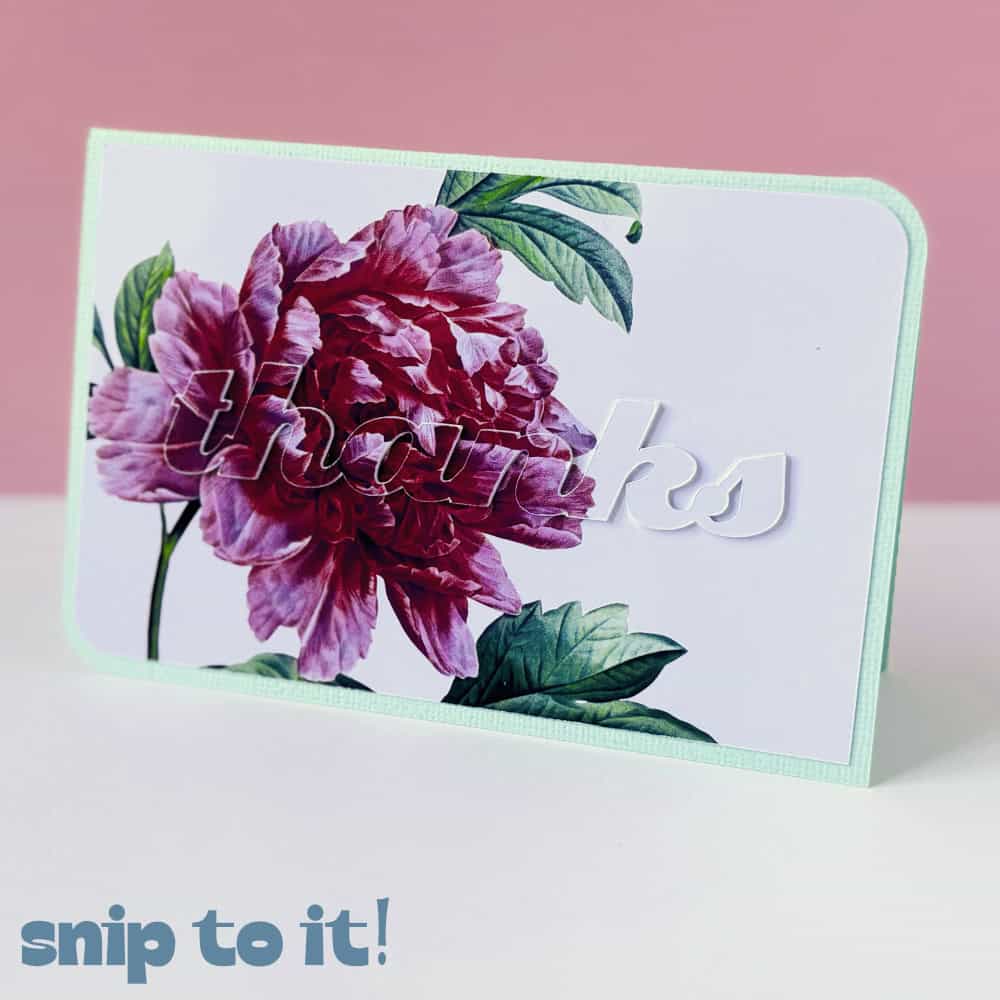
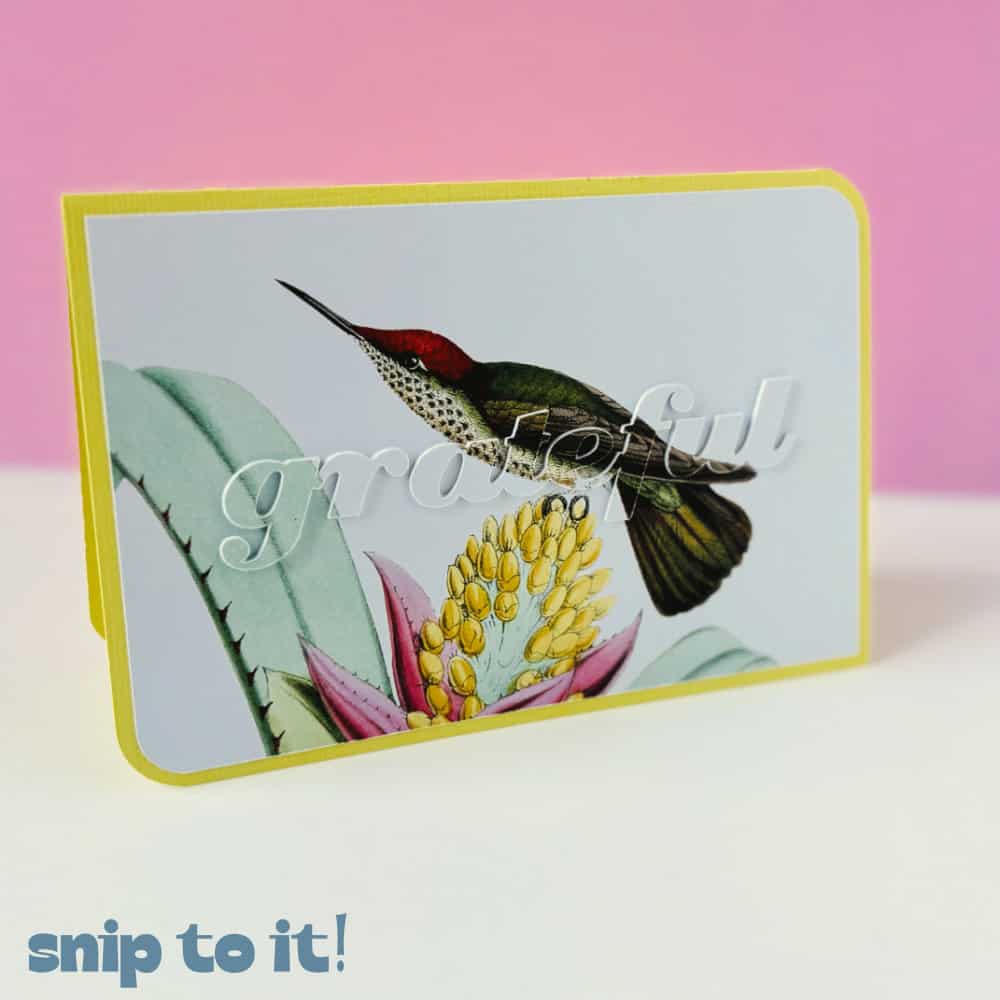
Eclipse cards are easy to make but always impressive. Just a printed base panel, some spacers, and matching printed text layered on top creates simple elegance perfect for all kinds of occasions. I’ll be making some lovely thank you cards for this tutorial.
After our last eclipse card tutorial, we had people telling us that they ran into a problem when making them in Design Space. When they created their front panel by flattening an image with a shape, they couldn’t Slice out the text. This is because Flatten turns multiple layers into a single printable image that can’t be sliced.
I’m going to show you 2 ways to solve this problem and easily create eclipse cards with any images you like:
Video: Cricut Eclipse Cards When Slice Doesn’t Work
Upload or create your card base + panel(s)
First, I’m going to upload my card base and panel, sized for a 4×6″ card. You can download this file from our Resource Library, just look for “4×6 squircle card base” under the “Image files” heading.
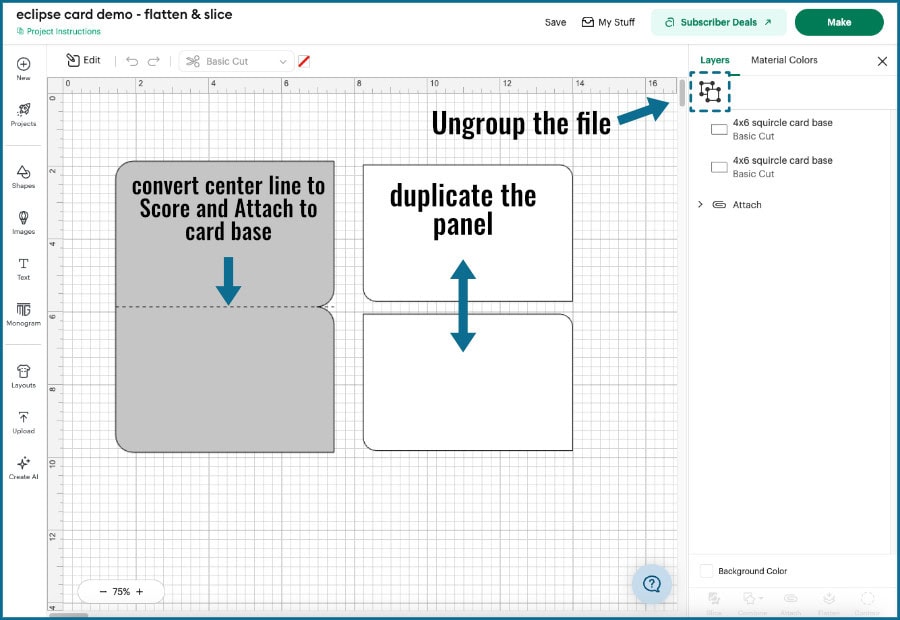
After uploading, ungroup the base + panel. I’m going to duplicate the panel so I have one for the front and one for the inside sentiment.
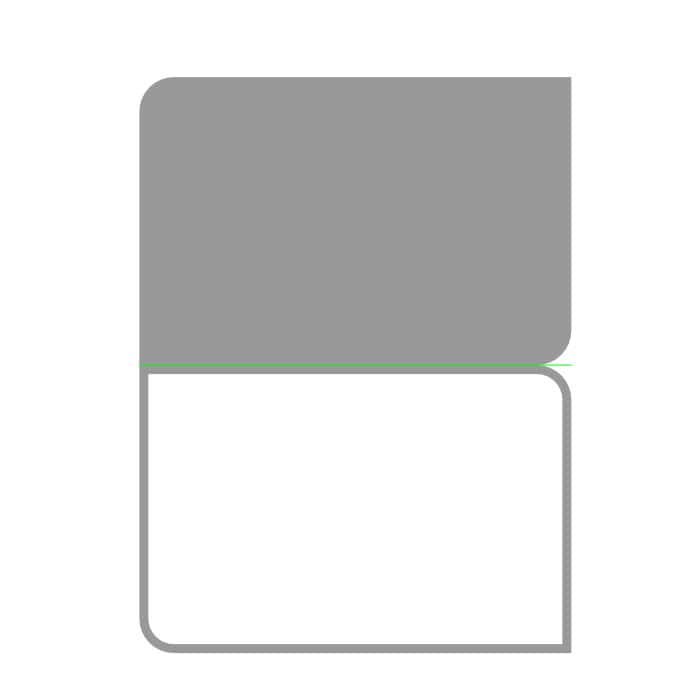
To get the card base ready-to-make, change the center cut line to a score line and Attach it to the base.
If you prefer, you can search for a card base in the Design Space image library, or create a base using a rectangle and score line from the Shapes menu. Just resize the rectangle to 6″w x 8″h, align the score line along the center, then select them both and Attach. You can create panels for the front and inside by selecting a rectangle from the shapes menu and resizing (I’d make the panel 5.75″ x 3.75″).
Upload your images (optional)
Any image can work for eclipse cards, but I prefer to use watercolors, ethereal photos, or delicate illustrations. You can use Cricut images or upload your own. This time I’m using vintage-style illustrations of flowers and hummingbirds. I got all of these from Enliven Designs via Creative Fabrica:
- pink mountain peony
- English iris
- white-throated mountaingem
- rubrum lily
- tricolor plumeria
- green-backed firecrown
I’m going to use the peony as my example. If you need help, you can check out our tutorial on how to upload a PNG or JPG image to Design Space.
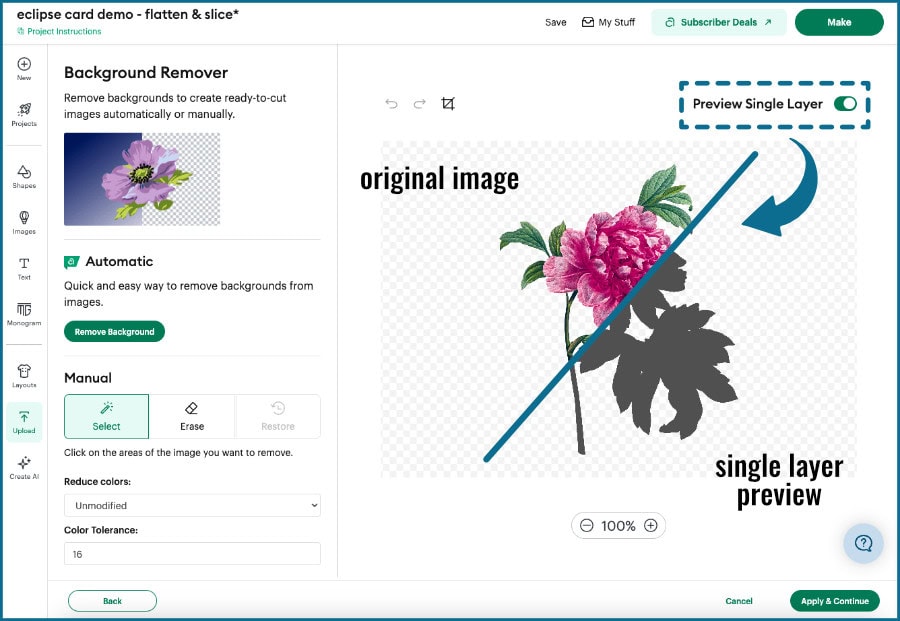
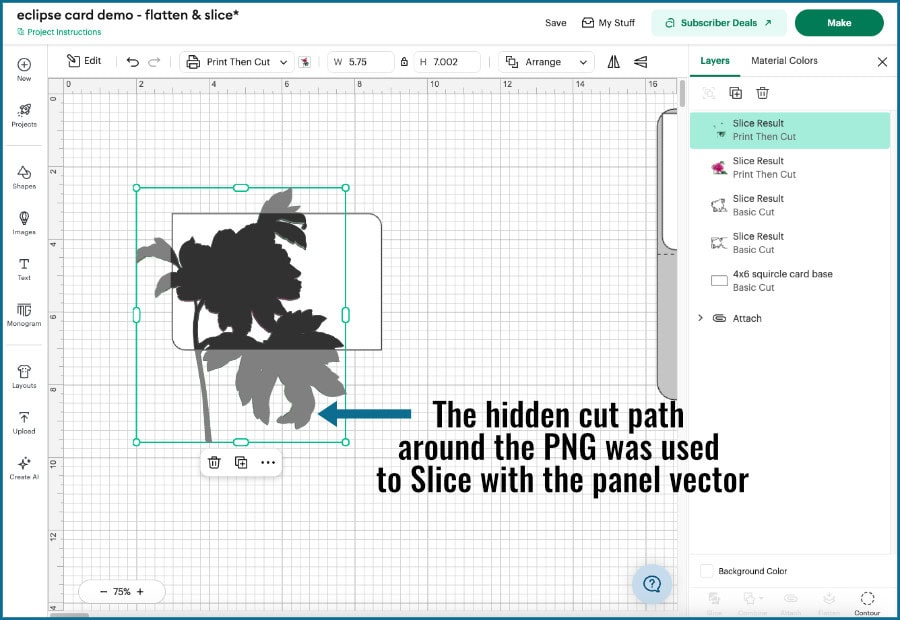
Keep this in mind for later: when we get to the Background Remover screen you can see that even though the image is a PNG with a transparent background, Design Space will still apply a trace around the image, creating a vector cut path. You can see this cut path when you toggle on “Preview Single Layer“; this is the vector component that Slice can work with, even though the image is a bitmap/Print Then Cut.
Once the uploads are complete, we’re ready to create our eclipse design!
1. Eclipse card design: Easy Method
Create your front panel image (Slice + Flatten)
Now I’m going to resize and arrange my peony image on the front panel for my card. Just use your own judgement as to what looks good, I’m going to use some asymmetry in my designs today.
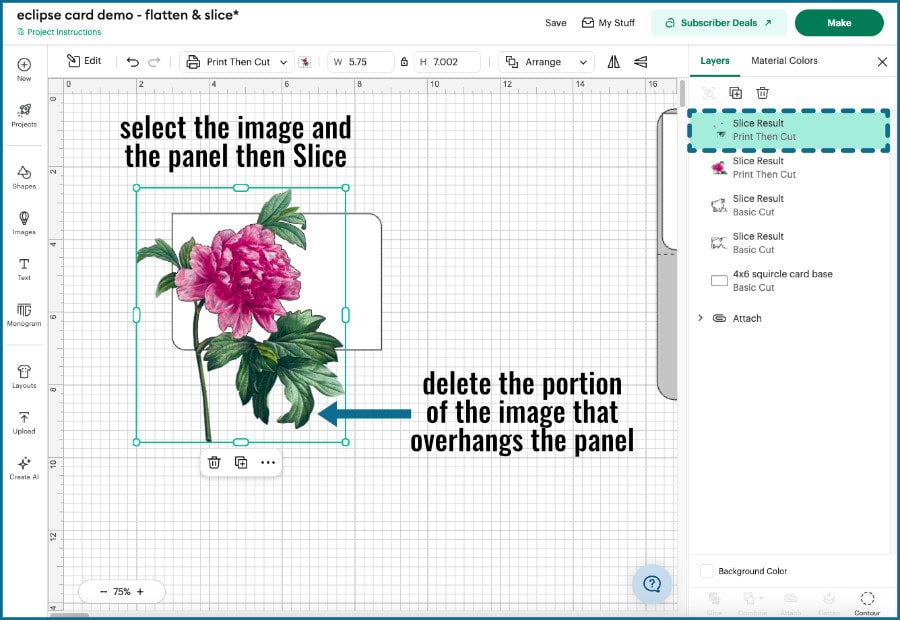
Once you’ve got your image placed where you want it, select the image and the panel shape and click Slice (either at the bottom of the Layers Panel or up in the Edit Bar).
[Remember when I uploaded the peony PNG, Design Space created a vector cut path as part of the background remover process? It’s that cut path that is being Sliced along with the panel shape, which is also a vector.]
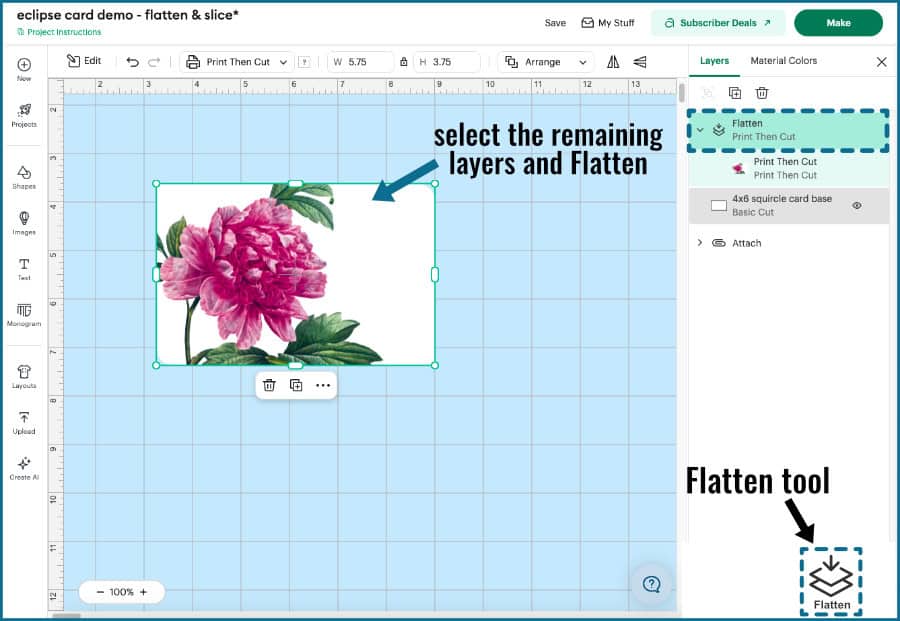
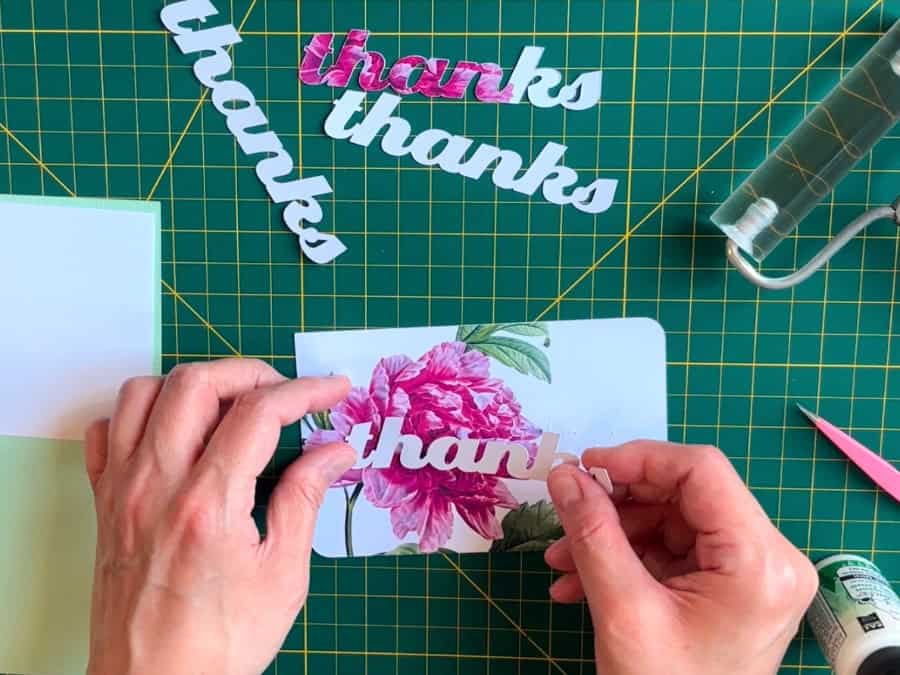
Select the overhanging piece of the Slice result, which is all the extraneous pieces of the image, and delete.
Now, select all the image and panel layers and click Flatten (in the Layers Panel or Edit Bar). At this point Design Space now sees this as a single printable image, not separate editable shapes.
Add your text
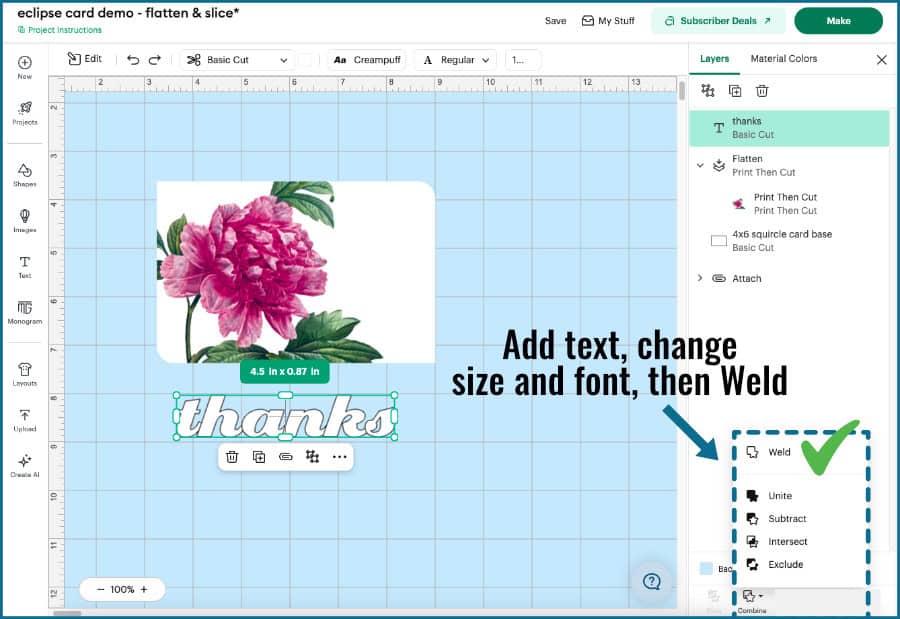
Add a text box from the Design Panel and type out your text. I’m going to use a simple “thanks”.
Next, choose your font. I want a script for this, so I’m going to choose Creampuff, which is a nice, thick, uniform typeface designed by one of my favorites, Nick Curtis (Nick’s Fonts). If you’d like something from the Cricut font library, Vala is a good cursive choice, and Cooper Black or Bodoni Poster are lovely thick serif fonts.
Resize your text to whatever looks good to you, but don’t make it too small to cut cleanly from cardstock.
Finally, I am going to Weld my text to merge all the letters into one shape.
Create your text spacers
I don’t use foam tape to raise my lettering, I use cardstock copies of the text. Foam tape is never thin enough to do a good job on raised text, plus it’s just easier and cheaper to cut however many copies I want from scraps. If you’re using medium cardstock (65-80lb), 3-5 copies is good for spacers. I’ll be using 3 layers of white 80lb Cricut cardstock.
Select the text and duplicate it however many times you want. Move the copies to the side.
Place the text & duplicate the whole panel
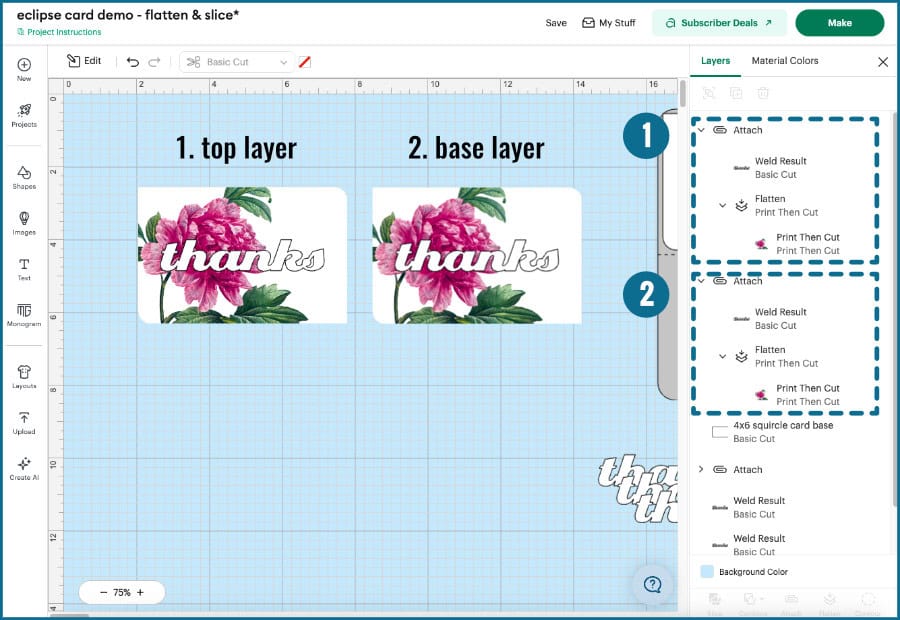
Now, place the text exactly where you want it on the image panel. Select the panel + text and click Attach.
Next, with the panel + text still selected, Duplicate the whole panel. I’m going to use one copy to create my top printed text, and the other copy will be a base panel with a scored guide for my text.
Create the top printed text: why can’t I Slice text out of the image panel?
We need to cut the text out of the image panel in order to create the top layer of printed text for the eclipse effect. If you select the panel + text, you will notice that the Slice tool is not available to cut the text from the image. Why?
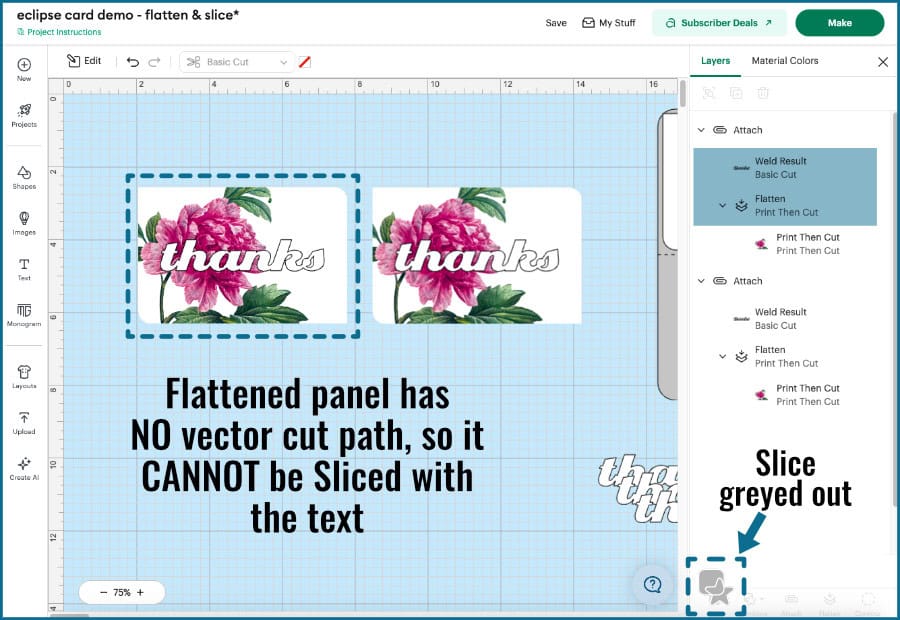
Slice can only work with 2 cuttable/vector layers. Previously, when I Sliced the peony PNG with the panel shape, Design Space was slicing the panel with the peony’s hidden cut path that was created when I uploaded the PNG.
Slice doesn’t work on Flattened images. Flatten turns all the selected layers into a single printable image instead of separate cuttable shapes. After using Flatten, Design Space no longer sees the peony image and the card panel as individual layers with editable cut paths, it just sees one printable image layer.
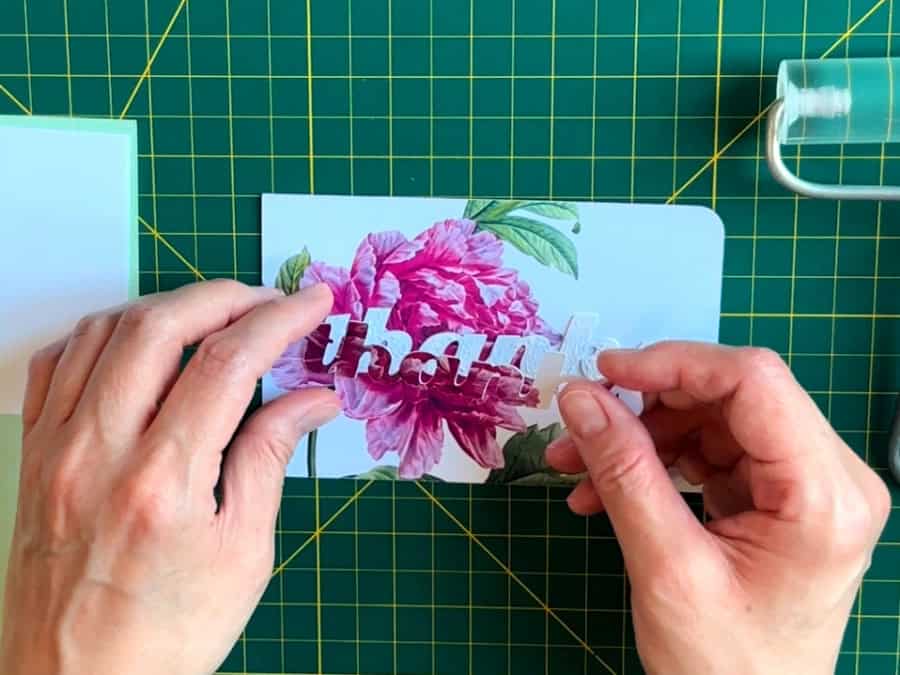
So, here’s the easy method: leave the second panel with Attached text as-is, with the text set to Basic Cut. That’s it – we’re going to print this then let the Cricut cut the lettering out, discarding the rest of the image panel.
Create the base placement panel
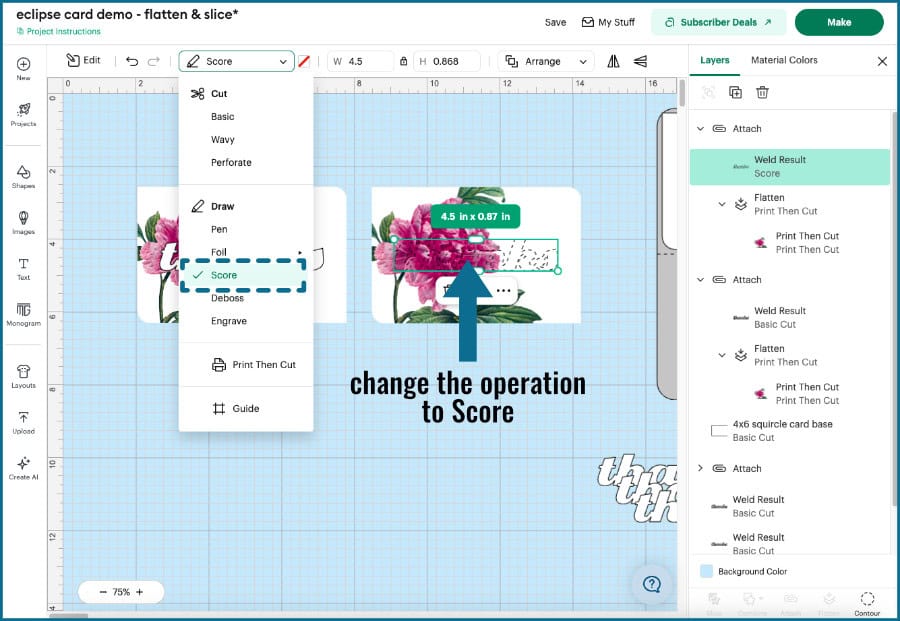
For the base panel, you’re going to create a score line guide for where to place your spacers/text.
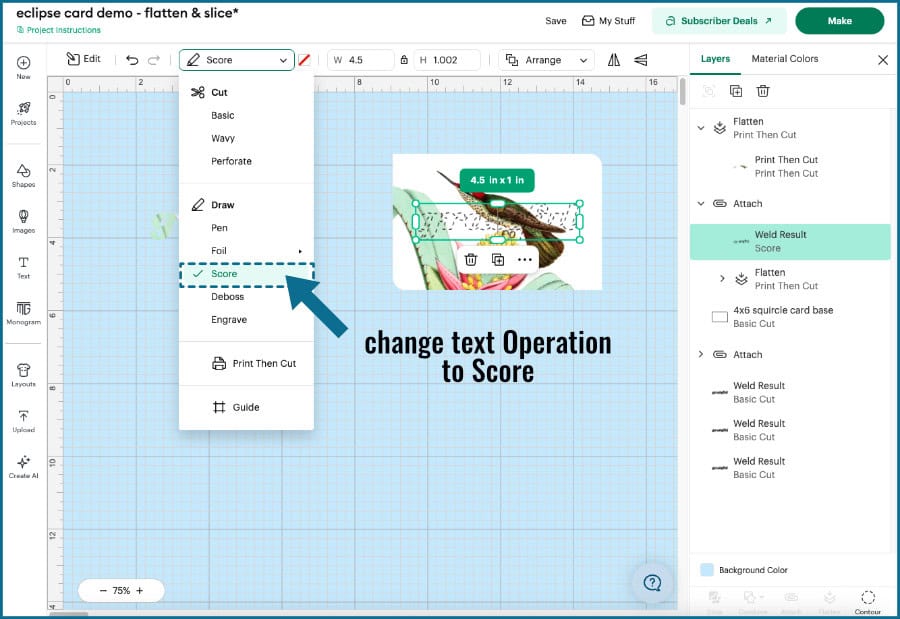
Go to the Layers Panel and select the text on one of the image panels and change the Operation to Score. Done!
Now we are ready to hit the Make button!
Print Then Cut/Score
Because the cards are 4×6″, both of the printed panels will fit on one 8.5×11″ sheet (that’s why I picked this card size).

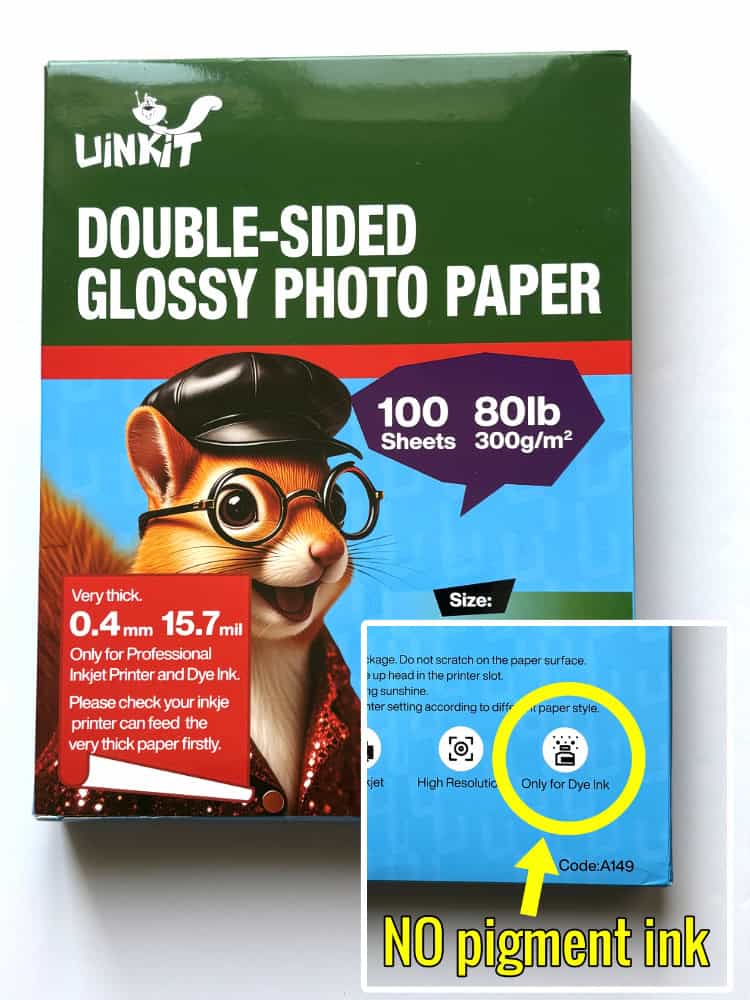
I’m printing all my images on this glossy 80lb cardstock, with my Epson ET-2800, but if you have a printer that uses pigment ink, make sure you use a matte or other compatible cardstock.
Once the printing is done, the text outline will be scored onto the base panel and then the panels (and top printed text) will be cut. I’m using the Scoring Stylus instead of the Scoring Wheel to do my scoring.
This particular cardstock needs to be cut on the Heavy Cardstock setting.
Cut the card base, panel, and spacers
Now I’m just going to cut the rest of the pieces for the card. I cut all of these on the Medium Cardstock cut setting.
- card base: Cricut 80lb pastel textured cardstock in green
- interior card panel: 65lb Astrobrights cardstock in white
- spacer text: 3 copies of 80lb Cricut white cardstock
Assemble the eclipse card
Assembly of these cards is super easy! Now I’ve got my card base, panels, and spacer text, and all I need is glue. I’ll be using Bearly Art glue to assemble most of my pieces, then dollar store tape runner to attach my panels to the card base. I use an acrylic brayer to roll over my pieces after gluing them down.
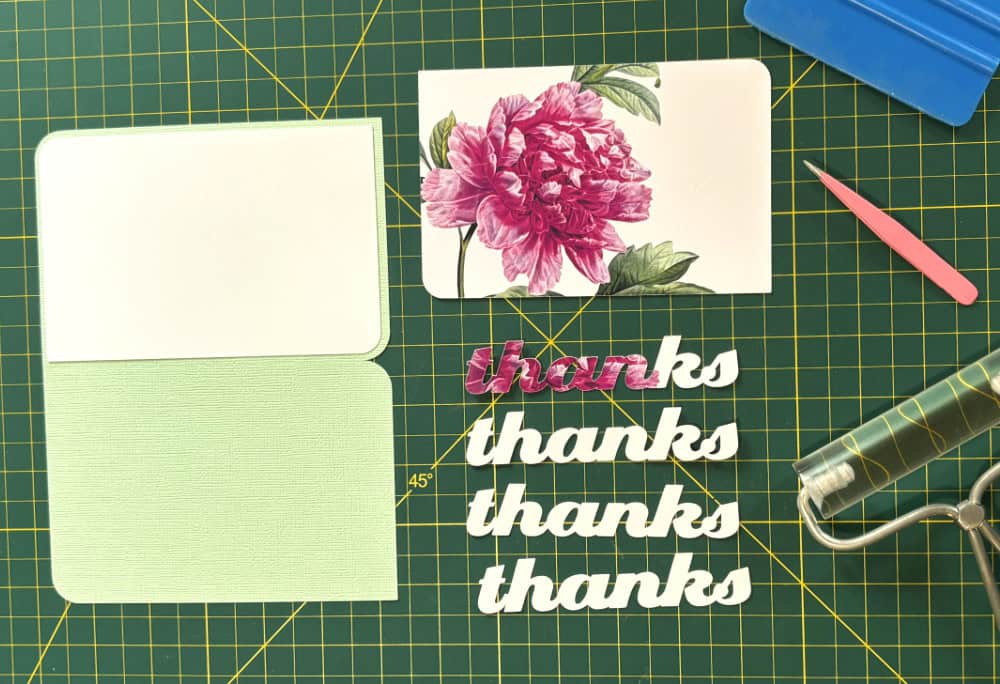
Start with front panel assembly. All you need to do is glue your first layer of spacer text to the printed base panel within the scored outline.
Then glue the rest of the spacers on top and the printed top text on top of those.
Attach the panels to the card base (I’m using tape runner for this) and that’s it.
2. Eclipse card design: Material-Saving Method
If you want to save materials, you can create the top printed text without having to print an entire second panel. If you use this method, you can make a larger card (e.g. 5×7″) and print the base panel and text on the same sheet.
Place your image + text
Begin by resizing and placing your image over the panel shape.
Add your text and resize it. Create 3-5 copies of the text to use as spacers and move them to the side.
Place the text where you want it on the panel. Select the text, image, and panel and Attach. Duplicate the whole thing.
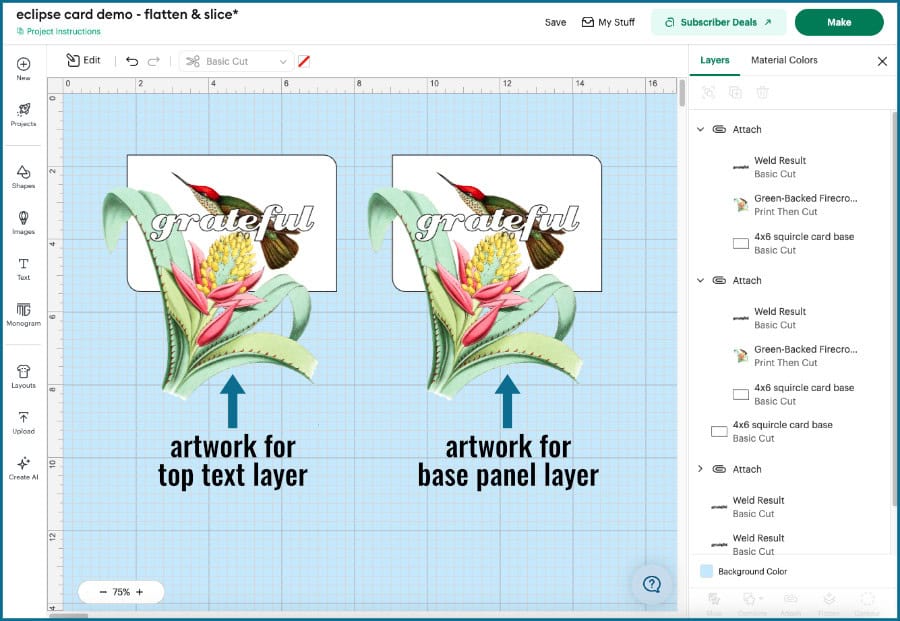
Create the top printed text
Working with the first copy of the Attach group, go to the Layers Panel and delete the base panel shape to get it out of the way.
Now, select the text + image layers and click Slice.
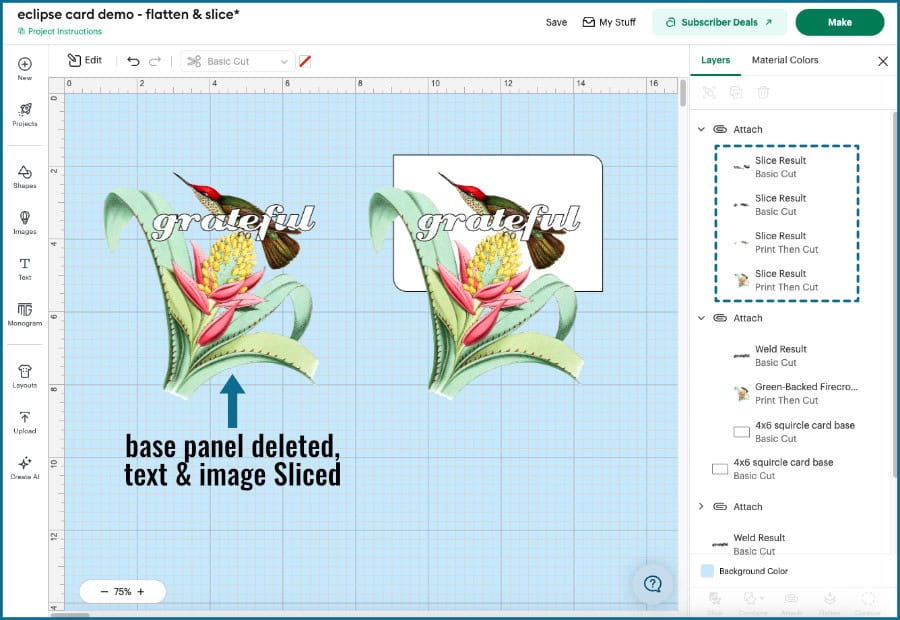
Delete the top piece of text, the one covering the image. Now you should see nothing but the printed text underneath plus the remaining white parts of the text.
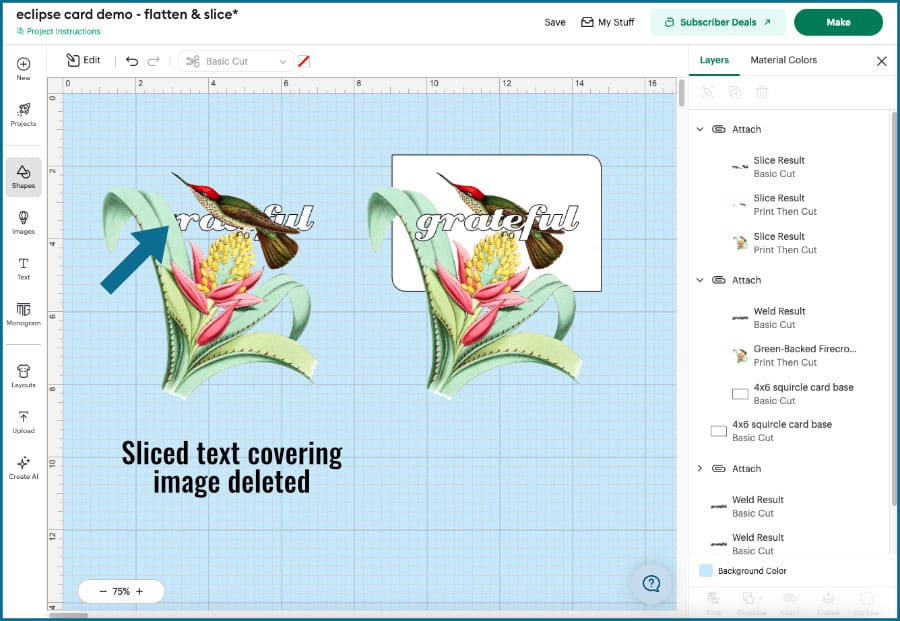
Delete the rest of the image that doesn’t overlap the text. You should now be left with pieces of text, printed and white.
Select all of the text (printed + white), and click Flatten.
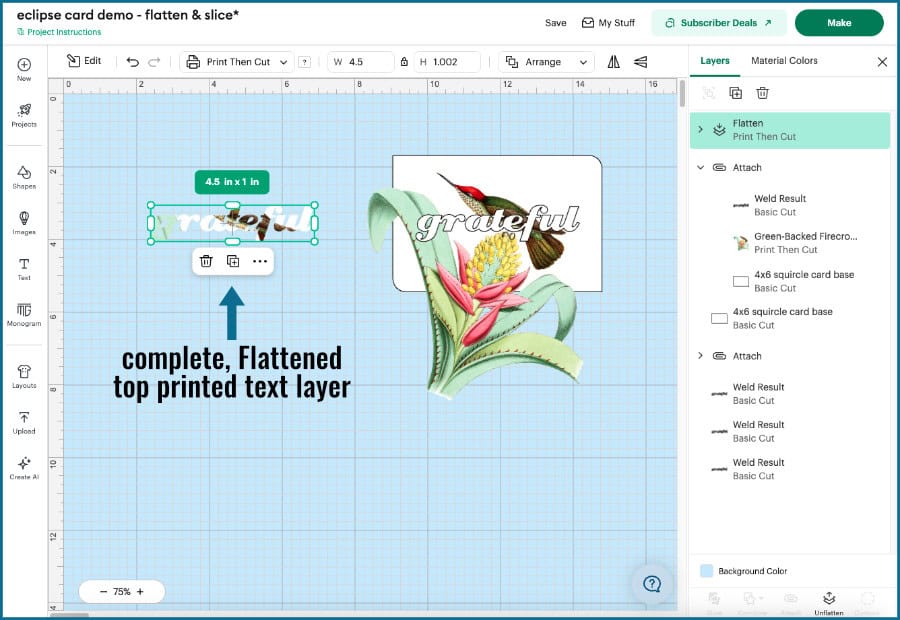
That’s it! Now I’ve got just the top printed text.
Create the base panel
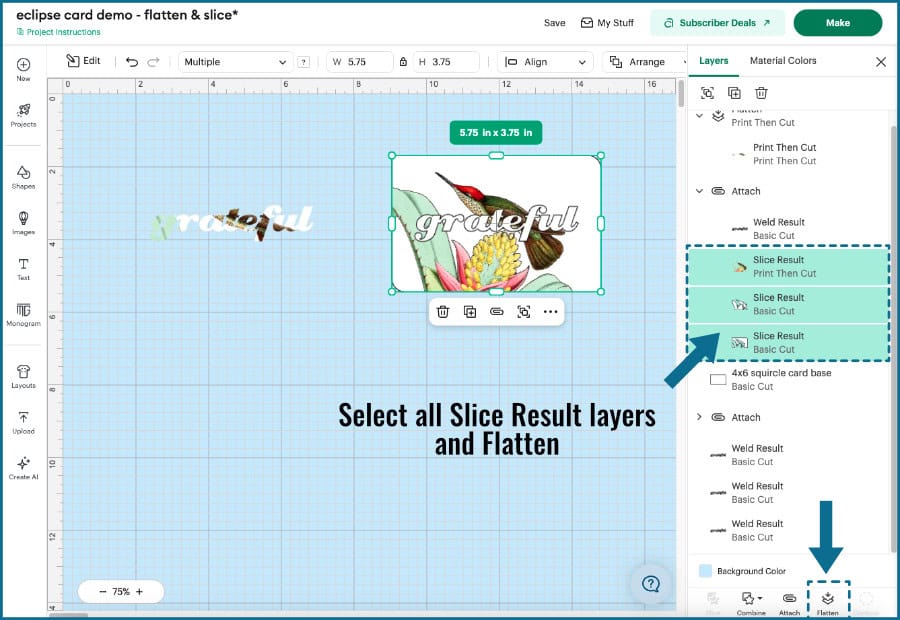
Go to the Layers Panel and select the image + base panel from the second copy of the Attach group (text/image/panel shape). Click Slice.
Select the extraneous image layer and delete.
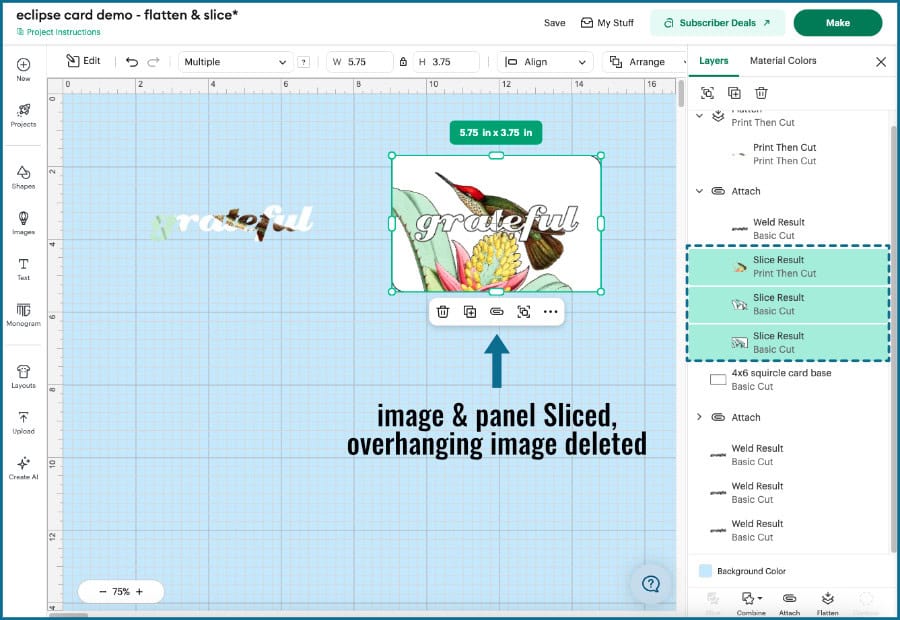
Select all the remaining Slice result layers (the image and panel pieces) and click Flatten.
Select the text layer and change the Operation to Score. Now you’ve finished the base placement panel!
Click Make!
Now all you have to do is print, score, and cut the rest of your pieces and assemble just like the easy method.
Don’t let anything stop you from trying eclipse cards!
If you want to try making one new type of card, I would make it an eclipse card!
Now you know:
- why Slice doesn’t work on Flattened images
- 2 different ways you can work around that to make eclipse cards
If you’re a beginner or want the simplest way, just Attach and let your Cricut cut out your text. If you want to try saving material, especially for larger cards, try the second method. But whatever you do, give it a try! I promise it is easier than you think to make these beautiful cards.
Want to try more projects using the tools of Design Space?
If you want to make the tools of the Canvas work for you and create some cool new projects, we have some tutorials you might like: