This tutorial is part of the advanced techniques section of the Mastering Cricut Design Space learning hub.
Do you want to make unique, sophisticated monograms that belong on a luxury spa robe or the most spectacular wedding invitations? I’m going to show you an advanced Design Space technique to create amazing monograms with intertwined letters.
Instead of overlapping, the letters of these monograms weave together seamlessly. And here’s the thing: all you need are the Slice and Contour tools!


This tutorial will walk you through creating intertwined wedding, 3-letter, and 2-letter monograms, step by step, using only Design Space.
Are you ready to supercharge your custom monograms? It’s way easier than you think, so let’s jump in!
Creating an intertwined monogram in Design Space
Creating intertwined letters in Design Space is easy, but it might take you a bit of practice before you get really comfortable with it. The steps are these:
- Type your text and select your fonts
- Slice + label the layers
- Use the Contour tool to hide specific parts of the top font to create an intertwined look
- Unite the layers
- Fix any internal cut lines
1. Choose your fonts & arrange the text
Start by choosing your fonts. I recommend pairing an elegant serif font with a fancy formal script, and I’ve done a bunch of sifting to find fonts that are perfect for this particular pairing.
All of these fonts are free (except for Wonder Bright).
Elegant fonts perfect for entwined monograms:


Arrange your letters
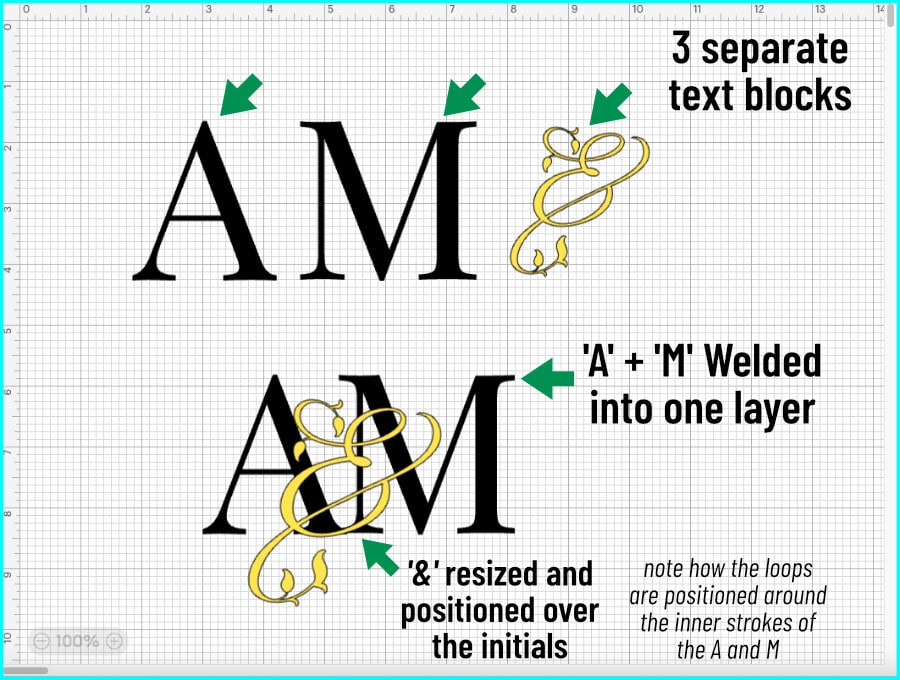
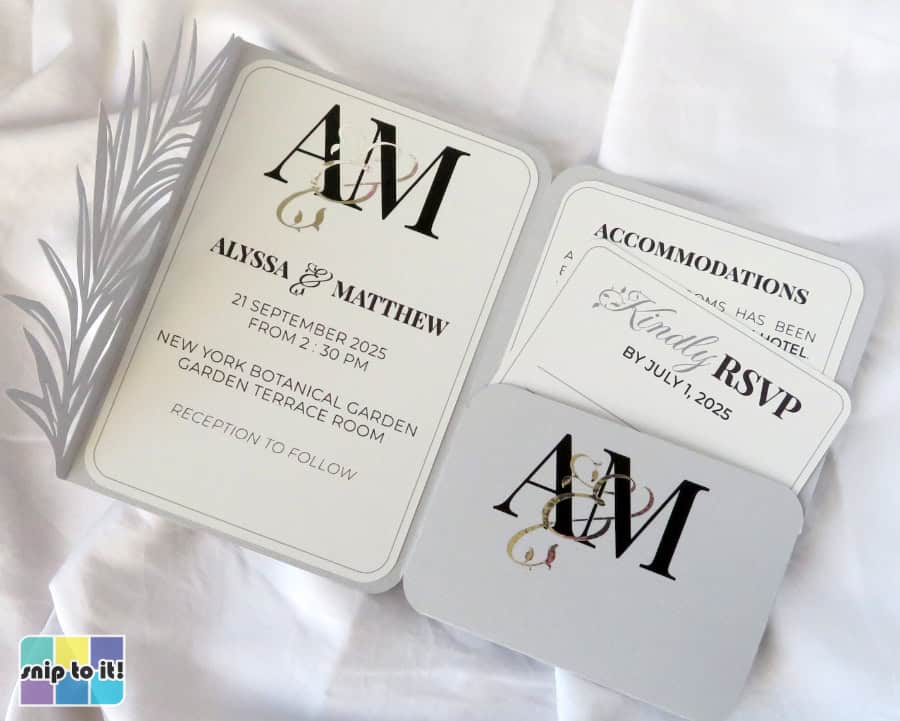
For this wedding monogram, I will entwine a couple’s initials with a fancy ampersand. I’m selecting Playfair Display SC as my serif, and I love the leafy ampersand from Fleur De Leah. I typed each initial in its own text block so I can place the A and M very close together, overlapping a bit at the bottom.
Once my initials are arranged, I am going to select them, open the Combine tools menu at the bottom of the Layers panel, and click Weld. Why? Because our next step is Slice, which only works with 2 layers (the serif initials layer and the ampersand layer). If your serif initials are in one text block, you can proceed as-is.
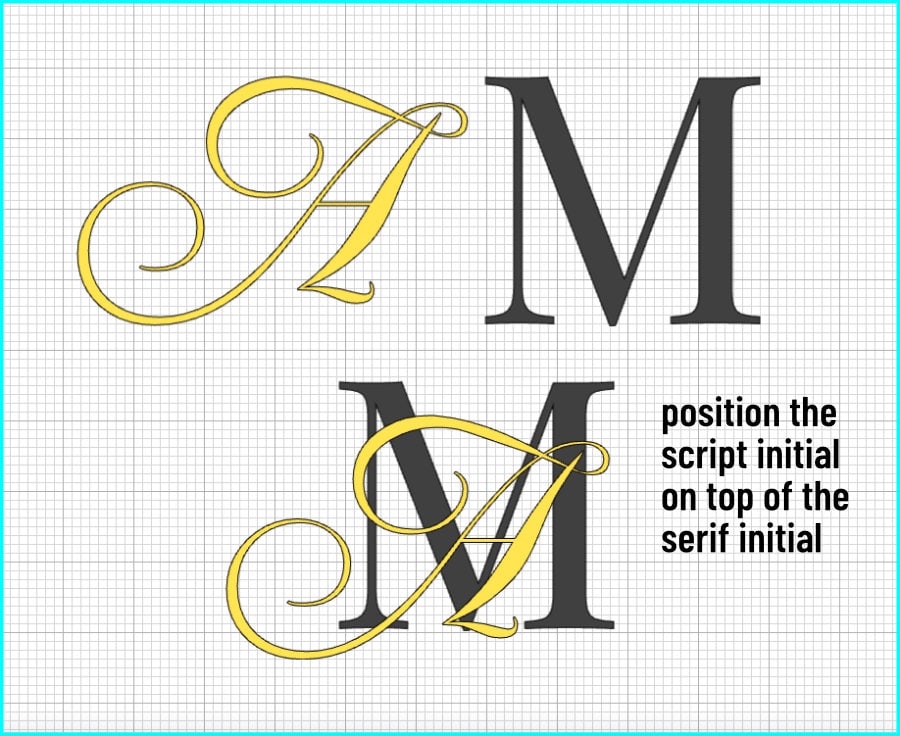
The last thing to do is to size and place the script text over the initials. Try to visualize how you want the loops of the script to encircle strokes of the initials.
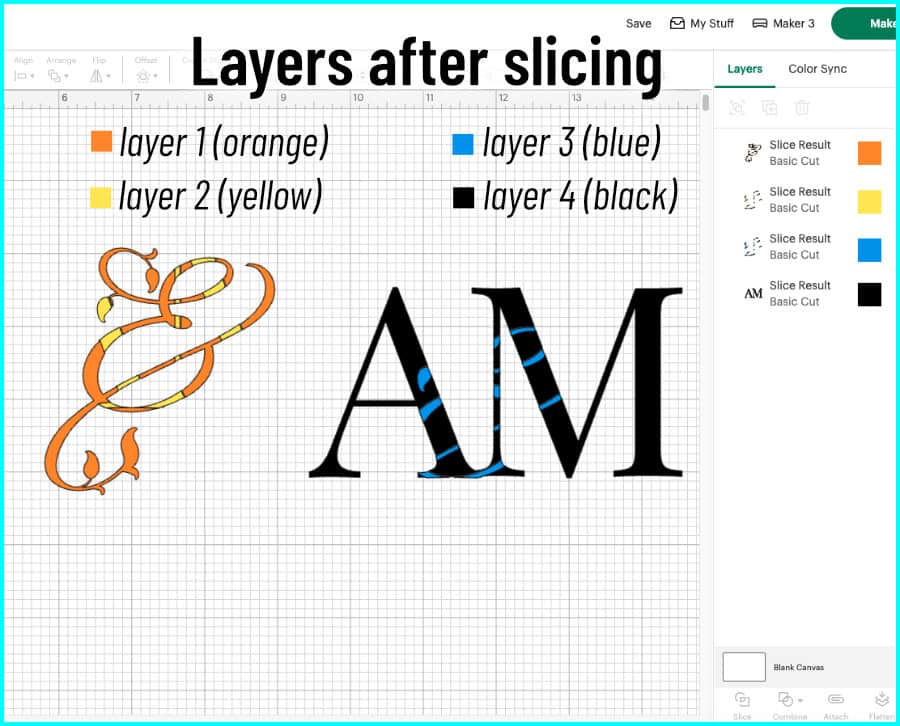
2. Slice your text
Select the 2 layers of text (AM + &), then click Slice (bottom of the Layers panel). There are now 4 layers.
The most important thing to do is USE THE LAYERS PANEL. Don’t select your layers on the canvas or move them around. Try to interact with the layers primarily using the Layers panel, because it is the easiest way to select a layer without moving it out of place or accidentally resizing it.
I am going to give each layer its own color so I can easily tell them apart. To change the color, click on the layer in the Layers panel and use the color selector menu in the Edit toolbar.
(need a refresher on the Design Space toolbars? Check out our Design Space Basics guide!)
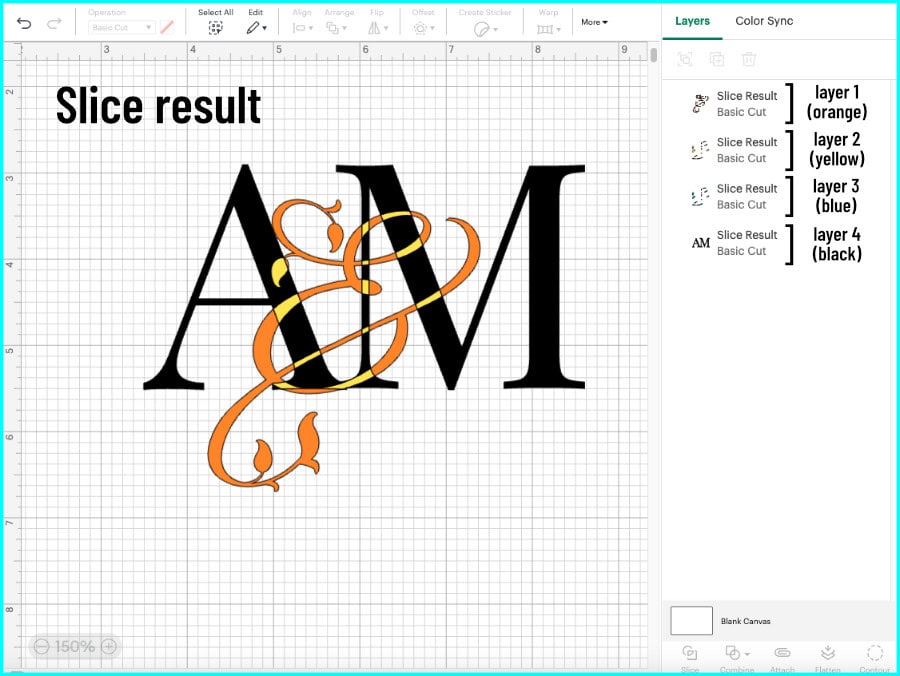
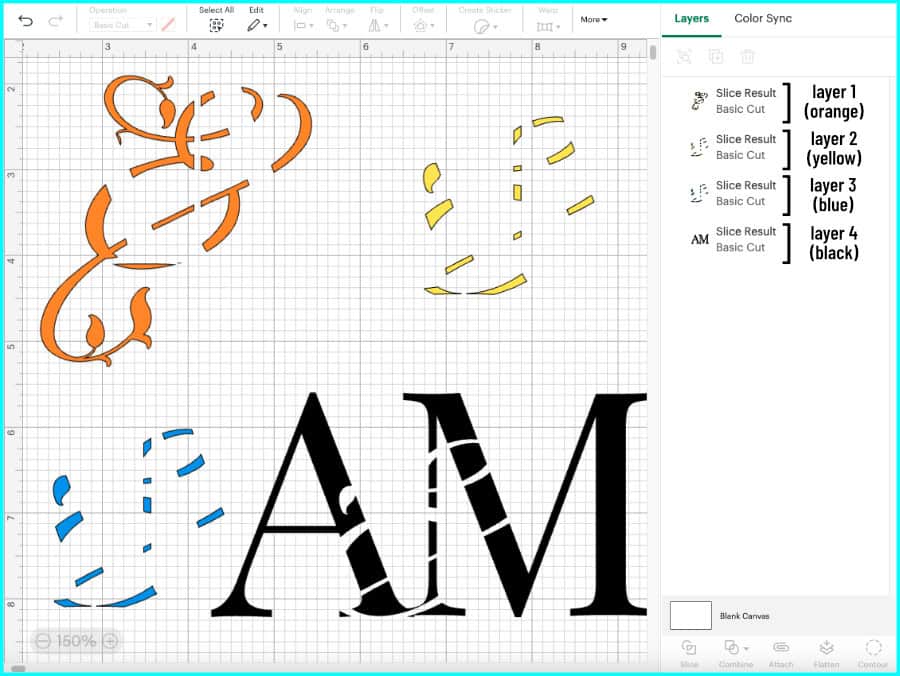
The top 2 layers are the script (&) layers:
- layer 1 is the parts of the script that don’t overlap anything – I’ve colored this orange
- layer 2 is the parts of the script that overlap the background letters – I left this yellow
The bottom 2 layers are the background letter (AM) layers:
- layer 3 is the parts of the background text overlapped by the script – I made this layer blue
- this layer is an exact duplicate of the second layer
- you won’t see the color until you delete parts of the script above it
- layer 4 is the non-overlapped parts of the letters – I left this black
Here is a view of all the layers pulled apart to show you the different pieces:
In the next steps, you will hide parts of layer 2 then unite with layer 1 to create the script layer. Then you will hide any part of layer 3 that matches an intact part of layer 2 (this creates a knockout wherever the & overlaps the AM); uniting with layer 4 will complete the initials layer. Let’s do this!
3. Use Contour to hide parts of your script
We are going to use our old pal Contour to create this text effect, so select everything and move the text to the bottom of the Canvas so you can see it while you have the Contour window open. You will use the image on the canvas to guide your choices in the contour window.
Select layer 2 in the Layers panel and open the Contour window.
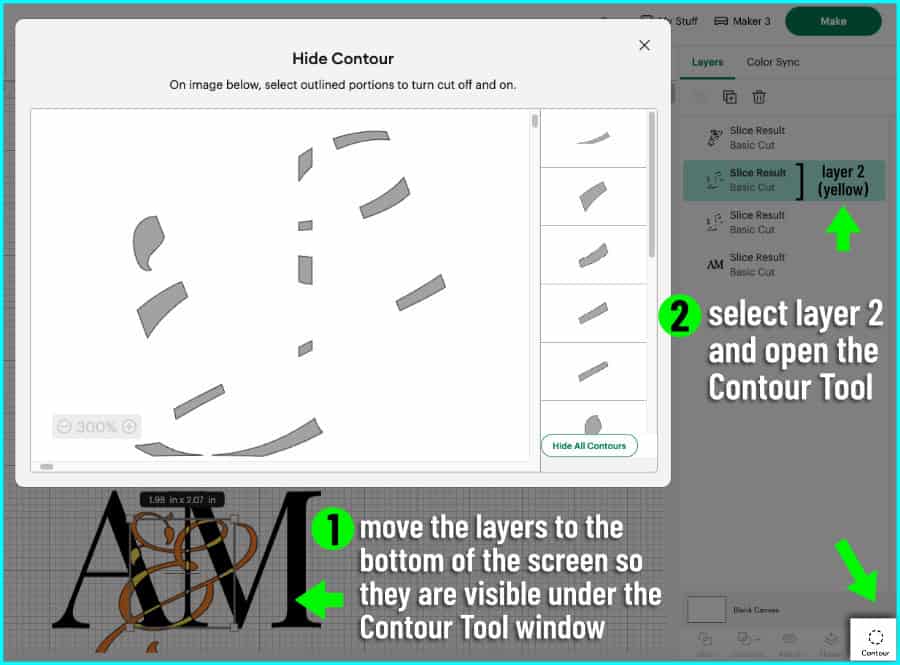
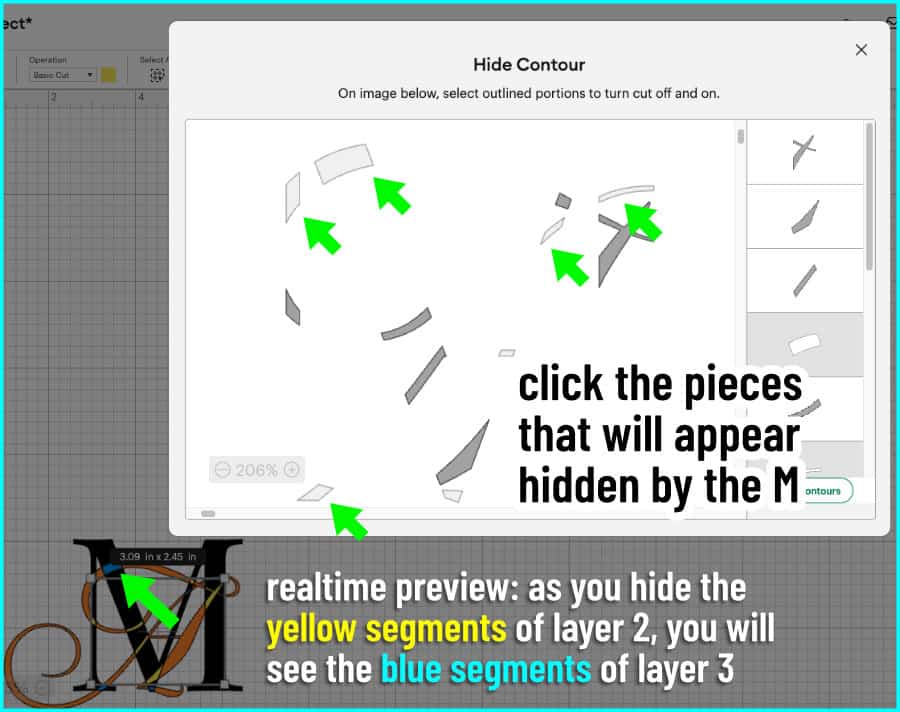
Hide pieces of layer 2
Remember, layer 2 is the parts of the script that overlap the background initials. We’re going to create the appearance of intertwined letters by hiding pieces of the script that will then appear hidden behind the base initials. The pieces of the script that remain visible will appear as if they are in front of the initials.
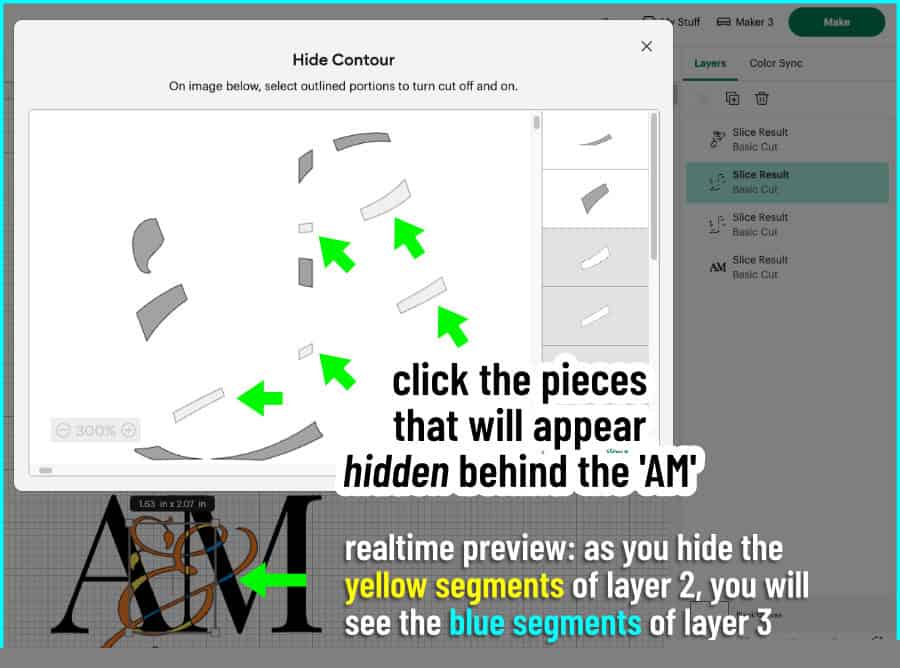
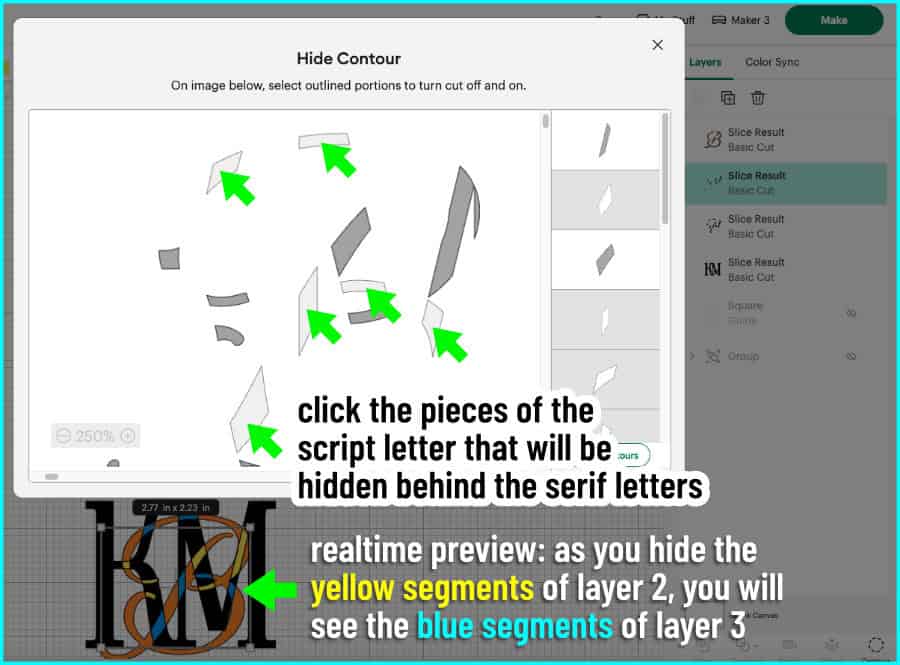
In the Contour window, click to hide the parts of the script text that you want to appear hidden behind the initials. As you click to hide pieces of layer 2, you will see the blue pieces of layer 3 appear.
I am hiding segments of layer 2 so that the top loop of the & appears to encircle parts of the M, and the long crosspiece of the & appears to weave behind the A and M.
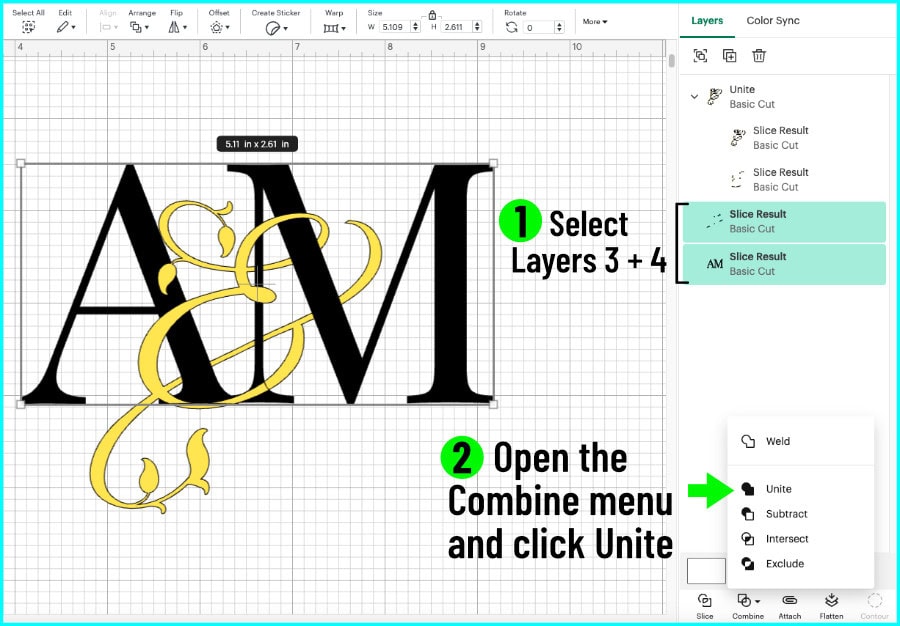
When you are finished, close the Contour window. In the Layers panel, select layer 1 and layer 2, open the Combine menu and click Unite. This will be the finished script part of the design.

Hide pieces of layer 3
Layer 3 is the parts of the base initials overlapped by the script. All we need to do now is keep ONLY the pieces of layer 3 that correspond to the hidden pieces of layer 2. We will hide the rest of layer 3 to create a knockout from the base initials where our script pieces will fit like a puzzle.
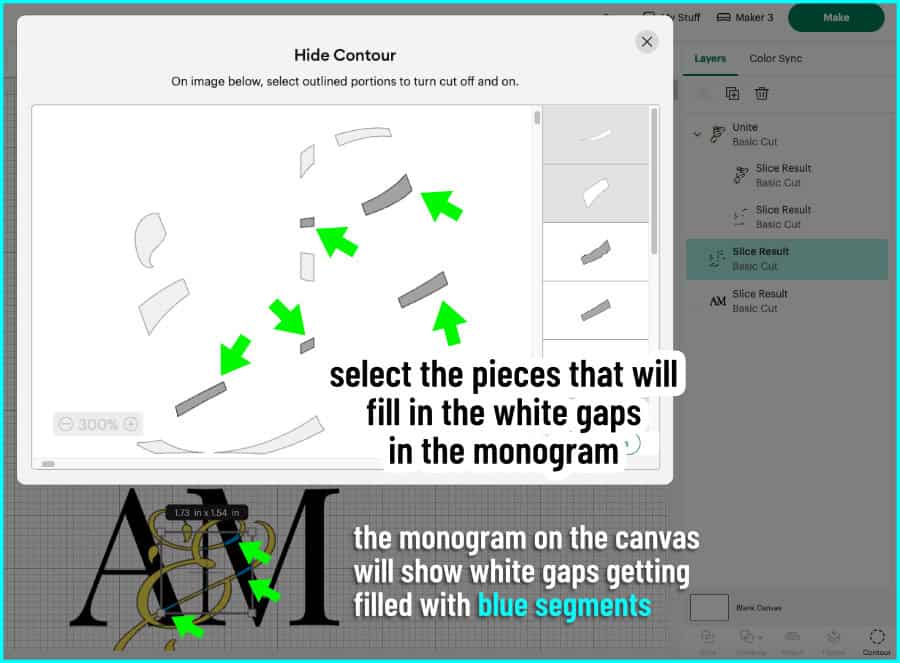
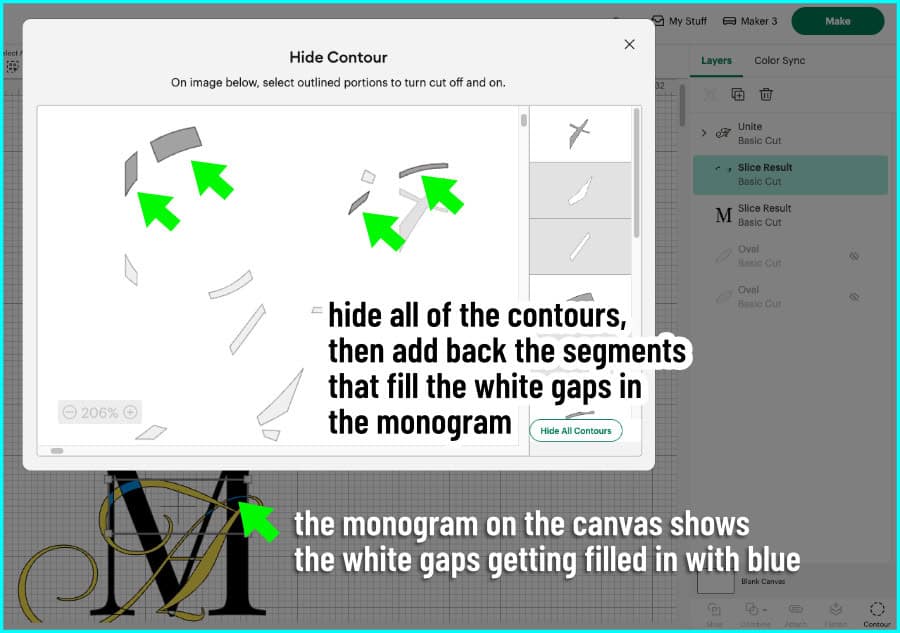
Select layer 3 in the Layers panel and open the Contour window.
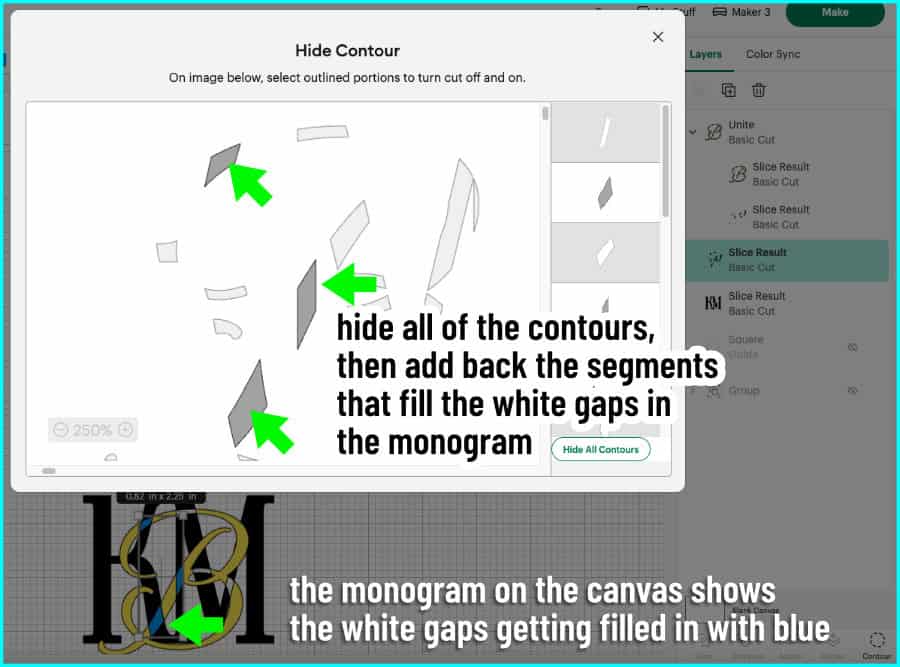
Click Hide All Contours, which will hide all but the largest piece of the layer (this piece will appear dark grey, all others will be light grey). What you will now see on the Canvas is that your monogram has white gaps that need to be filled.

In the Contour window, click on each piece that corresponds to a white gap in the monogram to ADD those pieces BACK. As you click each piece, it will turn blue on the Canvas. This will fill in gaps in your base letters, because they are the places where the script layer (&) appears hidden.
Also, click to hide the largest piece of layer 3 (the piece left over when you clicked Hide All Contours) if necessary (i.e. if it is NOT white on the Canvas).
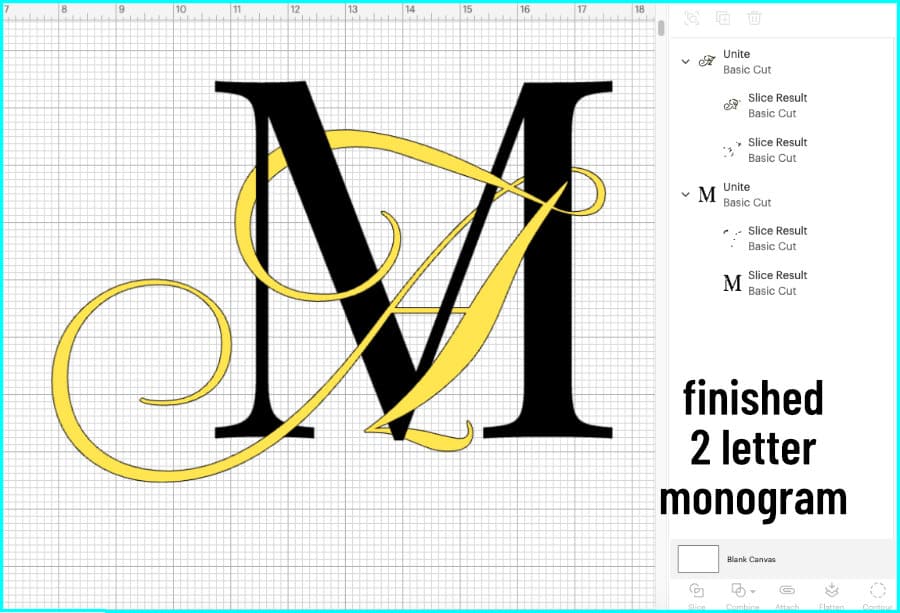
When you’ve filled all the gaps in the initials, close the Contour window. In the Layers panel, select layer 3 and layer 4, open the Combine menu and click Unite. The base initials layer is now complete, and you have finished your entwined monogram!
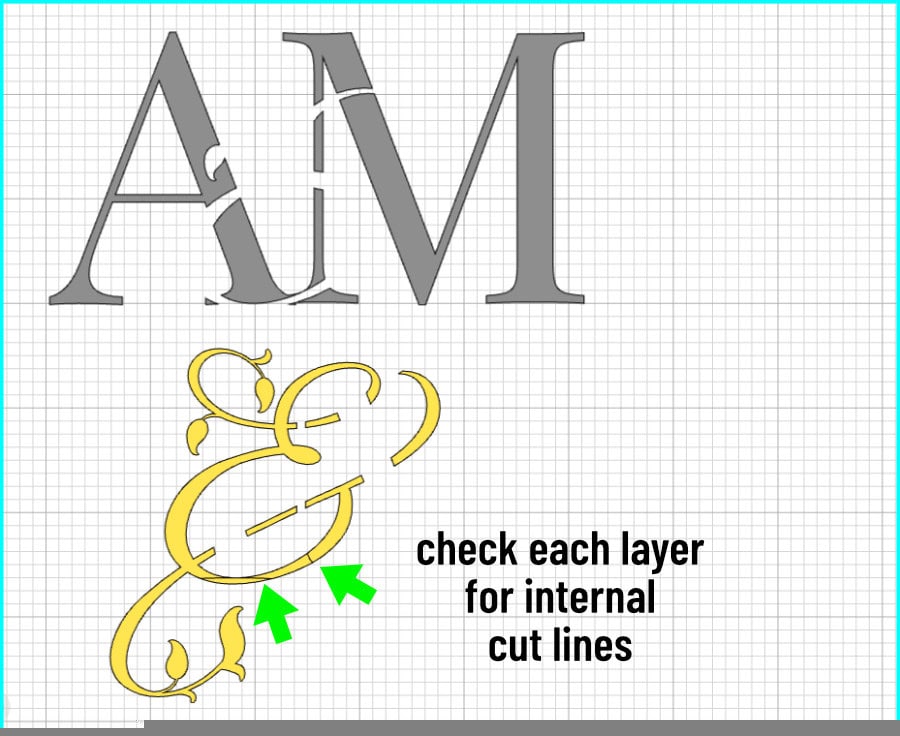
4. Fix internal cut lines (if any)
What you now have is a knockout design where your 2 layers will fit together like puzzle pieces.
This final thing to do before you Make your monogram is to check each layer for internal cut lines. Almost every time I do this technique there are stubborn little places where there is a miniscule gap between United pieces, creating a cut line. I’m going to change the color of the initials to light grey so I can inspect them.
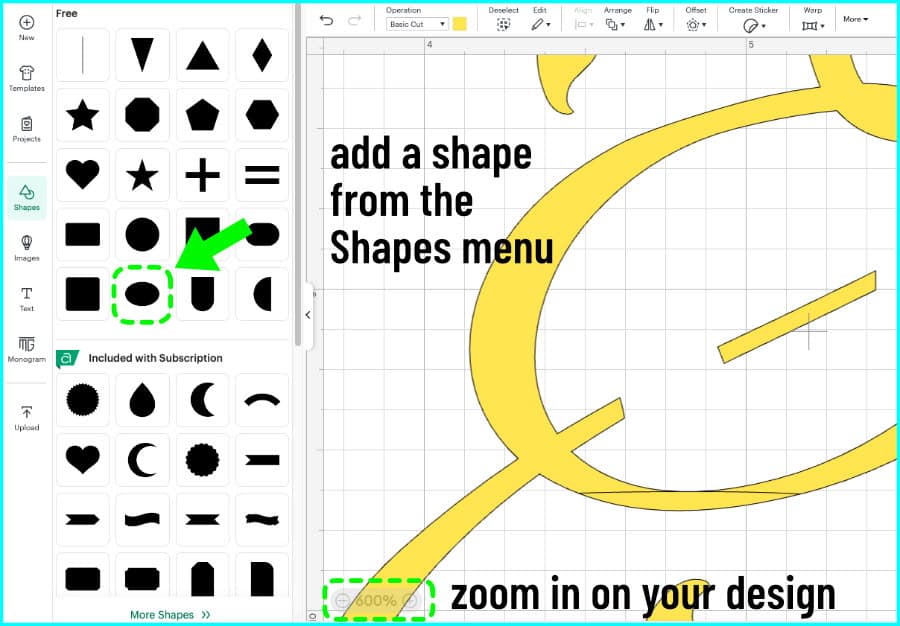
To fix these cut lines, you patch them by Uniting with a shape from the Shapes menu.
Zoom in really close to see your cut line clearly – even 600-700% is good. Open the Shapes menu and add a shape to the canvas. I generally just choose an oval, especially for patching curved segments.
Adjust the size, shape, and position of your patch to completely cover the cut line. You can make these adjustments in 2 ways:
- click and drag the shape with your mouse
- OR adjust size and rotation measurements numerically in the top Edit toolbar
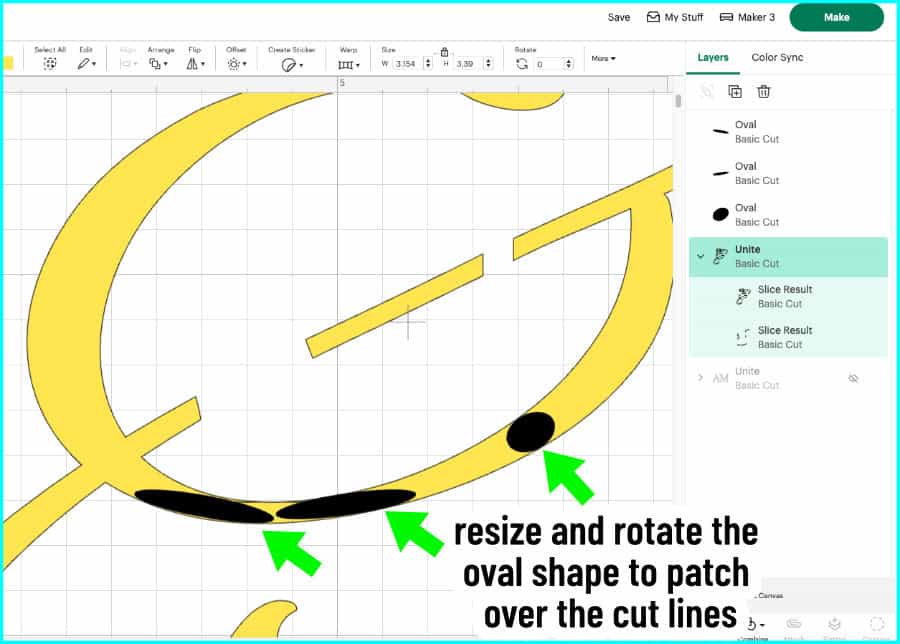
This is another technique that gets much easier with practice. Don’t worry too much if you don’t get it 100% perfect, there’s room for error here so just try to cover as much of the cut line as possible.
When you have covered the cut line(s), go to the Layers panel, click and drag the shape(s) into the Unite group for the layer you’re working on (in this case, I slip the Ovals into the Unite group for layers 1+2).
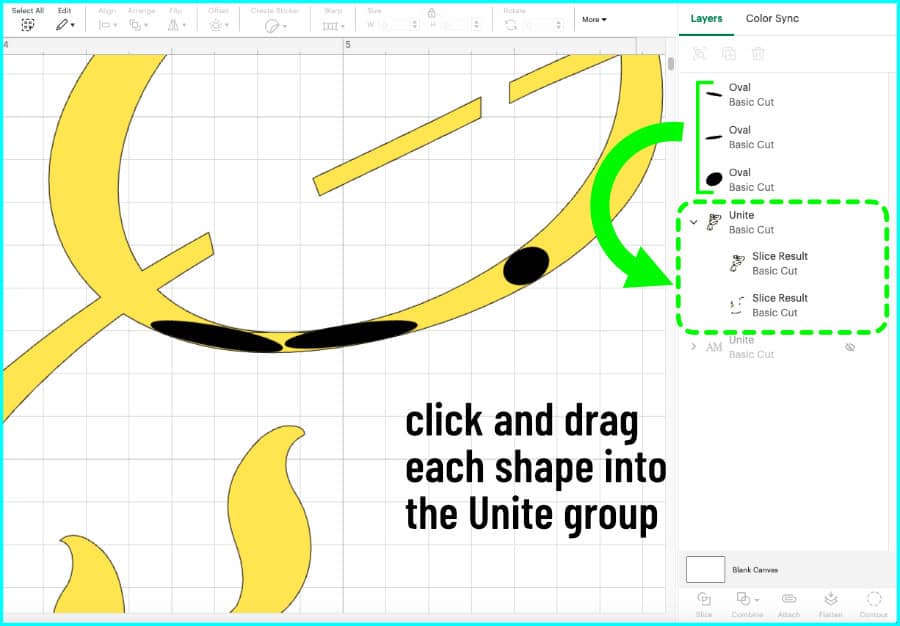
Again, just click and drag your shapes into the Unite group for the layer:

You will now have a patched, complete layer. Now you’re ready to click Make!
Cut and piece together your monogram
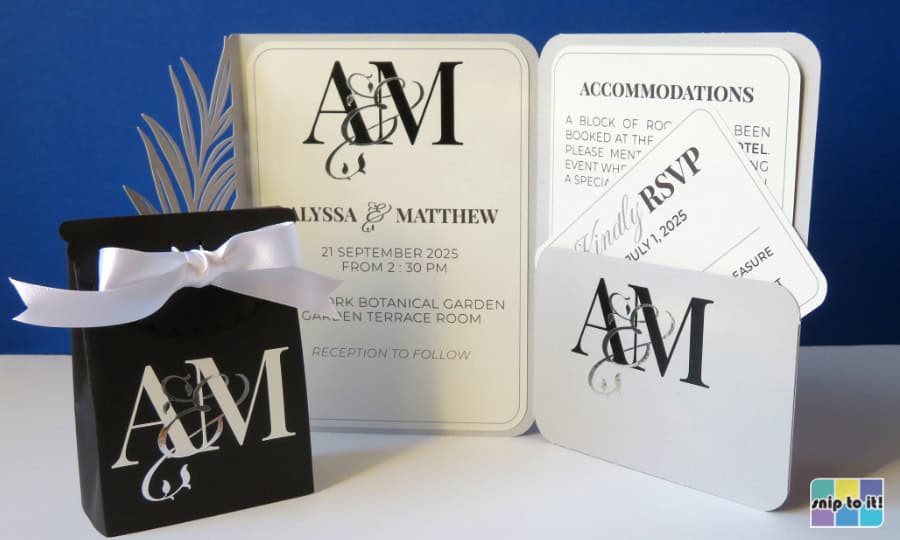
Intertwined letters like this wedding monogram are best suited to adhesive vinyl, HTV, or even being flattened to create a Print Then Cut graphic. For my example, I cut the initials out of matte black Cricut Value Vinyl, and I cut the ampersand out of Cricut silver Adhesive Foil.

All you need to do is transfer your base initial layer to your blank (in my case, a wedding invitation), and then slot the top script layer into place. There is only one way that these knockout monogram designs will fit together, so all you have to do is line up your top script piece with the gaps in the base initials.
The main thing will be tilting the script so all the loops line up – it is so satisfying when it all falls into place!
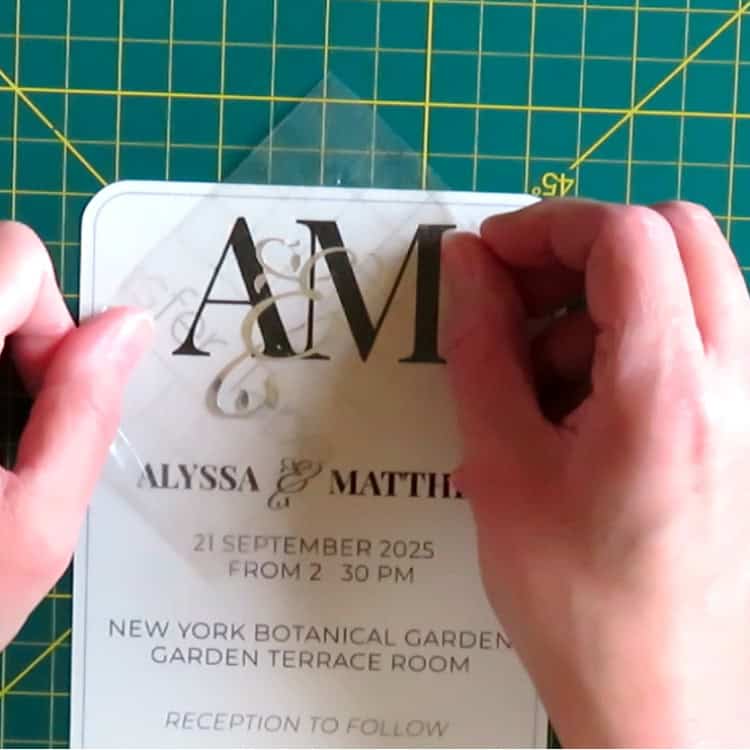
And just like that, your 2 easy layers turn into a lovely intertwined monogram!
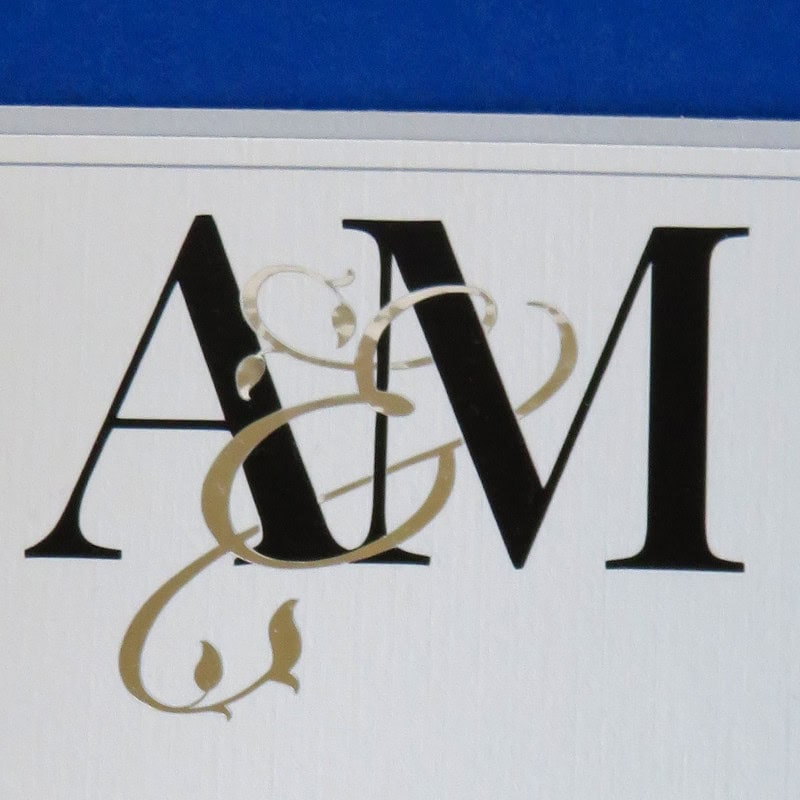
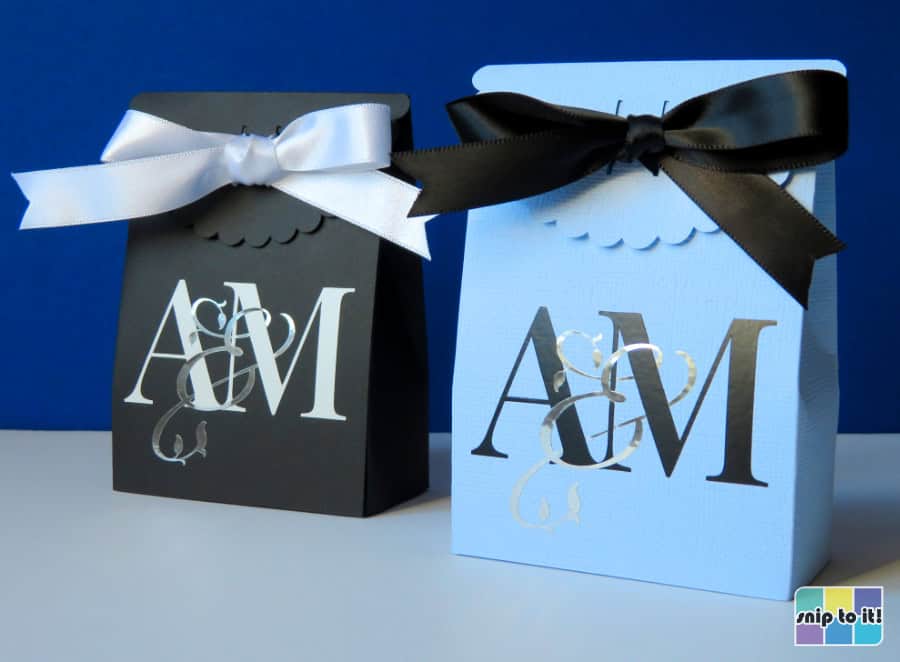
I put the monogram on the wedding invitation and its folder, plus 2 different favor boxes. You might prefer print then cut if you have a lot of invitations to do, but I love the metallic ampersand detail with the matte vinyl monograms.
Monogram variations: 3-letter and 2-letter monograms
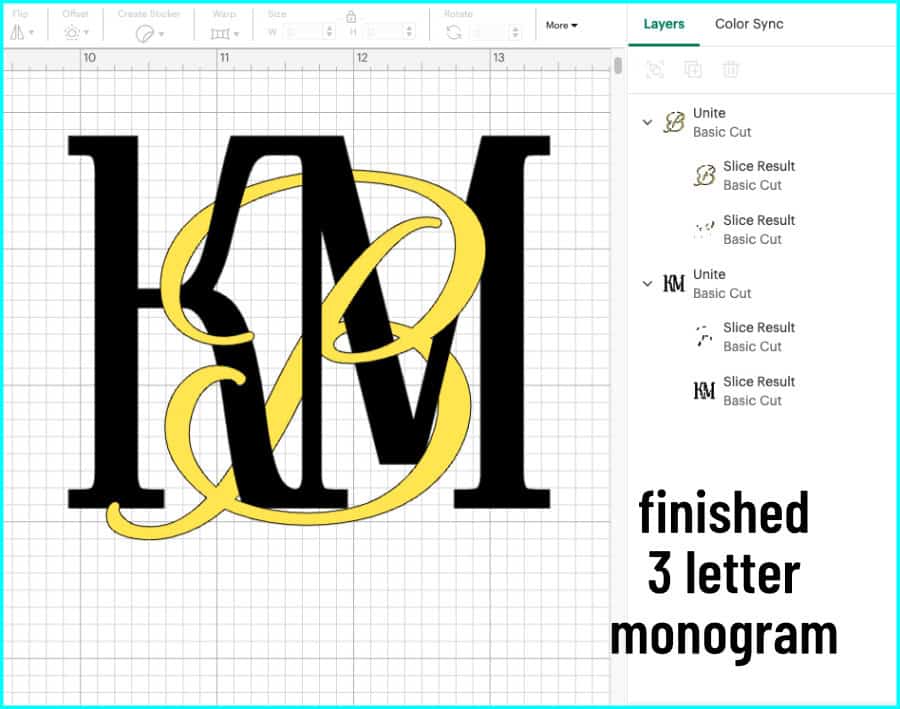
3-letter personal monogram
A classic 3 letter monogram can easily be elevated using this exact technique where a middle initial is used instead of the ampersand.
For this example, I’m using the font Wonder Bright for the first and last initials, and the middle initial is MonteCarlo. These fonts are a little thin so I’m adding a 0.05″ offset to the K and M, and I’m going to add a 0.02″ offset to thicken up the B.
I positioned the K and M close enough to overlap the serifs and welded them together. The B is sized and positioned how I want it over top of the base initials, so now I’m ready to Slice!

Once your letters have been sliced, make each layer a different color and select layer 2 in the Layers panel. Open the Contour window and hide each part of the script that you want to appear hidden behind the base initials. When you’re done, Unite layers 1 + 2.
Select layer 3 and open the Contour window, and click Hide All Contours. The goal now is to add back each piece of layer 3 that is needed to fill those little white gaps in the monogram. Everything else will be knocked out to create holes for the script layer to fit into like a puzzle. After you’re done, Unite layer 3 + 4.
Once you have completed your script and serif layers, check them and fix any internal cut lines. Now you’re ready to click Make!
Here are the pieces cut out out Cricut True Brushed vinyl in black and copper:
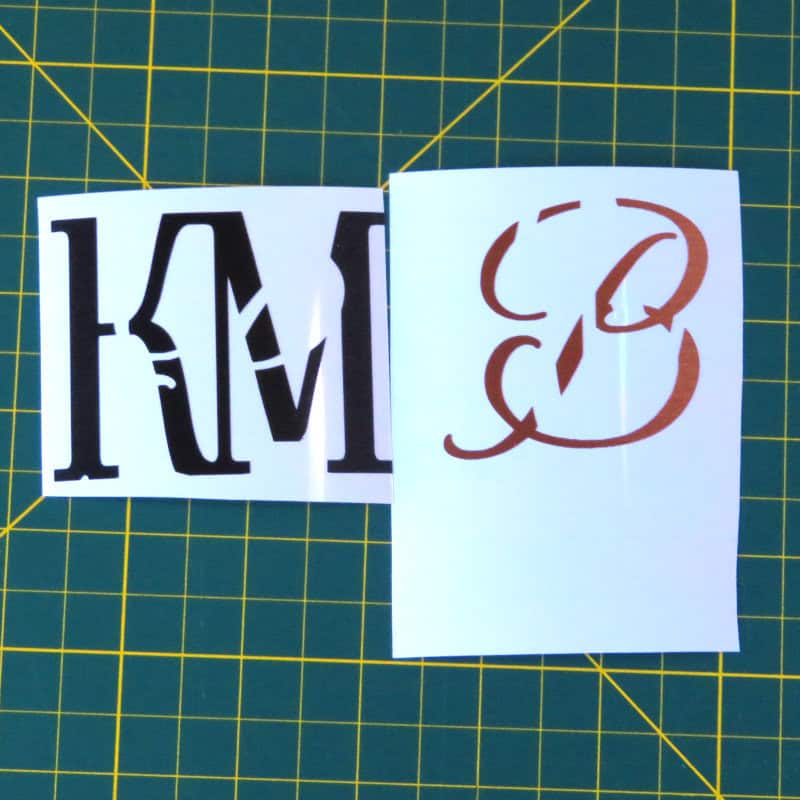
I transferred the KM first, then overlaid the B on this journal. Lovely!
2-letter wedding monogram
If you’d rather create intertwined initials for your happy couple instead of including an ampersand, it’s easy to do that, too!
For my example, I’ve chosen Imperial Script for my script font, and the M is still Playfair Display SC. The process is the same except you don’t have to Weld your base initials before you Slice. Just make sure your script font is the top layer, and size and place it so it will entwine with the other initial.
The process is the same: you select your initials and Slice, and I recommend giving each layer a different color. Next, Contour layer 2, hiding the pieces of the script initial you want to appear behind the serif initial. Unite layers 1 + 2.
After hiding all the script pieces, follow up using Contour on layer 3 to fill in gaps left by the script overlapping the base initial, while hiding the rest of the pieces to create a knockout for the script text to nestle into. Unite layers 3 + 4.
After you’ve got your script and serif layers done, just fix any internal cut lines and you’re ready to click Make!
For this monogram, I cut the M out of Value Vinyl but the A is copper Cricut Premium vinyl.

After transferring the M, I just overlay the A. Placement is easy for these knockout designs!
Final thoughts
I hope you like this technique enough to give it a try. It’s not a beginner Design Space project, but it isn’t too difficult either, and practice makes perfect!
If you enjoyed this tutorial, you might like to check out our other articles where we show you how to get the most out of our favorite Design Space tools: