
Design Space is the software you use to create projects and plan precise instructions for your Cricut cutting machine. This Beginner Series guides you through navigating the workspace to completing your first project, from the first click to the first cut. The series is part of our Mastering Cricut Design Space learning path.
The Canvas is where you will design your project before you send it to be cut by your Cricut machine. Think of the Canvas as the digital worktable where you add shapes, images, and text and plan your project before you turn it into a physical object.
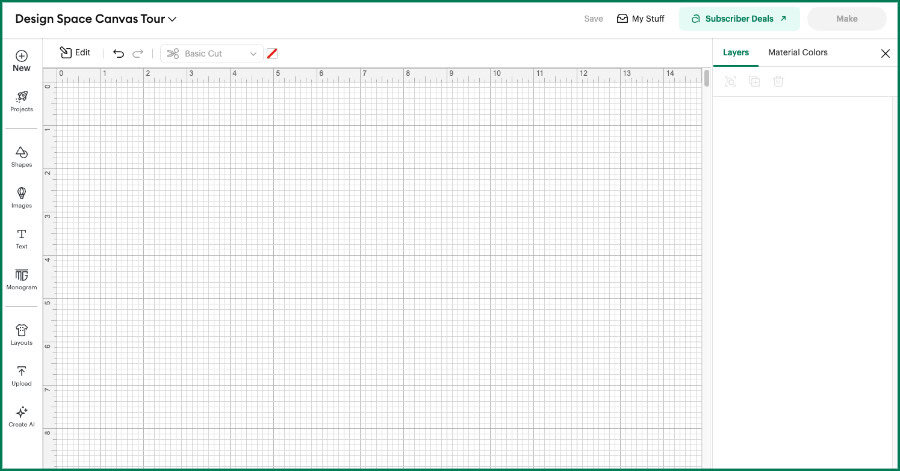
This article is a tour of the current layout of the Design Space Canvas, showing you where to find all of the important tools and features. Since Design Space updates frequently, this guide is for beginners and more experienced users alike – they may have moved things around since the last time you used your machine!
This guide is for Design Space used with desktop or laptop computers (both Windows and Mac). Images are taken from Design Space Live Version 9.54.64, MacOS.
The foolproof way to view the Canvas: 3 zones control everything
The best way to understand the Canvas (and shield yourself from disruptive updates in the future) is to view the Canvas as 3 main zones, not a collection of tools.
If you understand that Design Space will always rely on these 3 zones to organize all of the related tools and functions, you can understand where any of the tools are supposed to be. To make this article easy to scan, every screenshot and image is color-coded according to the zone being shown.
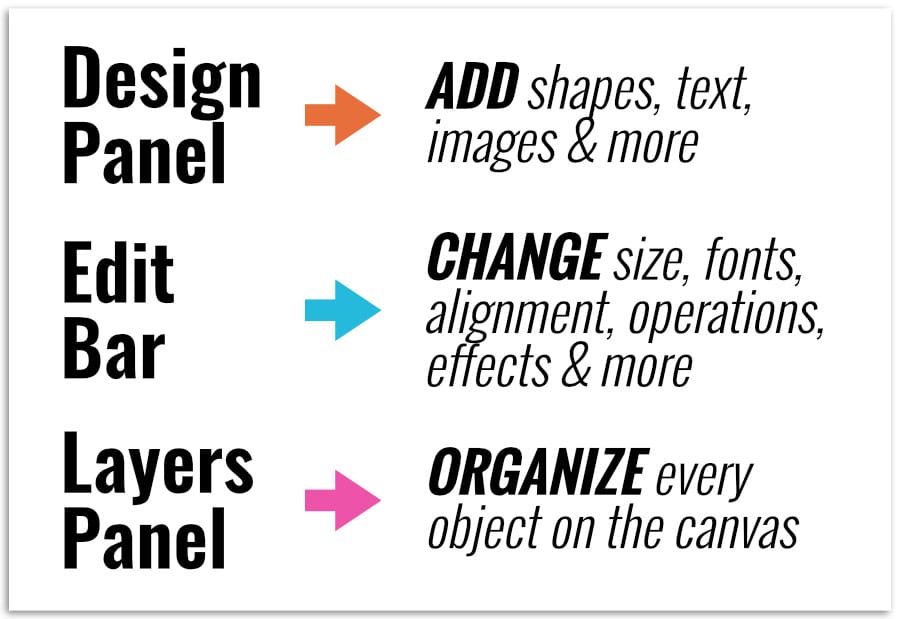
The 3 main functional zones:
- Design Panel (left hand side): ADD THINGS
- Edit Bar (top of screen): CHANGE THINGS
- Layers Panel (right hand side): ORGANIZE THINGS

How the different zones work together
The easiest way to understand the basic layout of Design Space is to understand how the Design Panel, Edit Bar and Layers Panel work together to help you complete your design.
- Design Panel: where you get the objects to make your design (shapes, images, text, etc.)
- Edit Bar: where you make adjustments to all of those objects (change color, size, fonts etc.)
- Layers Panel: a list and description of every object on the Canvas (including information like color and Operation type)
That’s it. Everything on the Canvas lives in one of these zones.
The Design Panel: Add things to your project
This is where everything in your project comes from.
There are 9 items in the Design Panel. Clicking most of these opens a new flyout menu on the Canvas. After you open a menu, it will stay open until you close it. To close this menu click the closure tab midway down the menu’s right side.
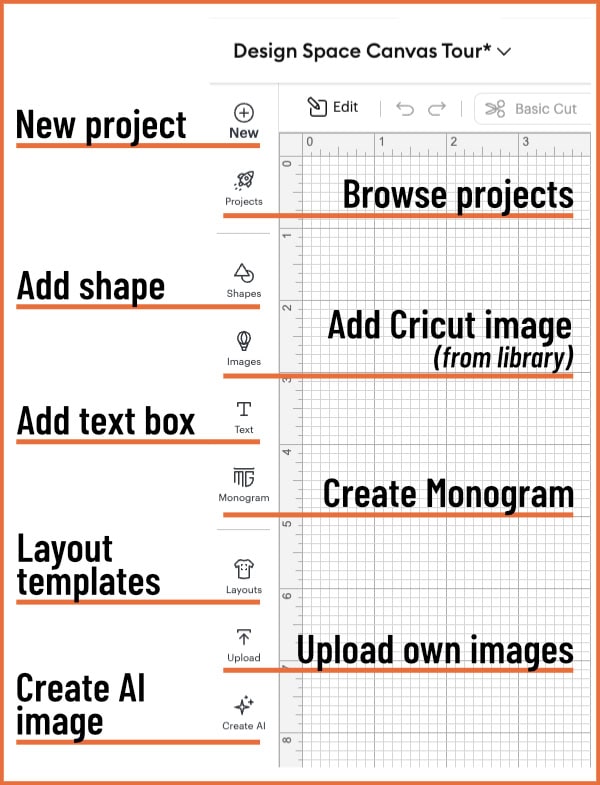
- New: Click here to open a blank Canvas, or open a pre-made project template
- Projects: searchable projects created by Cricut or Cricut Community members, bookmarked projects, or your own projects (clicking these opens the project on the Canvas)
- Shapes: a menu of basic and specialized shapes
- Images: Cricut’s searchable Image library
- Text: add a text box to the Canvas
- Monogram Maker: combine images, text styles and frames to make a custom monogram (Available to Access subscribers only)
- Layouts: guides to help you size your design
- Upload: upload image files from your own computer
- Create AI: use text prompts to create various images (Available to Access subscribers only)
I am going to focus on 3 key features here: Shapes, Images and Text. These 3 elements will be the foundation for most of the projects you will make: greeting cards, t-shirts, stickers and more!
Adding Shapes to the Canvas
The Shapes menu is very straightforward: it is a collection of shapes (ranging from basic to more complex) that you can add to the Canvas.
There are free shapes that are available to every Cricut user at the top of the menu. These are the basics, like square, circle, star, etc. These are the shapes you will use most, not just as a beginner, but at every skill level. You’ll use these to create card bases, backgrounds, test cuts, guide shapes and more.
To add any shape to the Canvas, just click on it in the menu. When you add a shape to the Canvas, you’ll also see the Edit Bar activate, and you’ll see the shape added to the Layers Panel. The default color for the shapes is black, but you can change that using the Edit Bar.

The more complex shapes at the bottom of the menu are reserved for Cricut Access members. These shapes include gift tag, banner, and label shapes, and other handy shapes that make it easier to create basic projects.
Adding Images: From the Cricut Library
When you click the Images icon in the Design Panel, it opens a flyout menu containing the newest images available in the Design Space Image Library. There’s a search bar at the top of this menu to help you find the right image for your project.
Images in the library include cut files (SVGs) and Print and Cut images (PNG/bitmaps).
To add an image from the flyout menu, just click on it.
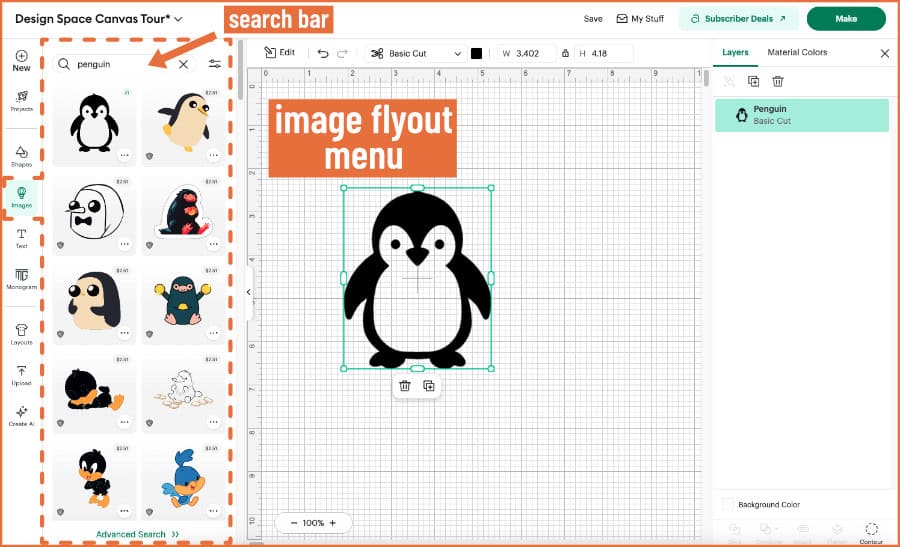
If you want more search options, click Advanced Search at the bottom of the menu and the search results gallery will open in the full window. You can filter your results by a large array of options including subject category, Operation type, complexity, layers, brand, etc.
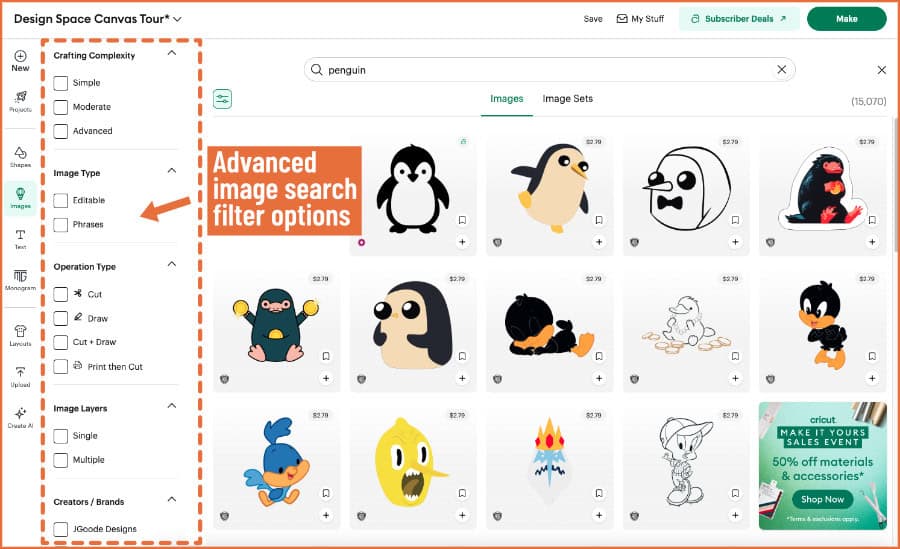
To add an image from the search results gallery, either click on the small plus sign at the bottom righthand corner of the image, OR click on an image to go to its information page.
The information page for each image lists the artist who designed it, related images, more from the artist, etc. (and you can add the image to the Canvas via the green button).

Adding Images: From the Upload option
You can also add images from your own computer to the Canvas by clicking the Upload Icon. You can upload your own SVG cut files, and you can also upload images and photos in PNG or JPG formats (ie. bitmap images).
This process is multi-step and is covered in depth in our articles How to Upload SVG files to Design Space and How to Upload Images to Cricut Design Space.
Whenever you add an uploaded image to the Canvas, a flyout menu will open to the left, showing related images from the Cricut Image Library.
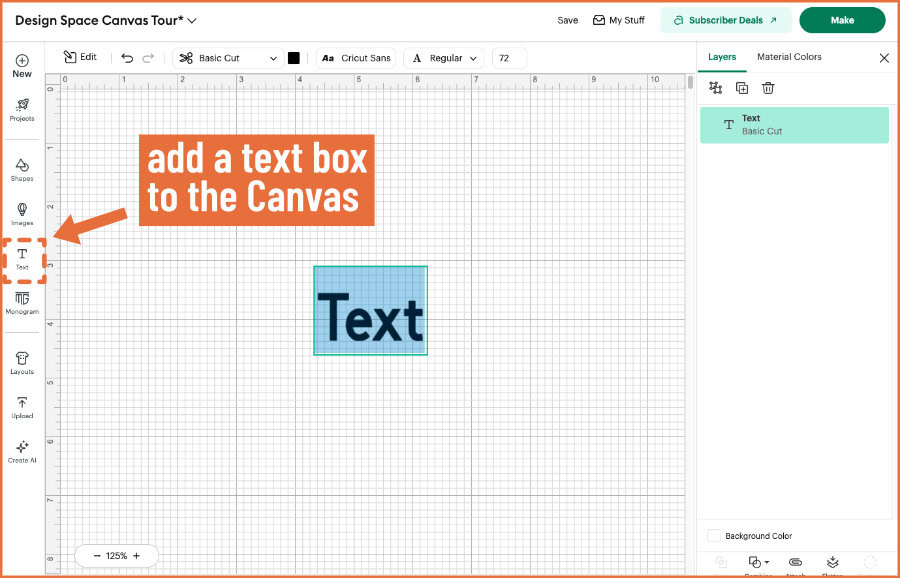
Adding text to the Canvas
When you click the text tool icon in the Design panel, it adds a text box to the Canvas. “Text” will appear in the default black color, in the default font (Cricut Sans), with the default Operation type (Basic Cut).
When you add a new text box to the Canvas, it will be highlighted blue, meaning that you can just type your desired text on the keyboard and Design Space will fill in the text box. Selecting the text box will activate the options in the Edit Bar to change the font, style, color and size.
Just like adding shapes or images, the new text shows up in the Layers Panel.
Live text vs Designed Text
Text in a text box is “live” text, meaning it can actively be edited. Live text has its own set of editing tools (see below).
There are two kinds of “designed” text available in the Cricut Image Library. The first is text as an image, which is static and cannot be edited.
The second kind of designed text in the Library is an Editable Text image. These are special graphics provided by Cricut that allow you to customize text as a part of a bigger image. Think of pantry labels, gift tags or birthday card images.
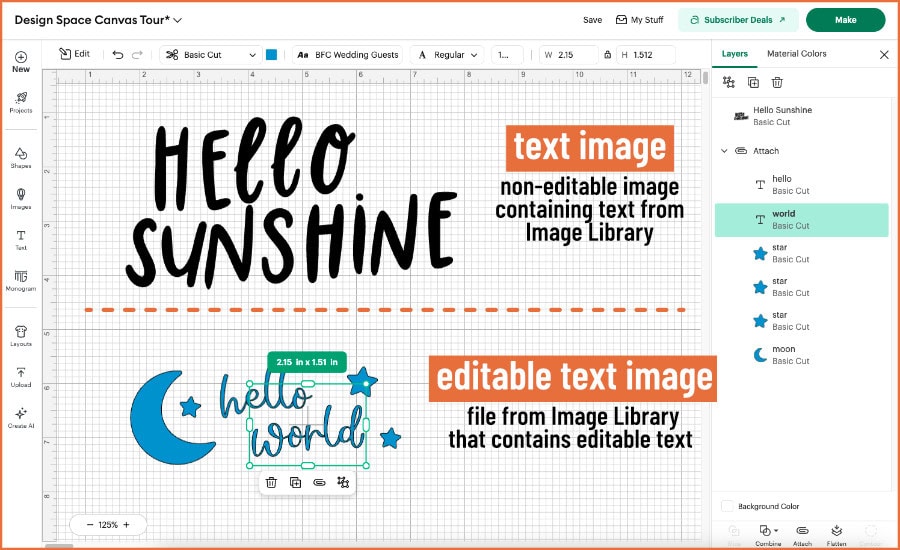
You can find Editable Text images in the Cricut Image Library using the Advanced Search function. The editable text in these images shows up in a text box and can be edited using all of the text editing tools.
The Edit Bar: Changing Things You’ve Selected
First off, here’s a tip that’s going to save you a lot of frustration: the Edit Bar depends entirely on what you have selected on the Canvas. It is contextual.
Here are the 2 basic things you need to know when dealing with the Edit Bar in Design Space:
- The Edit Bar only shows active options when you have an object (image/shape/text etc.) selected on the Canvas
- The Edit Bar will only show available options or tools compatible with the object(s) you have selected
Currently (March 2026), if you have a new, blank Canvas, you will not see anything where the Edit Bar should be. The Edit Bar only shows up at the top when you add something to the Canvas.
While previous iterations of the Edit Bar would contain all the Edit tools, the updated version of Design Space only shows you a few key options in the Edit Bar, and reserves the rest of the available tools in a flyout menu. How many tools you see at the top depends on the size of your screen, everything that doesn’t fit in the Bar gets shifted to the flyout menu.
Instead of making the entire tool suite visible and seemingly available, Design Space now hides incompatible tools, which makes it easier for beginners.
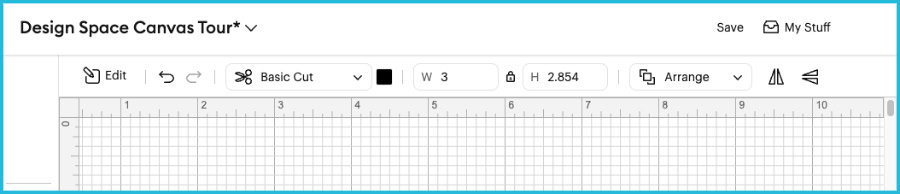
Basic tools of the Edit Bar
In the next few sections I’m going to give you a quick overview of the tools and functions in the Edit Bar. You don’t need to memorize these! The point is to see what tools show up depending on what is selected on the Canvas.
These first tools and menus show up when pretty much any type of object – shapes, text, images – is selected.
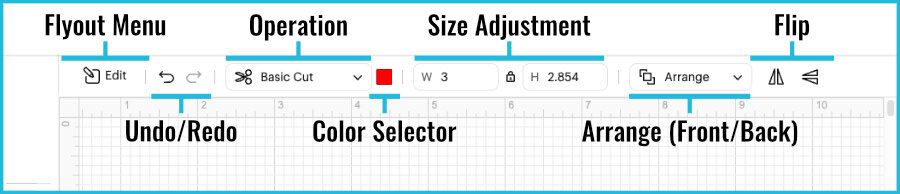
- Edit Bar flyout menu: Button to open the expanded tools flyout menu on the left side of the Canvas
- Undo/Redo buttons: undo or redo one or more previous actions
- Operation pulldown menu: a list of the tool options that you can apply to an image, shape or text. The list of available Operations depends on your Cricut machine and can include cut, draw, foil, score, deboss, engrave, Print then Cut (& Guide)
- Color selector: a menu of color or pattern options you can apply to shapes and text on the Canvas. Options depend on object selected
A note about Operations
Operations correspond to the machine tools you will use with your Cricut machine (blades, pens, foil tool, scoring stylus, debossing/engraving tools, etc.). Operations are not really design tools, but they are essential for planning your project’s toolpaths (the physical paths the Cricut machine will follow to draw, score, cut, deboss, etc.).
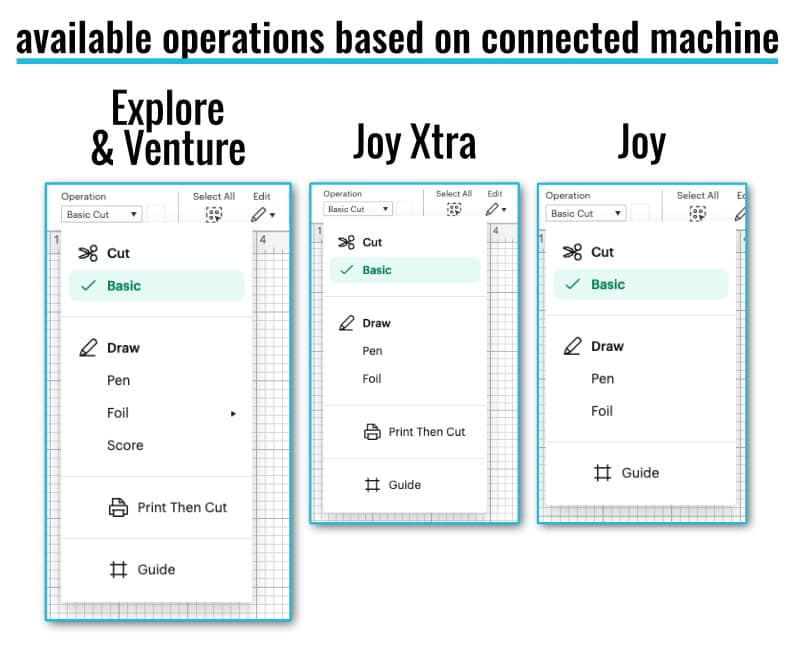
Like the Edit menu, the Operations menu is contextual: the tool options you see depend on the machine that is selected at the top of the Canvas. If you click on the machine listed, you can switch it if you have multiple Cricuts.
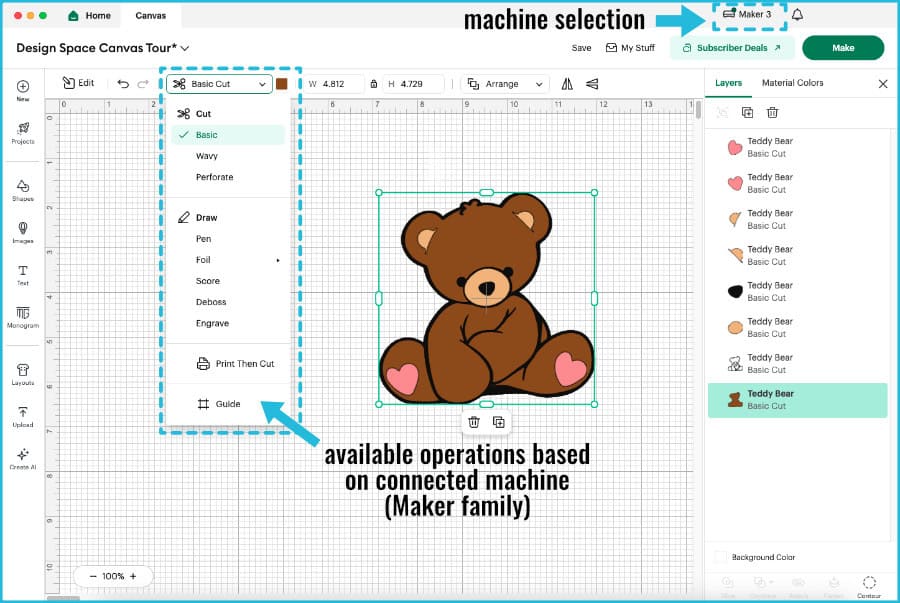
Once you have selected your machine, the Operations pulldown will show you the options based on your Cricut.
Flyout menu tools: basic shape selected
This is an example showing the flyout menu of the Edit Bar when you select a simple shape. In addition to the basic Edit Bar, these options will be available for most objects you select.
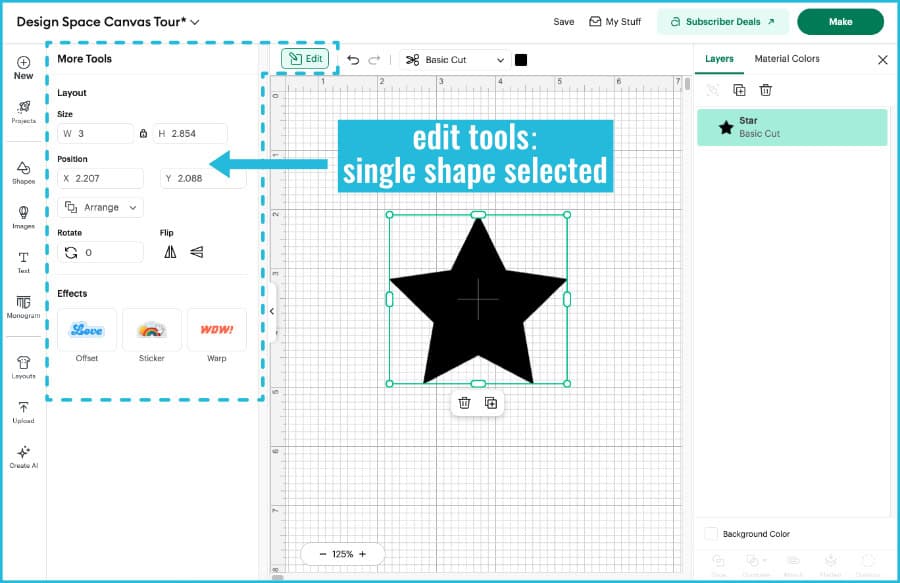
Layout Tools
- Size adjustment (resize): change the height/width of selected objects on the Canvas. When the padlock icon is closed, the original proportion is maintained. When the padlock is open, you can edit height or width independently
- Position: change an object’s position on the Canvas by editing the X-axis (left to right) or Y axis (up or down)
- Arrange pulldown menu: lets you change the order of objects on the Canvas (moves objects to the front/back)
- Rotate: rotate selected objects on the Canvas up to 360 degrees
- Flip Horizontal/Vertical: option to flip a selected object vertically, or horizontally (creates mirror image)
Effects Tools
- Offset: create a uniform layer behind the selected object, following the contours of that object. Very useful design tool
- Sticker: (Cricut Access subscribers only) automatically applies settings to create a sticker from an image. Will create die cut or kiss cut stickers, with or without an offset
- Warp: (Cricut Access subscribers only): lets you arch, warp or skew text and images
Flyout menu tools: image with interior cut lines selected
This is an example showing the flyout menu of the Edit Bar when you select a shape or image that has interior cut or draw lines. This will add the Contour tool to your options, so you can hide any of those interior paths.
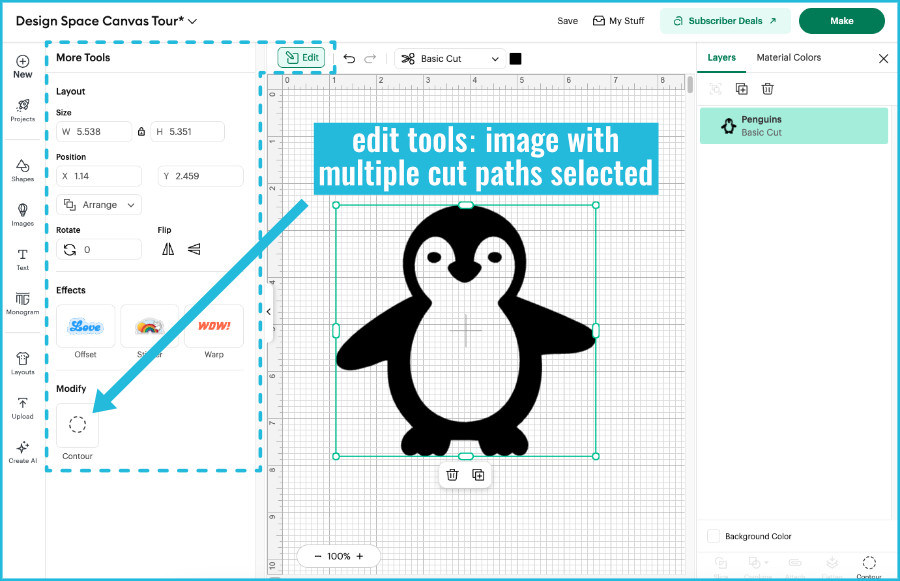
Modify Tools
- Contour: lets you hide specific cut or draw lines within an object to change which parts of the design are produced
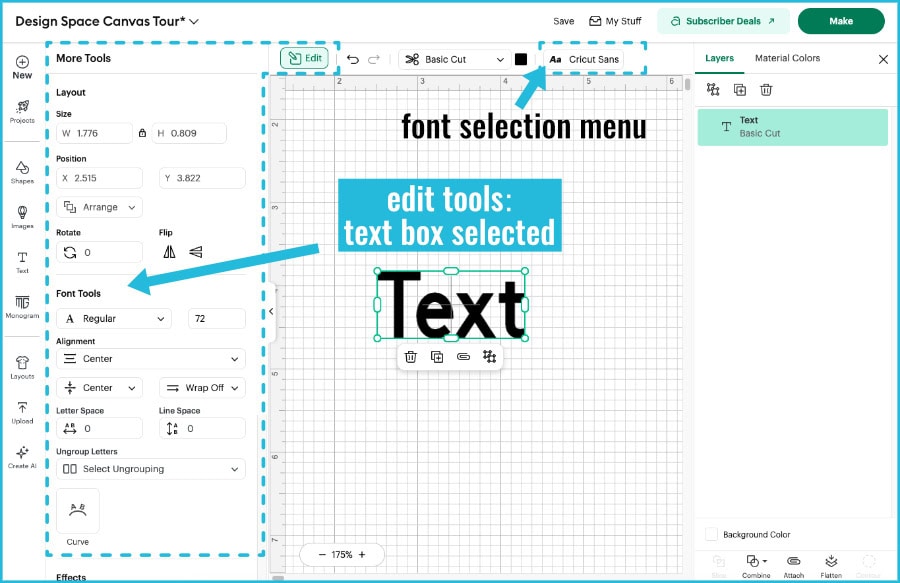
Flyout menu: text selected
This is an example showing the flyout menu of the Edit Bar when you select text on the Canvas. This will add a whole suite of font tools that you can use to edit your lettering.
The Edit Bar itself will usually show the Font selection button. This shows the name of the selected font on a button that will open to a flyout menu when clicked. This menu lets you choose from both the Cricut library of fonts and the System fonts installed on your computer.
Font Tools
- Font Style pulldown menu: shows the available style options for any font you’ve selected (regular, bold, italic, writing)
- Font size: point size of each font (for crafters text box size is generally more important than point size)
- Alignment: select left, center or right justified text
- Alignment (Vertical): aligns text top, center or bottom inside a text box
- Text Wrap: select text wrap on or off inside a text box
- Letter spacing: highlight a block of text and you can adjust the spacing between letters
- Line Space: highlight multiple lines of text inside the same text block and you can adjust the distance between lines of text
- Ungroup Text pulldown menu: allows you to ungroup text blocks to individual letters, lines or layers of text that will be treated as separate objects
- Curve: different from the Text Warp tool, this feature will align text to the edge of an circular curve without distorting the shape of the actual letter
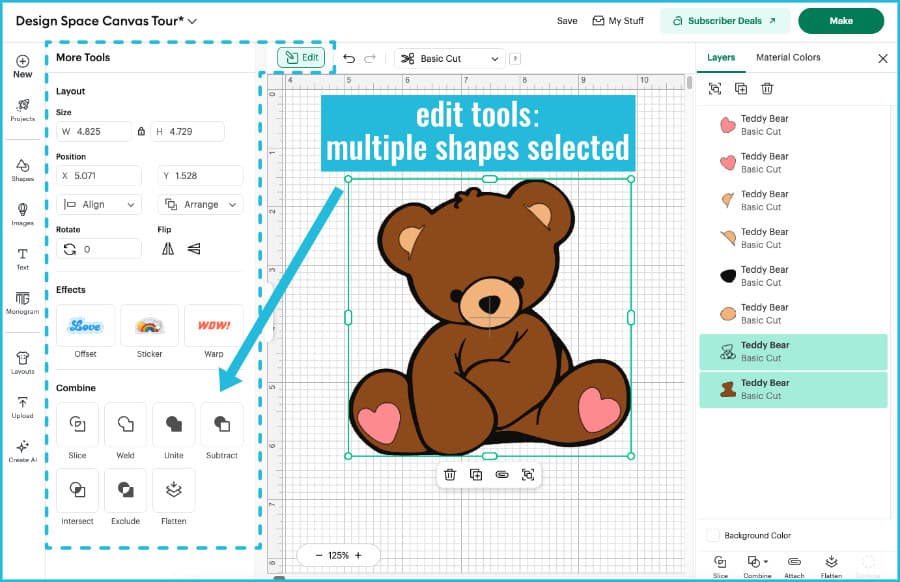
Flyout menu: multiple objects/shapes selected
This is an example showing the flyout menu of the Edit Bar when you select multiple objects on the Canvas. You will now see the Align tool options in the Layout tools, and you will see different Combine tools depending on how many and what type of objects you’ve selected.
In this example, the Slice tool is showing up because 2 cut layers are selected, but it won’t be there if you have an incompatible selection (e.g. more than 2 cut layers, objects with different Operation types, etc.). Flatten also won’t show up in every case, either.
Layout Tools
- Alignment pulldown: lets you align multiple selected objects at the top, bottom, center, etc. Will also evenly distribute multiple objects horizontally or vertically
Combine Tools
(Slice, Weld, Unite, Subtract, Intersect, Exclude, Flatten)
These exist in the Edit Bar flyout menu for certain selected objects, but their true home has always been in the Layers Panel. See the section below for a description of these tools.
The Layers panel: Organize your project
The Layers Panel shows your project behind the scenes: what exists, how objects are related, and what operations are assigned to each object.
Think of the Layers Panel as a checklist of everything that exists in your project, organized in a linear way. Everything that is part of your project will show up in the Layers Panel, even if you can’t see it on the Canvas.
If something is acting weird, check the Layers Panel first.

What is a Layer?
Each layer is a piece of the project that has its own Operation (cut, draw, foil, etc.). A layer can be an image, a score line, a shape, a text box, or even a single character if you’ve ungrouped text to letters.
How to read the Layers Panel
Every time you add something to the Canvas, it is added to the top of the panel as a new layer.
The list of layers from top to bottom represents the design on the Canvas from front to back. These are not static. You can move the layers inside the layers panel (just click and drag), and the layers in the panel will also reorganize if you rearrange objects on the Canvas.
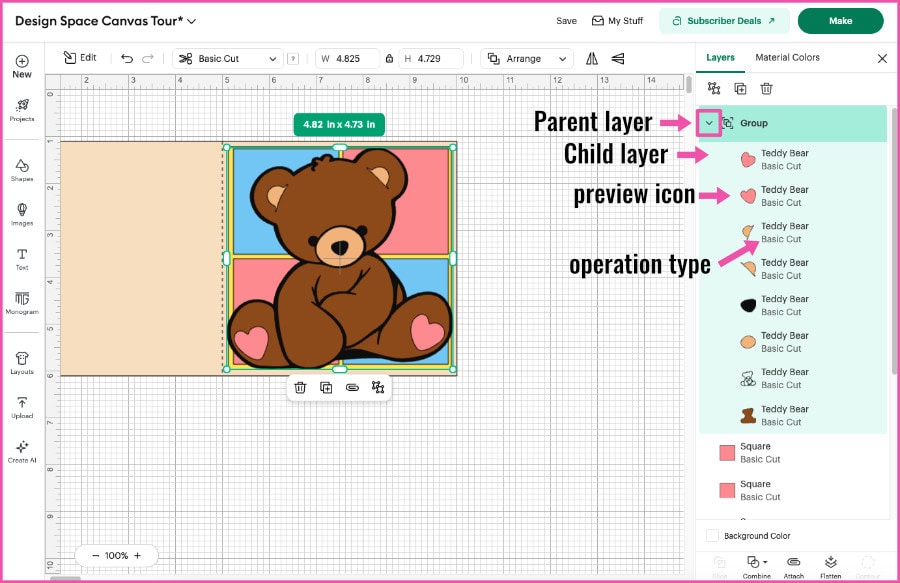
This is a baby shower card organized on the Canvas the way it will be constructed. Front to back, it has a layered teddy bear sitting on top of 4 colored blocks, on a background square, on a card base. The Layers Panel lists the teddy bear Group at the top (front), followed by the background blocks, then the panel, then the Attach group that is the card base with a Score line.

Each layer has a small preview image and a name (which you can change by right-clicking on the layer and selecting Rename). The Operation applied to each layer is listed under the name (Basic Cut, Draw, Score, etc.).
Groups in the Layers Panel
If there is a small arrow next to a layer name, that layer is a group with a parent layer and one or more child layers. Clicking the arrow expands the group so you can see each individual component. Child layers are indented below the parent layer, so you can easily see the hierarchy.
The parent/child structure is shown for 4 types of relationships:
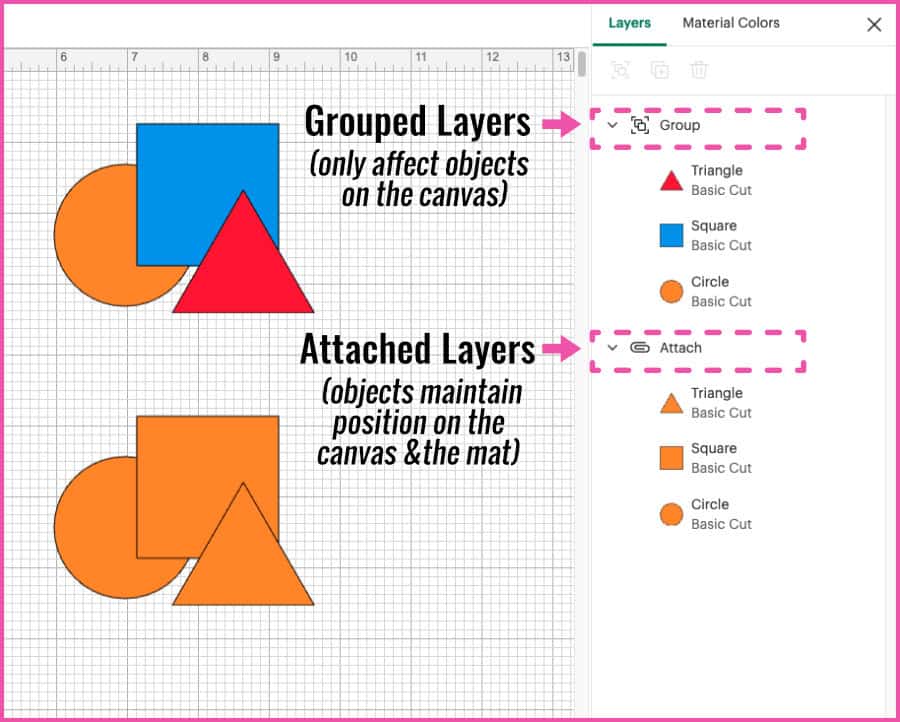
- Grouped objects
- grouped using the Group tool
- these objects stay together when moved/resized on the Canvas, but will be treated separately after hitting the Make button
- Attached objects:
- grouped using Attach
- these objects retain their alignment and position and will stay together on the Mat
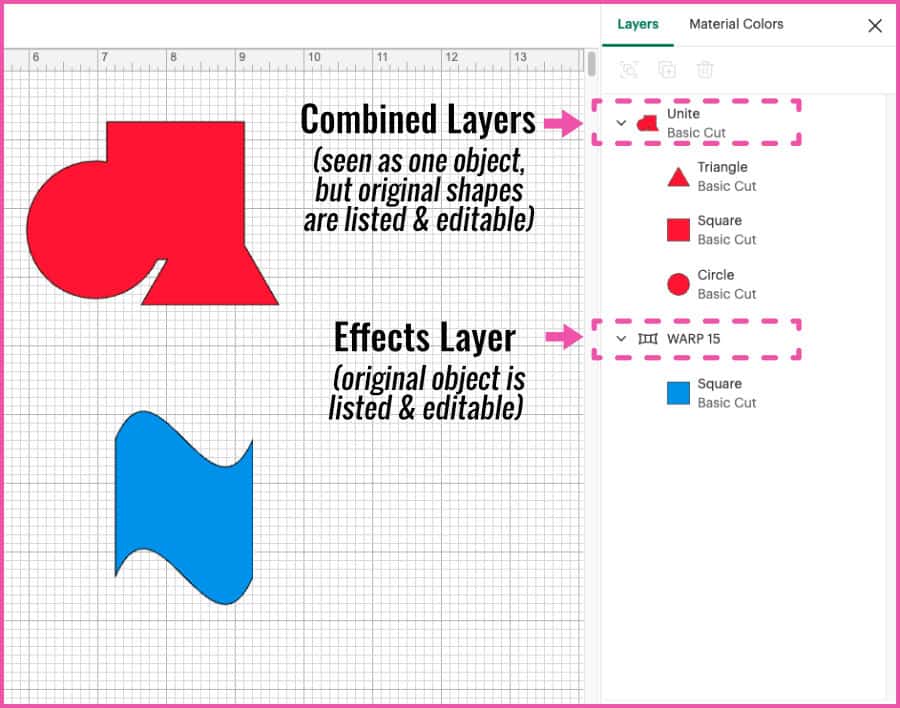
- Combined objects:
- grouped using one of the Combine tools (Unite, Subtract, Intersect, Exclude), the original component objects are listed under the Combined result
- Effects-modified objects:
- the original version of an object will be listed under the resulting layer after certain Effects (Warp, Sticker) have been applied
Tools of the Layers Panel
There is a selection of tools in the Layers panel. This is a brief overview of what everything does.
Top of the Layers Panel:
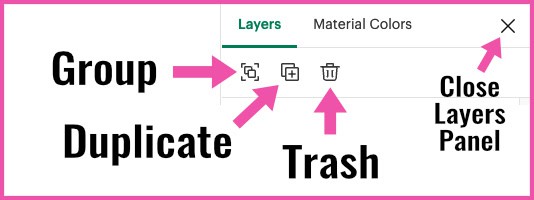
- Group: select 2 or more objects and use Group to keep them together on the canvas (they will NOT be grouped on the mat when you click Make)
- Duplicate: select an object or text and click Duplicate to create a copy with the same color and Operation type
- Trash: delete the selected object(s)4
- [ X ]: collapse the Layers Panel, if you need more space to work on the Canvas (reversible)
Bottom of the Layers Panel:
- Slice: select 2 overlapping objects and the Slice tool will cut the top shape out of the bottom shape, creating 3 or 4 new layers. Also found in the Edit Bar flyout menu for some selected objects.
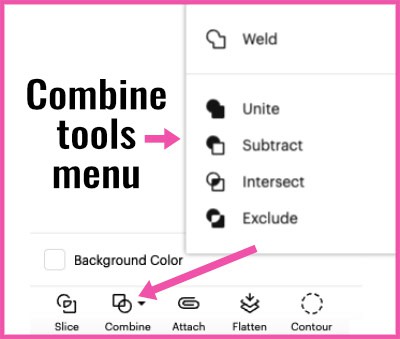
- Combine Tools Menu: a suite of tools (Add, Subtract, Intersect, Exclude) that allows you to create new shapes out of 2 or more selected objects. This is the same set of tools that can show up in the Edit Bar flyout menu
- Attach: locks in the relative positions of selected layers when planning a project (position information is retained when you click Make). Required to keep different Operation types like draw and cut together. Attach is the most important tool in the Layers Panel. If your design looks perfect on the Canvas, but is completely rearranged when you click Make, it’s because you didn’t Attach.
- Flatten: combines selected layers into a single Print & Cut layer so they print as one image and cut around the outer edge only. Also appears in the Edit Bar flyout menu in certain cases
- Contour: this is the same tool that shows up in the Edit Bar flyout menu for some selected objects. Lets you remove interior cut/draw lines
Other features in the Layers Panel
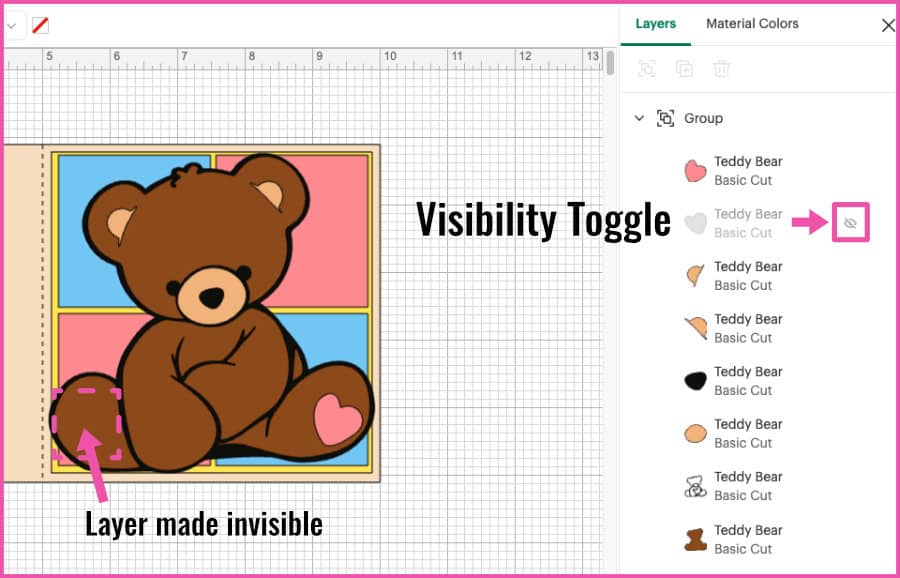
Visibility Toggle
The Visibility Icon (the eye) appears when you select or hover over a layer. If you click this icon, the layer will disappear on the Canvas. Clicking it again will make the layer reappear. This controls whether or not the layer will participate in the project. An invisible layer is ignored by Design Space during planning and Making: it won’t be included in the project preview (Prepare screen) or made by the machine.
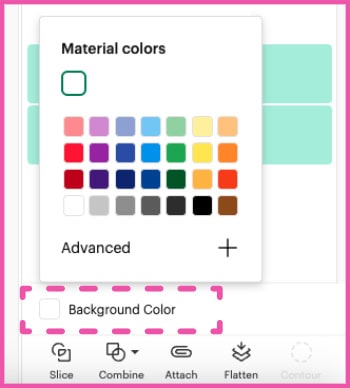
Background Color
You can change the background color of the Canvas by clicking Background Color at the bottom of the Layers Panel and picking a color from the pop up menu.
Material Colors
The second tab at the top of the Layers Panel is Material Colors (this used to be called Color Sync). It lists all the layers of the project grouped by color.
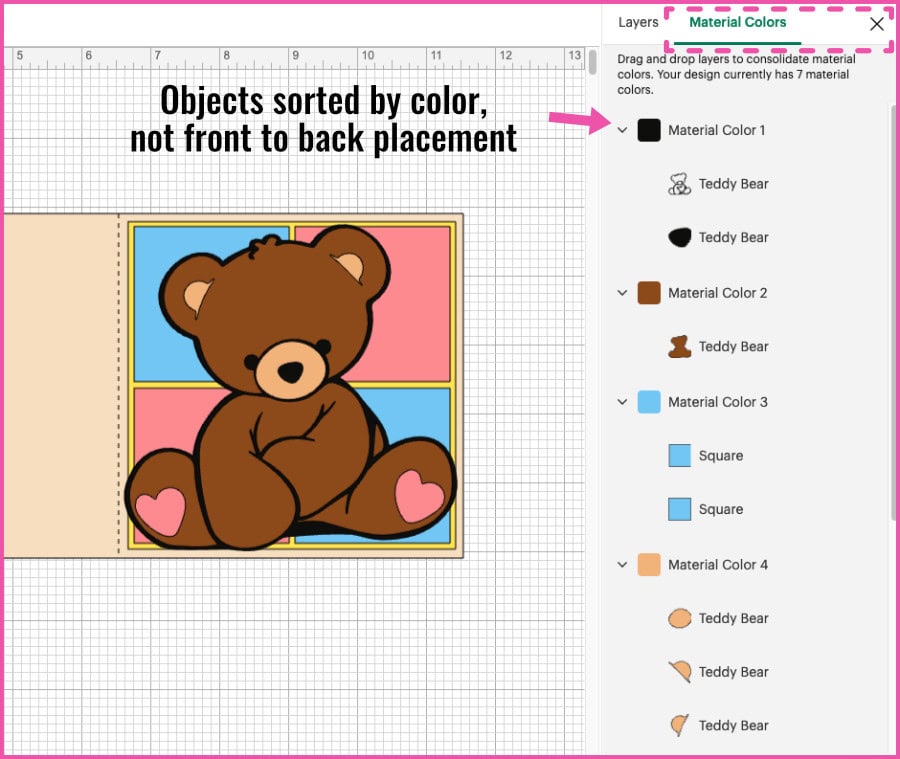
Color is a planning tool used by Design Space to group your layers on mats when you go to Make the project. This is a helpful tool to consolidate objects you want to cut out of the same physical material for your project. You can click and drag any layer into another color group to coordinate mat assignment.
Good to Know: other important things on the Canvas
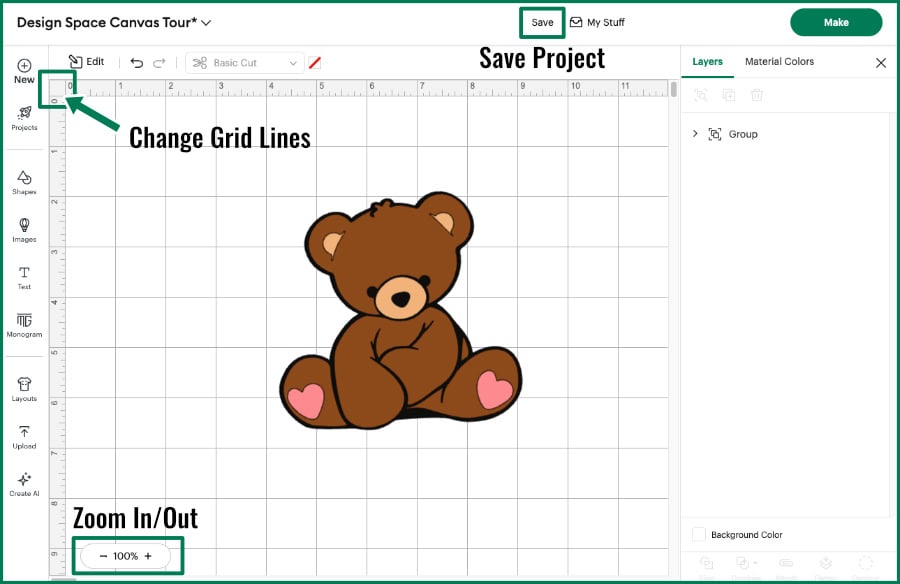
How to change the grid lines on the Canvas: Click top left corner of the Canvas where the horizontal and vertical rulers intersect. The grid lines will cycle between 1 inch squares, 0.1 inch squares and no grid lines at all.
Save your project: Click the Save button above the Edit Bar to save your current work.
Zoom in and out: Click the plus/minus icons in the lower left hand corner of the Canvas.
So that’s our tour of the Design Space Canvas! This is just to get you acquainted with the basic sections of the Canvas and the kinds of tools you’ll find there. The tools of the Canvas are predictable, and you will find them in one of the big 3 zones.
What we’ll be covering next
So now you’ve gone on a tour of the 3 zones of the Canvas where you will find both design and planning tools.
Up next, we’re going to follow the Design Space workflow to the Prepare and Make screens. You will learn what you control and what will happen automatically as you finish the planning phase of your project, right to the moment where your Cricut machine takes over.
- How to Download, Install & Log in To Cricut Design Space
- What Does Cricut Design Space Do? Understanding The Workflow
- The Canvas: Understand The 3 Zones ← YOU ARE HERE
- The Prepare & Make Screens: Planning Your Cut ← UP NEXT
- From Canvas to Cut: Your First Complete Cricut Project