
This article is part of our Mastering Cricut Design Space learning hub. It is part of our series on the tools and techniques of the Canvas.
Cricut users can often find learning Design Space a little intimidating, but a new feature provides an easy solution to a problem that has dogged veteran users for a long time. Specifically, how do you make round corners in Cricut Design Space?
The Offset tool creates an outline around any shape or text on the Design Space canvas. Users can choose to set the outline to have round corners, thus creating an easy way to have DS display any shape with round corners.
This is my favorite feature of the new Offset tool, and it sure beats the old method of welding and slicing circles and squares to make round corners. This simple method will save you tons of time and aggravation and give you perfect results!
Update: Cricut added several new options to the Shapes menu, including a rounded corner square and rectangle. This is great news, but if you want to make other shapes with rounded corners like triangles, stars or something else, you can still use the steps we’ve outlined below to achieve fast, easy and perfect results!
How to use the Offset tool to create Round Corners
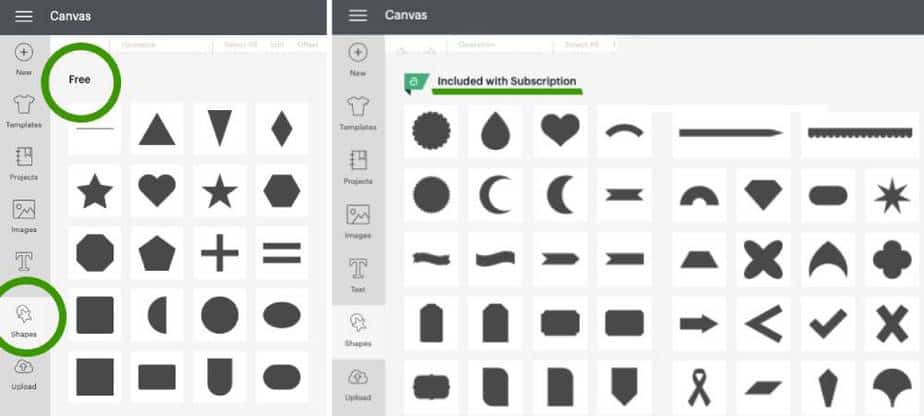
1. Select a shape from the Shape Menu
The first step is to open the Shapes menu from the left-hand tool bar. Select any shape with corners (ie. any shape except the circle) from the menu. I have chosen a basic square for this demonstration.

2. Open the Offset menu
The next step is to click the shape to highlight it, then select the Offset tool from the top toolbar. The Offset menu contains two options: offset distance, and corner style. You can drag the slider left or right to increase or decrease the size of the offset line. (Or you can enter a specific value in the measurement box.) The larger the offset, the more round the corner will be.
(Users should note that the offset has a 1 inch limit.)
The most important step is to check the rounded corner option in the menu. This selection makes the corner round. Luckily, rounded corners are the default setting.

3. Delete the original shape
After you have filled in the values in the offset menu, you will have a new shape on the canvas. Design Space treats the Offset as a separate object from the original square we placed on the canvas.
Click the original shape to highlight it, then delete it. (You can delete by clicking the trash can icon in the upper right corner of Design Space, right-clicking your mouse on the shape and selecting Delete from the shortcut menu, or pressing the Delete key on your keyboard.)

Now the only shape remaining on the canvas is the rounded square. It is ready to use like any other shape in Design Space. Resize, re-scale, slice or weld the new shape to fit into your project.

Bonus tip: how to make a perfect rounded corner frame
So now that you know how to make a rounded corner shape, how do you make a perfect rounded corner frame for a label, decal or t-shirt graphic? Once again, the Offset tool rides to the rescue!
Select your rounded corner shape, click the Offset tool in the toolbar and create another offset around it. This time, it will create a perfectly even frame around the original shape!

Slice the offset shape and the original shape
Conveniently, the two shapes line up perfectly. All you have to do now is select both and click the Slice tool from the lower right-hand corner. (Or right-click and select Slice from the shortcut menu.)

Delete the two solid shapes from the layers menu. Your perfectly proportioned round corner frame is ready to use.

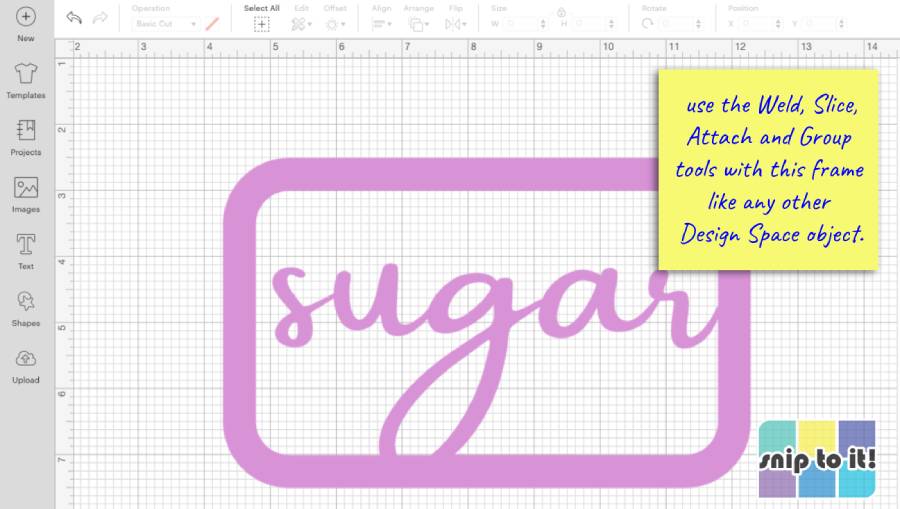
Use this new frame for any Cricut project
This round corner frame can be resized, re-proportioned and used with the Slice, Weld, Attach or Group tools to make labels, decals, iron-on designs and more!
External Offset vs Internal Offset
Just a quick note on the Offset tool: if you drag the slider to the left, you get an internal offset. (ie. a shape smaller than your original). In most cases – like a rectangle, triangle or polygon, the corners will not be rounded! You can see the exception below is the star shape, which has internal and external corners. Only the internal corners will be rounded!

Next Steps in Design Space Learning
I hope you found this step-by-step pictorial to be helpful and easy to follow. The Offset tool is one of my favorite Design Space tools and it makes working with shapes and images so easy in a very straightforward way.
Here are more great ways that I use the Offset tool: 11 tips for using the Offset tool for Next Level Crafting
Want more great tips?
Super. Just what a true beginner needed
Glad you found this article useful! Thanks for reading! Ian
I have created my offset project – what I need now is tips and tricks for physically aligning the layers on my card stock for the final product.
I am old and have shaky hands so any kind of tips you have to assist me with getting the layers physically aligned would be wonderful.
All of the many sites are really great at showing all the ins and outs of the machine – but really not much about what happens after everything is cut/printed out.
Hi Jill,
I know what you mean, and believe me when I say that my alignments are not always perfect!
If I am working with cardstock layers, one of the best things is using glue so I have a little time/wiggle room to reposition the layers if I have to. I usually use tape runner for larger layers, and it’s harder to reposition. I usually just eyeball my layers to get the alignment right and I don’t worry about things that are a little bit crooked or not-quite-centered, because I’m a firm believer in handmade charm.
That said, there is a trick you can use when you are designing your project in Design Space. If you are working with cardstock and want to give yourself a guide to place your offset layer (or text), you can use the scoring tool (or a pen to draw a guideline):
1) make a duplicate of your top layer
2) position the duplicate over the offset layer (i.e., select the duplicate layer and the offset layer and choose Center from the alignment menu)
3) change the Operation for the duplicate layer to Score (or Draw)
4) select the duplicate layer and the offset layer and Attach
Now your cardstock base shape will have a score line showing you where the top layer needs to fit. Kerri demonstrates this technique in her tutorial for making eclipse cards – she scores the outline of the text onto her patterned card base. If you have trouble seeing your score line, you can always draw an outline in thin pen (I’d use one of the 0.3mm/Extra Fine pens). Hope this helps! – Ian
Ian – thank you so much for the brilliant idea!
I was making greeting cards just using graphics I had purchased and the text/ryhmes/ or just some silly note to go with the graphics. My friend got me started with CRICUT for added personalization.
You see our 4 kids who are v well into their 40s now produced 15 grandchildren and recently one of our granddaughters gave birth to our first great grand child.
We are on a fixed income and with my handicap shopping is just too tiresome and too expensive. So I create personalized gift cards for each of them.
I needed a hobby and well this one keeps my mind busy and all the kids amused…
Jill,
I’m so happy to help! I totally agree with you about using the Cricut to make personalized gifts – you can do anything you want with just simple cardstock. Cardmaking using dies, stickers, etc. is so expensive and so much less versatile.
It’s really great that you can use your crafting to connect with all your kids, grandkids, and now great grandkids. There is nothing as special as handmade, I’m sure your family cherishes getting their personalized cards from you.
Your question has inspired Kerri and I to make a video for our YouTube channel demonstrating this technique, we’ll be publishing it in the next couple of weeks, so thank you for asking. My mother in law has essential tremor that has made doing anything with her hands increasingly difficult, so this is an issue near and dear to us.
If you have any more questions, please feel free to ask us! We love hearing from readers and hope that we can help. Wishing you a very happy Mothers Day! – Ian
I am having a problem with the scoring.
Is there away to make just a scoring outline of the top layer?
Is there a way to create an outline of a layer for the purpose of scoring it onto the next layer?
My top level has a lot of detail which is not needed in the scoring of the next layer as a place holder.
I hope this makes sense.
Hi Jill
If I understand correctly, you want an outline of your top level that you can score onto the next level below to help you align it. But you say your top level has a lot of detail which is not needed in the scoring…Am I correct in understanding your top level has small, internal cut details?
If this assumption is correct, here’s what I would do.
1. In Design Space, create a duplicate of your top layer.
2. Open the Contour Tool in the lower right hand corner of the screen.
3. Select “Hide All Contours” to hide all of the small details inside the layer. You will be left with the main solid shape remaining.
4. Line this duplicate layer over the second lower layer.
5. Change the operation of the duplicate layer from Cut to Score, then Attach it to the lower layer.
Hopefully this should solve your problem! Good luck – Ian
YES!!! Thank you ever so much!!!
So glad I could help! – Ian