
We were recently lucky enough to participate in a DIY Halloween shirt design challenge from our partners at Heat Transfer Warehouse. They invited a bunch of bloggers and YouTubers to come up with a Halloween themed shirt using a wide selection of heat transfer vinyl.
We had to say yes. Halloween is an epic holiday for kids and adults alike. It’s the perfect reason to indulge our love of 80s pop culture. The only rules were that we had to use at least three of the materials included in the bundle from Heat Transfer Warehouse:
- Siser Glow in the Dark
- Siser EasyReflective
- Siser Sparkle (Sunset Orange)
- Siser Easyweed (Moss Green)
- Siser Easyweed (Wicked Purple)
- Siser Twinkle (Orange)
- Siser Holographic (Firelit Pearl)
- Siser Glitter (White, Tawny)
- Siser Easyweed (Orange)
- WALAKut Puff Neon (Orange)
- Decofilm Soft Metallics (Silver)

We also got a black longsleeve t-shirt and a black cotton tote bag. As long as we used at least three materials, Bob’s your uncle – we could do whatever we wanted.
Here’s what you will need for this project:
- Siser Glow in the Dark
- Siser EasyReflective
- Siser Sparkle (Sunset Orange)
- Siser Easyweed (Moss Green)
- Siser Easyweed (Wicked Purple)
- black long-sleeved T-shirt
- cutting machine (I used a Cricut Explore Air 2)
- heat press (I used a Cricut EasyPress 2)
- SVGs and font (available at the bottom of this article)
Halloween Design Challenge Video
Designing our T-shirt
So inspiration hit me pretty quick. It’s Halloween, I was thinking horror movies and the classic movie monsters: Frankenstein, Dracula, the Wicked Witch of the West. They are fun Halloween archetypes that make great costumes and decorations. Since they are universally loved and recognized, wouldn’t they be in some sort of museum, gallery or…Hall of Fame perhaps?
BOOM!
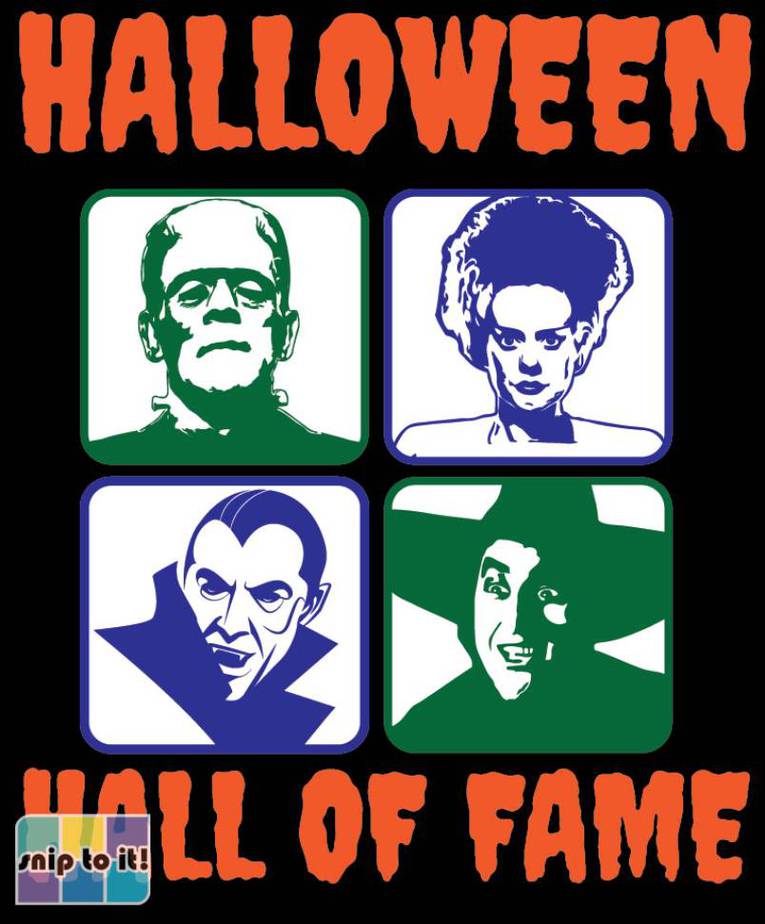
It had to be a design honoring the Halloween Hall of Fame, featuring Frankenstein and his Bride, Dracula, and the Wicked Witch of the West.
Also, I grew up in the 80s, when a 9 year old could rent Friday the 13th on VHS from a gas station with no questions asked. So I had to honor 80s Hall-of-Famers Freddy and Jason. What latchkey kid from my day didn’t don a striped sweater and pretend to be a child killer for Halloween?
I was stoked to start designing, but first I had to find the right images to turn into cut files.
I browsed clip art and free SVG sites for a while, but most of the offering were either too generic, too cartoony or didn’t have the right license.
(Since I’m doing this project to demonstrate HTV layering techniques and including links to commercial websites, this counts as commercial use, even though the actual t-shirt I am making is not going to be for sale.)
Finding the right images (with the right license!)
So I decide to make my own SVG cut files from public domain photos! I have created an entire tutorial to the process, and the steps were easy to apply project photos. I found my source photos from Wikimedia Commons, Youtube screen captures and Fandom.com. The media on these sites are typically made available under Creative Commons license, allowing for use with attribution under the Attribution-Share Alike 4.0 International license.
(In layman’s terms, this means the image is available for use for personal and commercial purposes, as long as the resulting artwork is attributed and also made available under the share and share alike license)

So, in total, I used 6 images (full attribution and source links here) and I spent an afternoon removing the backgrounds and vectorizing each image. Here’s a video tutorial I made that walks you through the entire process of turning a photo into an SVG cut file.
After each photo has been vectorized, I’ve got great results that will look great on a t-shirt.

The basic structure of the shirt design was taking shape. Each character is going to be cut out in either green or purple Easyweed and overlaid on Siser Glow in the dark vinyl. The text on the shirt is going to be cut out of Siser Sparkle Orange. In order to make sure all of the images are the same size, I also added a frame in my vector editor.
Halloween Hall of Fame Design Reveal
After a couple of different iterations and trying a few different vectors, I have my design ready to cut and apply to my t-shirt. Here’s the front view:
And here’s the back view:

And here is what I’m planning for the sleeves in Siser EasyReflective:

So now that the design is finished, it’s time to get it set up in Cricut Design Space for the cut!
Cricut Design Space setup
This design was cut with my Cricut Explore Air 2 (my preferred craft cutter for making t-shirts) so all of these SVG files need to be loaded into Cricut Design Space. I am going to load both the front and the back SVG files into one project so I can group each element by color, and hopefully have a streamlined experience cutting, weeding and applying the HTV to my shirt.
I front-loaded most of the design work for this shirt in Adobe Illustrator so I wouldn’t need to tinker with it a lot in Design Space. Every image should belong to its own group and (I hope) there won’t be any surprises when I upload the files!
Here’s the first look at the design after I’ve uploaded the files to a new project in Design Space.

Once the design is loaded in CDS, there are 3 key things to do before the file is ready to cut:
- attach the text
- weld the image layers
- resize the design
I also did 4: use the Offset feature to create a glow in the dark outline for the text
First, let me show you what not to do:
This is what happens when every element of the design is one big attachment. It’s all one color, and it won’t work for this or most designs)

We need to attach strategically. Each group of text needs to be its own attachment and each colored image needs to be welded together. If the text is unattached, Design Space will set it to cut the text out of order. If the colored image panels are not welded, all of the small, unconnected facial feature pieces inside each panel will end up as a separate cut shape detached from the rest of the design elements.
To see what this looks like, just hit the Make it button at this stage and get a preview of each mat and what every unattached element looks like on its own.

To get the design ready to cut, I just want to make sure all the elements of each image panel are either attached together (do this for the text) or welded together (do this for the images). After these adjustments, we should be fine to cut!
Attach the text layers and weld the colored image panels
Start by ungrouping each of the designs. (When I made this in Illustrator, I grouped many of the elements together to keep the process organized. You may have to ungroup each image two or three times.) Then attach or weld each element. Click a block of text to highlight it, then click the attach icon at the bottom of the layers toolbar on the right side of Design Space. (You can also right-click on the text and select “Attach” from the shortcut menu.)

The next step is to weld together each green or purple graphic element. I opted to weld rather than attach, because in my experience, Design Space takes less time to load welded images rather than attached images. If you have problems welding the images, you can always attach them instead.
To weld the image, click one of the colored panels in the design (or highlight it in the layer sidebar) and click the “Weld” icon at the bottom of the layers panel. (You can also right-click and choose Weld from the shortcut menu).

Resize the image to fit your t-shirt
The next thing I want to do is get everything sized correctly. I’m going to be applying this cut HTV to a 3XL shirt, so I next to make it nice and big to use up as much of the real estate as I can. As it stands right now, the front and the back designs are about 8.5 inches wide. I am going to size up the overall width of each design to 11 inches so I can easily fit everything onto the standard mat of my Explore 2 machine.
To adjust the width of the design, all I have to do is drag the cursor over each half of the design in the main part of the canvas. Next, I change the width value in the top toolbar to 11 inches. Repeat this step for the back half of the design and every element should be proportionately resized and ready to cut.

Add an outline to the text (optional)
This is a step that I saved to do in Design Space rather than do in Illustrator. The new Offset tool is really easy to use and it does a great job creating an outline of any shape or block of text. To do this simply click one of the text blocks to highlight it, and then click the offset icon in the top menu bar.
In the Offset menu, choose the width of the outline (the default value is 0.25 inches). I made mine slightly smaller (0.15 inches), and then clicked Apply. The offset shows up as a black outline around the text by default, but you can change the color in the top menu bar. I changed it to white to match the glow in the dark panels I already had in my design.

When Design Space groups every element by color to cut, the offset shapes will be included with the background panels that will be the first layer of glow in the dark HTV under the colored Easyweed.
Mat Preview
In the mat preview, we can see that everything looks like I wanted. All of the text is in the correct order and each image is welded and all of the small components are where they are supposed to be.
We’re ready to cut!
A. DON’T FORGET TO MIRROR YOUR CUTS!
B. DON’T FORGET TO PLACE YOUR VINYL COLORED SIDE DOWN TO THE CUTTING MAT!
Cutting the HTV
The first layer cut is the Siser Glow. We are getting ready to cut six rounded squares that are 4.65 inches wide. This means that these cuts will have to be made in two steps because all 6 of the squares can’t fit on a 12″ x 12″ mat.
If you have a 12″ x 24″ mat, or if you are cutting from a Silhouette machine, you can cut these panels in one step. In Cricut Design Space, select the 12″ x 24″ option in the “Material Size” pulldown menu and all 6 cut squares will appear on the same mat.
If you have a Silhouette Cameo 4, set up your machine to do matless cutting from the roll.
After the Glow in the Dark HTV, the next layer up is the orange Siser Sparkle. I like to use a crosscutter to get a clean, even trim of the vinyl off the roll before I stick it to the mat.

The final two layers to cut are the Moss Green and Wicked Purple Easyweed. Again, I find it easier to cut a twelve inch square from the roll using a crosscutter and then apply it colored-side down on the cutting mat. In the preview window I have moved each image on the mat to allow for more space when they are cut apart before the application process.
Cutting the Vinyl
As I said earlier, I am using my Cricut Explore Air 2 to cut this design, and I am following Siser’s instructions for cut settings:
- EasyWeed: set Smart Set dial to Vinyl+
- Glow: Vinyl+
- EasyReflective: Vinyl+
- Sparkle: Vinyl+
At least the settings are easy. Once I’ve pre-cut my vinyl into 12 inch squares, I just load up the mat, press GO on the Cricut and let the machine do the work. After each cut, I unloaded the entire sheet of vinyl so I can weed while the next layer is working in the machine.
One thing to note about cutting the Siser EasyReflective: I was initially confused about what side was the carrier and what side was the vinyl. It turns out this vinyl has an opaque carrier that prevents you from seeing the “pretty side.” I actually cut it upside down the first time I tried to use it and sliced through the carrier sheet!
When you cut it, place the dark grey side of the vinyl facing up.
Weeding
There’s a lot to weed for this project, but thankfully, most of it is not too daunting. The Glow in the Dark, Sparkle and the Reflective are pretty basic shapes that are mostly finished just by pulling up the outer band of vinyl. The green and purple EasyWeed layers were a bit of a challenge because I let myself get a little caught up in the details when I designed the monster vectors.

There are some small pieces in the faces of the monsters, and I apologize in advance if it’s tricky for you to weed. I spent about 30 minutes weeding everything in total, but the green and purple consumed most of that time.
Application Using Cricut EasyPress 2
Finally we get to the best part of making this t-shirt! I am using an EasyPress 2, so the strategy for pressing will be to apply heat in short increments, moving section to section and layer to layer.
Placement
Before you get started with the heat press, I recommend laying all of your weeded vinyl pieces out on your shirt to mock up the layout. This lets you verify that everything is going to fit together, and it gives you a chance to see the thing you’ve been creating on your computer in real life for the first time.
I’f you’ve missed any spots weeding, or if you’ve made a spelling mistake or forgotten to mirror your cut, this is your chance to catch any goof -ups before you apply the heat.
Here’s what my project looks like before I press it:

Finding the center line of a shirt
Before you press your shirt, you should have a reliable method of finding the center line of your shirt. Lots of people use a t-shirt ruler, but I use the crease method. Simply fold your shirt down the middle and press for a few seconds to put a crease down the center of the shirt. Don’t worry about this messing up your design, the crease will be pressed out when you apply your HTV.

The three finger rule
When placing the design on the shirt, how far from the neckline should your design sit? Again, a t-shirt ruler is a great guide to help you with HTV placement. If you don’t have a guide, you can use three fingers to measure the general distance you should place your design from the neckline.
Also important to note: when pressing the back of a t-shirt, a good general guideline is to have a 4 inch space between the collar of your shirt and the design.

Fold the HTV in half to find the center
Finally, make sure your HTV is centered on the garment. Fold your vinyl in half and pinch a line in the carrier sheet at the middle. Then use that fold you just made to line up with the crease down the middle of the shirt. Now your vinyl is centered on your shirt and you are ready to press!
Temperature settings
Heat press settings are determined primarily by your material. In this case, I am following Siser’s guidelines for time and temperature for these HTVs. Siser recommends adding 30 degrees Fahrenheit to their temperature settings if you are using a Cricut Easy Press, so here are my settings:
- Glow: 305oF + 30oF = 335oF for 10-15 seconds, hot or cold peel
- EasyWeed: 305oF + 30oF = 335oF for 10-15s, hot or cold peel
- Sparkle: 305oF + 30oF = 335oF for 10-15s, hot or cold peel
- EasyReflective: 305oF + 30oF = 335oF for 15s, warm peel (wait 15s before peeling)
Easy! All my press temperatures are the same, but I have to wait extra time to peel my reflective.
Siser also includes pressure recommendations (medium for all these HTVs), which you can set if you are using a regular heat press. With the EasyPress2, I am using firm pressure applied evenly from directly above the press.
Time settings
Because I was layering and pressing the shirt in multiple passes, I first tacked down each piece for only 1-2 seconds. As long as the HTV doesn’t lift when you remove the carrier sheet, you’re good. I tacked all of my Glow pieces down first, then pressed the EasyWeed and Sparkle layers.
Tack first, then one final press. While layering, the strategy is to count the accumulated seconds of each short press. Total time should be equal to the maximum recommended — try to avoid overpressing!
Carrier Peel
Most of the vinyl used in this project is hot or cold peel, the EasyReflective required a “warm” peel, meaning a wait of 15 seconds. Because I was working with layers and elements that were grouped close together, I found it useful to trim my carrier sheets down to a minimal margin around the vinyl before pressing.

Tip: Use parchment paper or a teflon sheet while you press to protect your press platen. It’s recommended that you layer parchment paper or teflon above any HTV that has had its carrier sheet removed to protect the vinyl, the heat press and the garment.
Applying HTV to a garment sleeve
I was very ambitious on this project, so I tried something new and applied HTV to the sleeves of the shirt. I used the same basic method as pressing on the front: I folded the sleeve in half with the seam on the bottom edge, then I pressed a crease along the outer edge.
A lot of people use sleeve inserts, small teflon pillows or even mouse pads when pressing sleeves to protect against seam marks while they press. I just rolled my 12 x 12 inch Cricut mat into a tube and pushed it into the sleeve. It completely filled the space, but I could still see the crease I made and I was able to line up my pieces of vinyl.

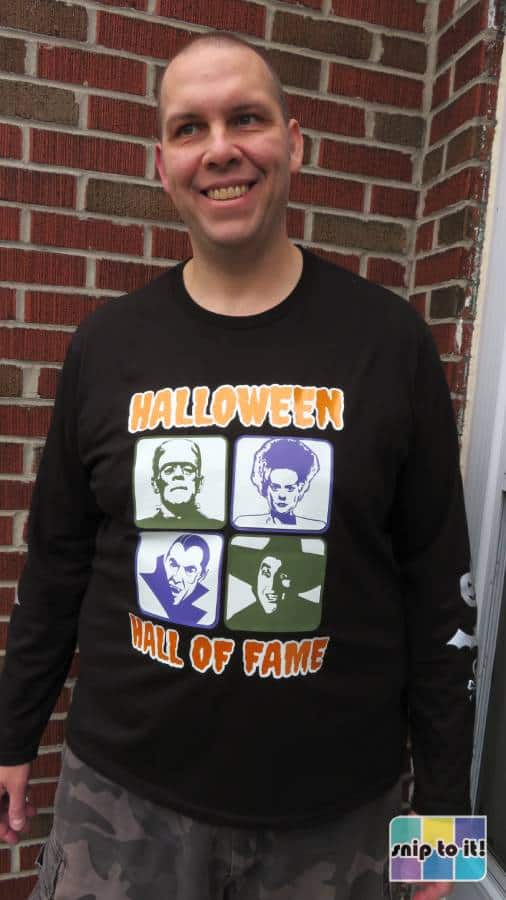
Finished Project
So here’s the big reveal!
This shirt combines great elements of unique artwork that you can’t get just anywhere, and the awesome glow in the dark effect. If you or someone you care about is a big fan of Halloween, horror movies and the 80s, this is the perfect project to make for the 31st (or Friday the 13th, or your Elm Street block party).


Free SVG Files
As promised, here is the link to the front, back and sleeve designs. Depending on the file type you need, I have made SVG, PNG and DXF versions of each image pack. Download these files on our free Resources Library page.
Image Credits/License
- Frankenstein: Public domain image (Wikimedia Commons)
- Bride of Frankenstein: Fandom.com image submitted by user CrystalManta under CC-BY-SA license
- Freddy Krueger: Wikimedia Commons image uploaded by user Obed7 under CC BY-SA 4.0
- Wicked Witch of the West: screenshot from YouTube video “I’m Melting“
- Jason Voorhees: screenshot from YouTube video “Friday the 13th (movie series review)“
- Dracula SVG: Public domain vector (publicdomainvectors.org)
- Creepster (font): widely available at numerous sites, free for commercial use
- Skull, Bat, Jack o’Lantern: FreeSVG.org


This is Fantastic and so Vintage! Thank you for the great easy step by step process.
Thanks so much! So glad you liked it. I can’t believe how easy it is to make a shirt at home these days!