I really enjoyed making the stacked warped text tutorial, and I wanted to make a fun Halloween T-shirt design using that technique. This tutorial can be as easy as you want it to be: you can either make your own design or use my ready-made free SVG.
Depending on the size of your decal and the HTV you want to use, you can even make this design in a single press! Fun and easy!

Video: How to make warped text Halloween t-shirts
Related: How to make wavy stacked text designs
Quick navigation:
Considerations before you begin
Design Software
I used PhotoPea to create both of the wavy text designs I’m pressing and I saved both as SVGs to use in Design Space.
Choosing a blank and HTV
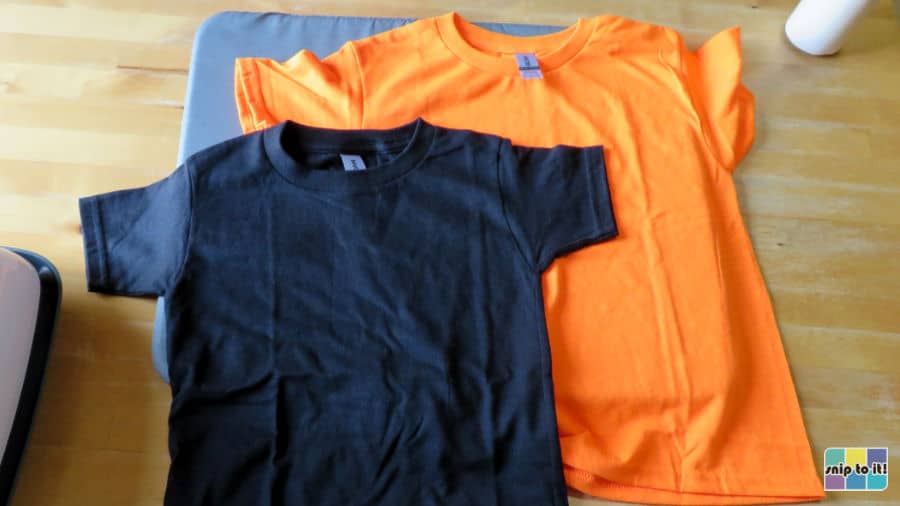
Any T-shirt in any size will do! I chose to decorate two 100% cotton Gildan kid’s shirts, a Youth XS and a 4T Toddler size.
The HTV I used was chosen for a couple of reasons. The HTV had to be good for shirts, and I wanted to be able to press everything at once, at the same temperature, for each design.
For t-shirts, I usually like to use HTV that is thinner, has a soft feel, and washes well. WALAKut Express in simple black and white was perfect for the bright orange shirt, and it has a lovely matte finish and soft, flexible feel after pressing.
Siser Sparkle and Electric have all the shine and glitz of glitter or holographic without the thickness, inflexibility, or plasticky feel. Sparkle and Electric are thin films that feel soft and light after pressing, and all the HTV used for the black shirt presses at the same temperature.
Materials and tools:
- Cutting machine – I’m using a Cricut, but you can use a Silhouette or any other machine
- Cut file – either download my free SVG from the Resource Library, or design your own using PhotoPea
- Cutting mat – (unless your machine cuts without a mat). I’m using a green Standard Grip mat
- Brayer or squeegee
- HTV – I’m using WALAKut Express in black and white for the orange shirt. The black T-shirt is being decorated with Siser Sparkle in Silver Sword, Siser EasyWeed Electric in orange, and Siser EasyWeed in black. You can use any type and brand you want, but check the manufacturer’s instructions for application time/temperature and peel instructions
- Weeding tool – I mainly use Tweezerman pointed tweezers, you can use any kind of tool you prefer
- T-shirts – I am using Gildan 100% cotton kids T-shirts (Youth XS and Toddler 4T), you can choose any size of shirt
- lint roller
- Heat resistant tape (optional) – to tape carrier sheets in place, if necessary
- Heat press – I will be using an EasyPress 2
- Pressing mat
- cover sheet – parchment paper or teflon sheet
How to make Spooky Vibes Only wavy text T-shirts
Prepare your design
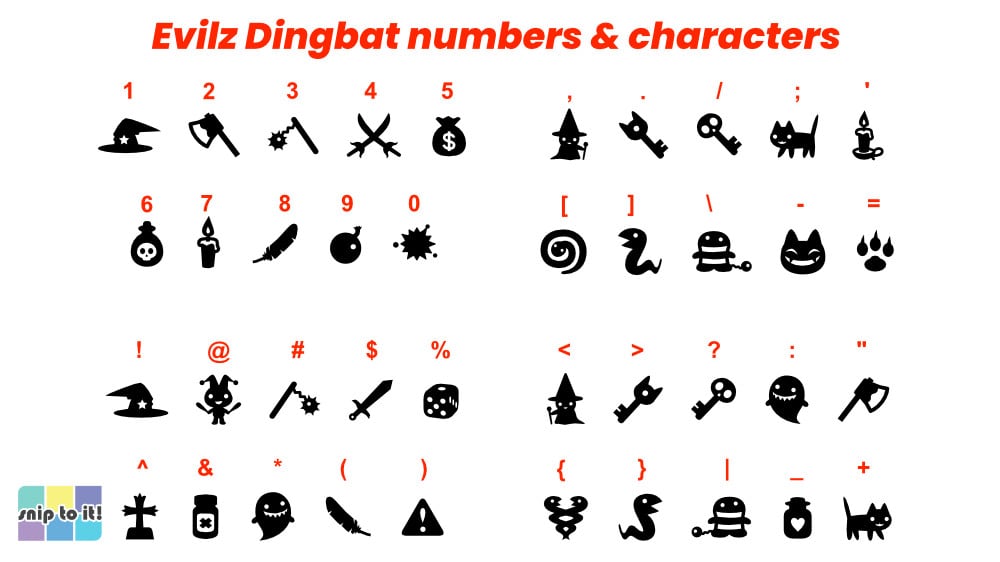
If you want to use my free, ready-made design, download the SVG or DXF file from my Resource Library. This design was made using ActionIs and Evilz dingbat fonts which are 100% free for commercial use:

I used the font Horror Area for the black t-shirt design, it’s free for personal use. If you’re looking for more options, check out my curated list of retro/groovy fonts for wavy text !
If you want to make your own design using PhotoPea, I have written a full tutorial and created a step-by-step video that takes you through the process of making a stacked wavy text design with straight edges on the top and bottom.
I encourage you to go through the tutorial (it’s pretty easy, and the video is less than 7 min long) to learn how to make your design from scratch with your own font, but here’s a quick summary of what you can expect:
- Download my stacked wave text template from the Sniptoit Resource Library.
- Open PhotoPea.com in your web browser, select “Open from computer” and select the template PNG.
- Add your first text block. Use the font selection menu, font size and font color controls in the top toolbar to customize your text. Resize your text to make it as wide as the template.
- Rasterize the text to convert it from editable type to pixels. Repeat for every layer (each line of text).
- Under the Edit menu in the top menu bar, select “Free Transform.” Next click the Warp button that appears in the top toolbar.
- When you click the mesh to make it active, there will be active white anchor points on the four corners and 8 handles represented by blue circles.
- Drag the white anchors to match the corners of each template section. Click and drag the blue handles to warp the text mesh to follow the contours of the template. Fine tune the handles until you’re satisfied. Repeat this step for each layer. Click the checkmark next to the warp button to accept the changes.
- Open the Layer menu in the top menubar, then select Vectorize Bitmap. This will convert each warped text layer to a vector. Repeat this for every layer.
- Open File > Export As and select the SVG option to save the file to your computer.
You’re done!
Swapping Dingbats into the Warped text
Adding images to your wavy stacked text design isn’t anything complicated that you need to be an expert to accomplish. I’ve made it easy using a cute dingbat font!
When I wanted to swap out the OO in Spooky for the cartoon bats, the first thing I tried was creating a text layer that left two spaces where the OO would be: “SP_ _ KY”. I rasterized that layer and warped it to match the shape of the template. Then I created a new text layer, changed the font to the dingbat font (Evilz from Fontspace). There are lots of fun characters in this font, I tried a bunch, but in the end I chose the capital N bats.

From there, I simply repeated the steps from the tutorial: rasterizing the dingbat, warping it to fit the contour of the template in the gap between the P and K, and then vectorizing the letters.
I encourage you to watch the video in this tutorial and follow along.
Importing your own design into Design Space
The next step is to open a new project in Design Space and upload the SVG file. The first thing I did was to ungroup the layers and then update the colors to match the vinyl I’m going to cut. SPOOKY and ONLY are set to light grey to match the Siser Sparkle HTV I used. VIBES is set to orange to match the Siser EasyWeed Electric. The bats are black and are cut out of Siser EasyWeed.
The dingbat layer is separate from the SP_ _KY layer. I wanted to press the bats in black on top of a silver sparkle layer. Using the Offset tool, I added an new layer around the bats, then attached that offset to the SP_ _KY layer.

If you are using my free SVG:
- Open a new project in Design Space and upload the Spooky Vibes Only SVG file
- Resize the design to whatever you need (see below)
- Ungroup the layers so you can change the colors to whatever you like
Sizing the design
I sized the designs using my 50% rule: the design should have a maximum width of half the distance between armpit seams. The Youth XS shirt measures 15″ between armpit seams, so I sized the first design to 7.5″ across. The 4T Toddler shirt measures 12.5″ between armpit seams, and the design was sized to 5.5″ across. Check my sizing and placement guide if you need help!
After these steps are done, the design is ready to cut. Click Make it and then arrange your cuts on the mats.
Make sure you mirror all of your mats when you go to the Mat Preview!
Cutting Step 1. Do a test cut, then cut your design
Always do a test cut before cutting your full design if you are using a material for the first time. The HTVs I chose for this project are very basic types that I use all the time, cut from rolls that I have actively been using, so I didn’t bother to test cut. But if you are using a new type of iron on, a fresh roll, or you just need more experience using HTV, I encourage you to try a test cut first.
Create a triangle inside a square weeding box by adding a square and triangle from the Shapes menu to your canvas. Click Attach to keep them together and size to about 0.5″. I usually make them a color I’m not using for my project so they will be on their own mat when I go to Make It.


Click Make It and choose the test cut mat, cutting using the manufacturer’s recommended settings first. If the HTV weeds cleanly from around the triangle, you’re good to go. If not, adjust your cut settings.
Suggested cut settings for WALAKut and Siser HTVs
WALAKut Express:
- Cricut Explore Air 2: Iron-On
- Cricut Maker: Heat Transfer (non-Cricut)
- Silhouette Cameo: AutoBlade setting 3; Heat Transfer, Smooth; force 6; speed 8
Siser Sparkle, EasyWeed Electric, and EasyWeed:
- Cricut Explore Air 2: Vinyl+
- Cricut Maker: Heat Transfer (non-Cricut)
- Silhouette Cameo: AutoBlade setting 3; Heat Transfer, Smooth; force 6; speed 8
Cut your carrier sheets very close so you can press once

After you cut and weed your HTV, cut the clear plastic carrier sheets close to the design, leaving a bit of carrier at the sides in case you need to tape the pieces down. This way they won’t overlap and you can press your design in a single press.
The downside to cutting the carrier sheets close is that it leaves less of the sticky clear sheet to hold the piece flat against the shirt. If your HTV was rolled tightly and your decal pieces are curled, you may need to use heat resistant tape to hold them in place on your blank.
Press your design
I pressed the shirts on a Cricut pressing mat using an EasyPress 2.
Siser recommends adding 30ºF to their normal press temperatures if you are using an EasyPress. I always follow this advice unless pressing on delicate fabric or doing complex layering.
These are the recommended press temperatures, times, and pressures for each HTV (adding 30ºF to Siser):
- WALAKut Express: 250ºF-305ºF, 5s, high pressure
- Siser Sparkle, EasyWeed Electric, and EasyWeed: 335ºF, 10-15s, medium pressure
I will be using firm pressure with my EasyPress. When using an EasyPress, too little pressure will result in HTV that lifts after a wash. If you are using a conventional heat press, use medium-firm pressure.

Pressing Step 1. Prepare your base material:
- remove lint and debris with a lint roller
- pre-press to remove moisture and wrinkles
Pressing Step 2. Press your layers:
I like to tack my layers down then give a final press without any carrier sheets in order to avoid carrier marks. It is OK if you prefer to just do your pressing for the full time, then remove the carrier sheets at the end. I pressed everything under a teflon sheet, but parchment paper is also OK.
Orange shirt design:
- the HTV was curled so I taped down the edges of the carriers (with Siser heat resistant tape) to keep the pieces flat
- all WALAKut Express layers were pressed together at 300ºF for 5s
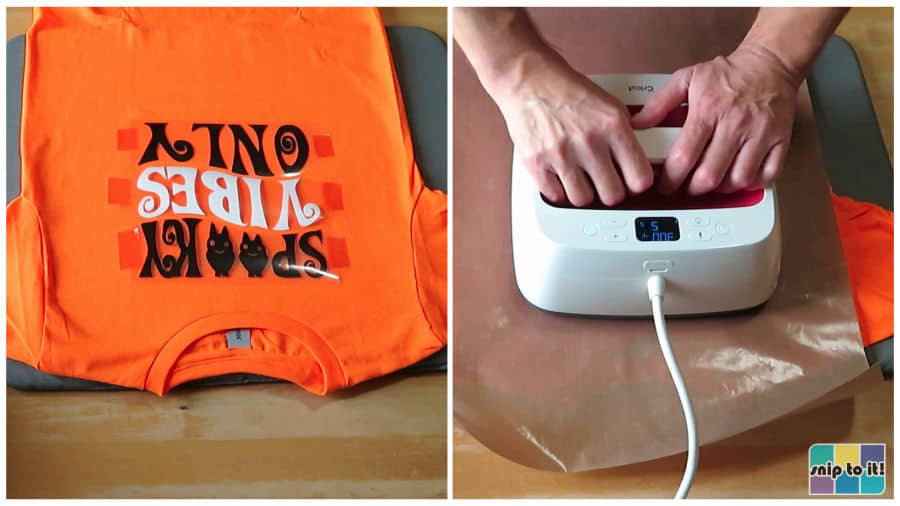
- carrier sheets were peeled warm (wait 10s or flip the shirt and rub it on the table top to cool it)
- layers were covered with a teflon sheet and given another 5s press to make sure everything was adhered properly (optional)
Black shirt design:
- Sparkle + EasyWeed Electric pressed together: 335ºF, 5s
- carrier sheets peeled hot

- EasyWeed (bats) added: 335ºF, 2s

- EasyWeed carrier removed, then 335ºF, 10s

And now your project is complete!
I hope you like these fun Halloween shirts as much as I do, the stacked wavy text is a favorite of mine. It’s so fast and easy to make some cool shirts!
The WALAKut Express turned out beautifully in just classic matte black and white, a perfect pairing with a vibrant shirt:

And the Siser Sparkle and Electric look awesome on the black shirt:

Seriously, photos really don’t do these HTVs justice, that Electric orange is 🔥!

Whether you want to make your own wavy text design or simply use my SVG, I hope you enjoy creating a fun shirt this Halloween!
If you have any questions, please feel free to ask in the comments below, or post a pic of your own creation!