This article is part of our Cricut Design Space learning hub, part of a series on the tools of the Canvas.
Welcome to our guide to Weld, Slice and the Design Space Combine tools (Unite, Subtract, Intersect, Exclude)! Have you tried these shape creation tools, but have been confused about unexpected results? Do you wonder why you can’t find them, or why you can’t use them with the images you want?
There are so many things you can do with these tools: make custom card bases, create knockouts for durable vinyl or HTV designs, make custom photo collages for Print then Cut, and so much more!
I’ll show you what the Combine tools do, how they work, and give you some examples of what you can make with these incredibly useful tools. You will go from confused to pro in no time!
Here’s what we’ll cover:
- What do Weld, Slice and the Combine tools (Unite, Subtract, Intersect, Exclude) do?
- How to access the tools in Design Space
- Weld: how and when to use it
- The Combine tools: how they work and when to use them
- Slice
Weld, Slice & the Combine tools: what do they do?
Weld, Slice, and the Combine tools create new shapes from multiple objects. They can be applied to text, shapes, and vector images.
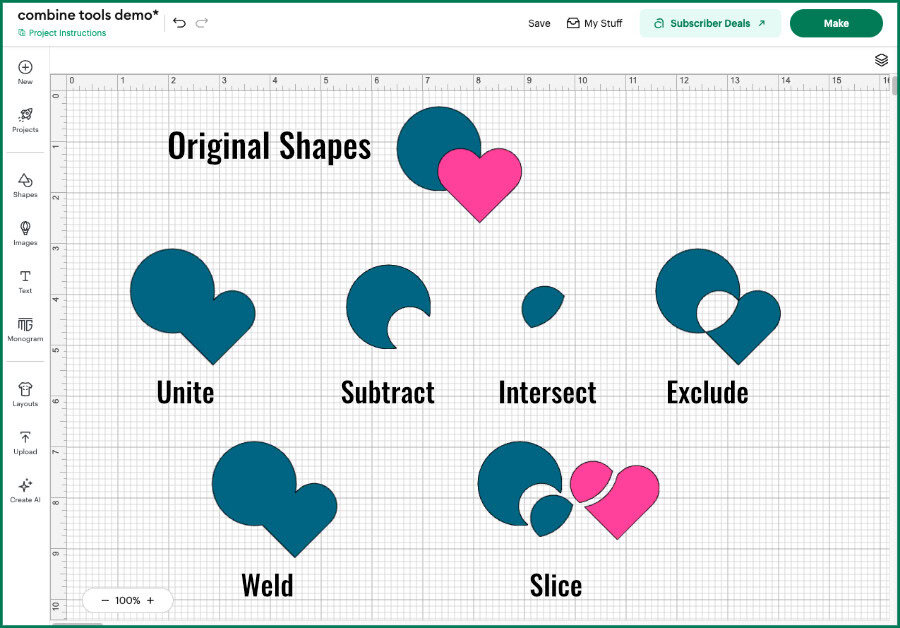
- Weld: creates a unified shape from multiple objects, but unlike Unite, it is permanent
- Slice: cuts 2 overlapping objects into multiple shapes; all the new shapes are retained
- Unite: creates a unified shape from multiple objects
- Subtract: subtracts the top object(s) from the bottom object
- Intersect: retains only the shared portion of overlapping objects, discarding everything outside the overlap
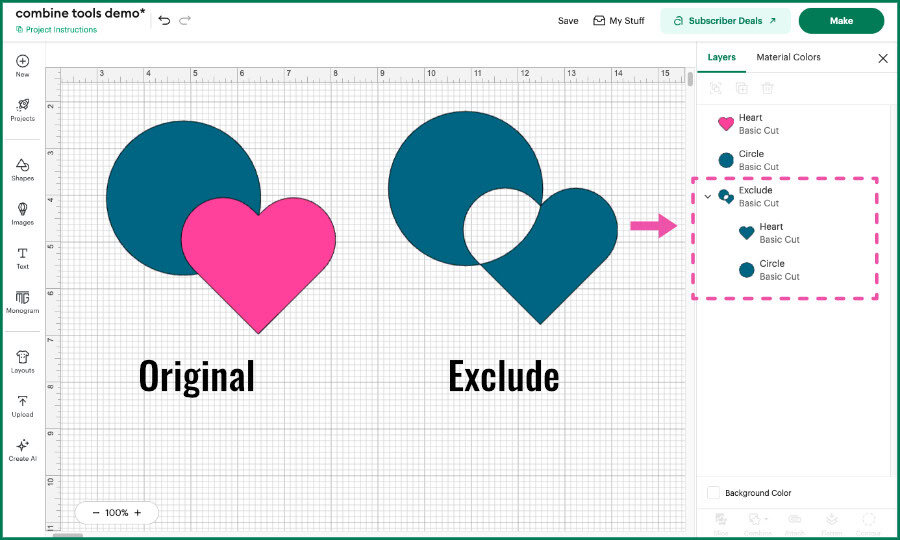
- Exclude: retains everything but the shared portion of overlapping objects, discarding the overlapping portion
Why can’t I find Weld, Slice, or the Combine tools?
If you can’t find one of the tools you’re looking for, look at what you have selected on the Canvas. The tools of the Design Space Canvas are contextual, meaning they will only show up if compatible objects are selected.
To access Weld and the Combine tools (Unite, Subtract, Intersect, Exclude):
- select 2 or more objects
- objects can be shapes, text, or vector images (cut files)
- these tools won’t work with bitmap (Print then Cut) images
- only Intersect requires objects to overlap
To access Slice:
- select ONLY 2 objects
- objects can be shapes, text, vector images, or bitmap images (as long as those have not been flattened)
When the compatible objects are selected, the Combine options will show up in 2 places on the Canvas: the Edit Bar and the Layers Panel.
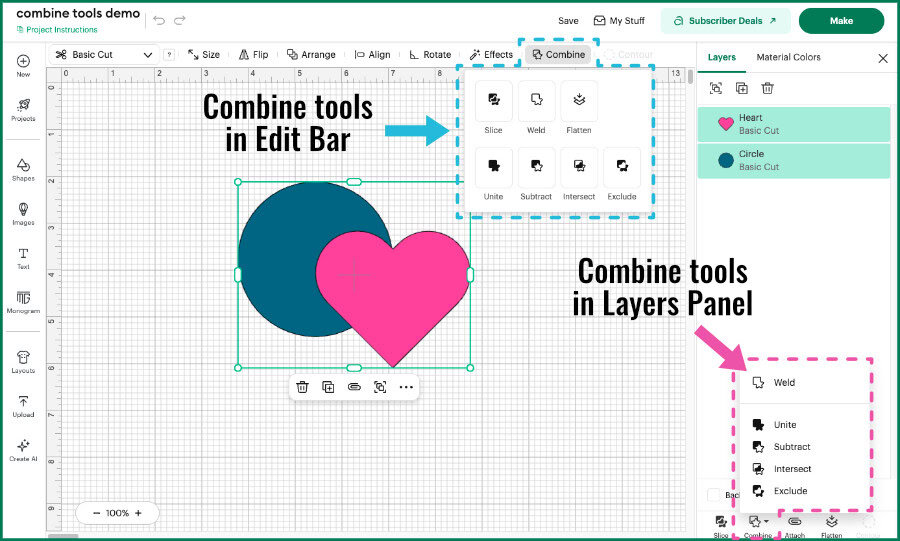
The Edit Bar‘s Combine menu includes Unite, Subtract, Intersect, and Exclude, along with Slice, Weld, and Flatten.
At the bottom of the Layers Panel the tools are arranged a little differently. Slice is its own thing, the Combine tools get a popup that includes Weld, and then you also get the icons for the Attach, Flatten and Contour tools.
Weld: permanently join objects (there is no “Unweld”)
Weld will create a single unified shape from 2 or more objects, and the new shape is permanent. The objects do not need to overlap or touch, Weld can create a single layer from non-overlapping objects.
Weld and Slice are the legacy shape creation tools in Design Space. They are destructive, meaning that once you apply them to your objects, the original objects are lost and only the new compound shape exists.
Although you can use the Undo arrow/Ctl+Z to undo these functions, they are not reversible.
In the example below, you can see that the new shape formed from the heart and circle is listed as a single layer called “Weld Result” in the Layers Panel.
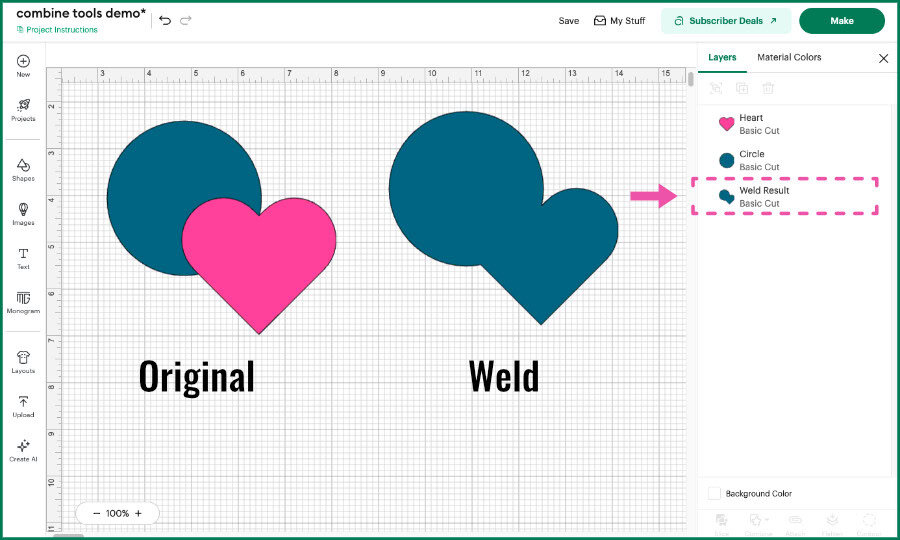
There are plenty of uses for combining objects like this: creating card bases, constructing papercrafts like boxes and envelopes, or turning multiple unconnected objects into a single layer so that you can Slice them.
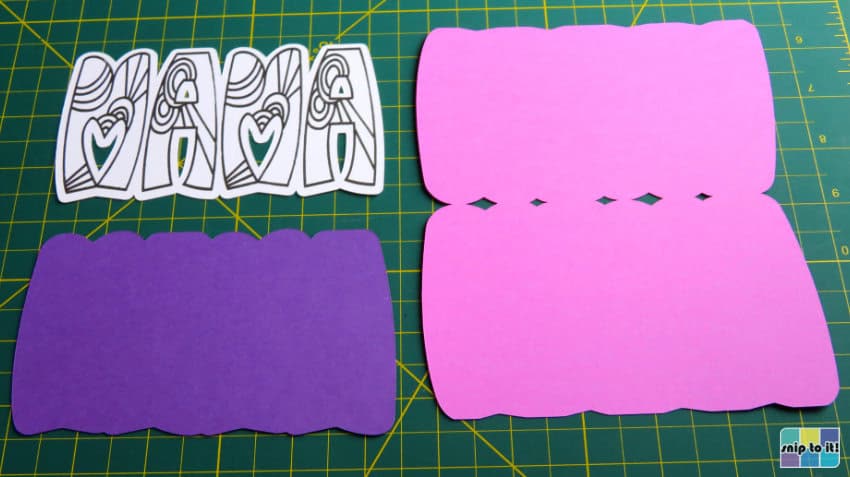
One of the most popular ways to use Weld is to create custom shaped card bases like these Mother’s Day cards, which were made by welding offsets together.
No more Welding (or Uniting) text!
One of the most common uses for Weld has always been merging text into a single shape, particularly if you’re using a cursive font.
I haven’t seen anyone talking about this, but as of at least June 2026, Design Space now automatically merges text when you go to the Prepare screen. No need to Weld or Unite text!
Type out your text and click Make, and you will see that any cut lines between letters are now gone. I have tested this with cursive text and text where I have pushed letters together, and it works for Cricut and System fonts.
Is Weld the same thing as Unite?
Weld and Unite (part of the Combine tools) both create composite shapes from multiple objects, but Weld is permanent, making it less versatile. They do the same thing, but Unite retains the original objects for editing.
I’ve been using Design Space since before the Combine tools existed, so I find myself using Weld just out of habit, but Unite is the superior tool.
Keep reading to learn all about the Combine tools and you’ll see why Unite is the better choice!
The Combine tools: Unite, Subtract, Intersect, Exclude
The Combine tools are Design Space’s version of Boolean operations on polygons. You can find versions of these tools in all vector design programs (Illustrator, Inkscape, Affinity, etc.).
These tools all have the following features:
- they can be applied to more than 2 objects at a time
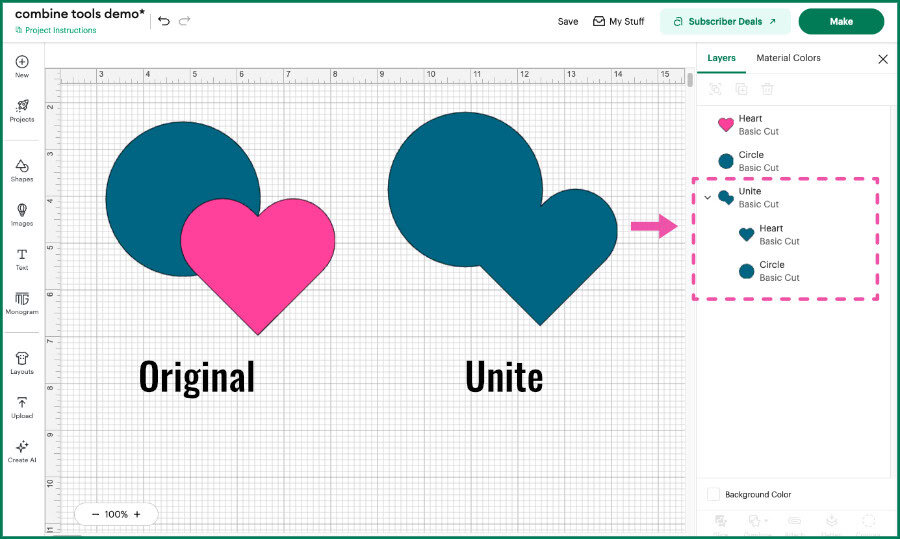
- applying these tools creates a new compound shape on the Canvas, and creates a new group in the Layers Panel
- each member of the group is present in its original form
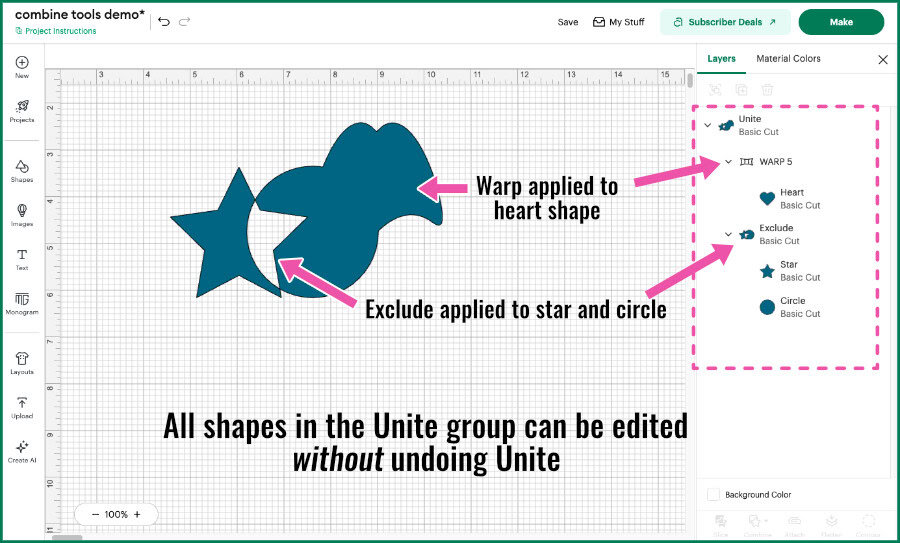
- the function of the tool can be undone, and all of the components in the group can be moved and edited without undoing
- tools like Align, Offset, Arrange, Resize, and even other Combine functions can be applied to the objects in the group, and the result on the Canvas will automatically adjust
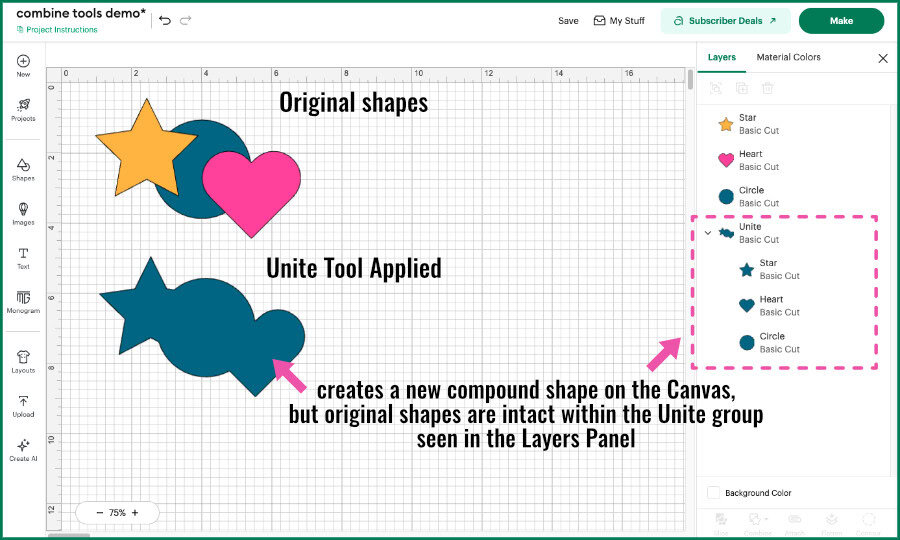
In plain terms: when you use Unite, Subtract, Intersect or Exclude, Design Space doesn’t permanently merge the shapes.
It creates a live relationship between them, so changing the original objects automatically changes the composite design that you see on the Canvas.
Undo and Merge options
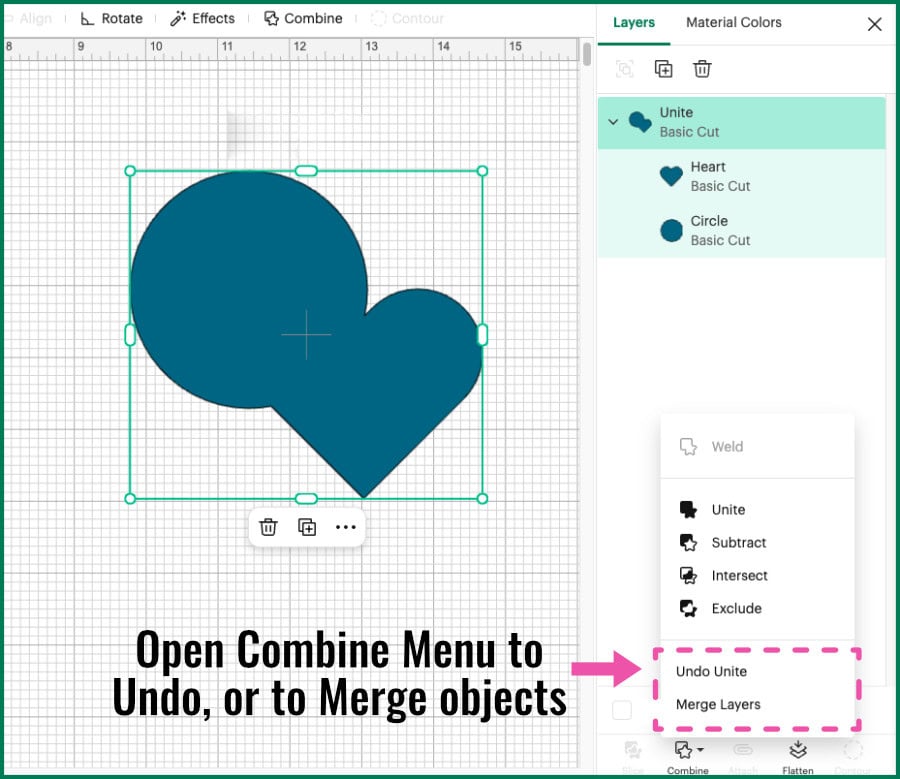
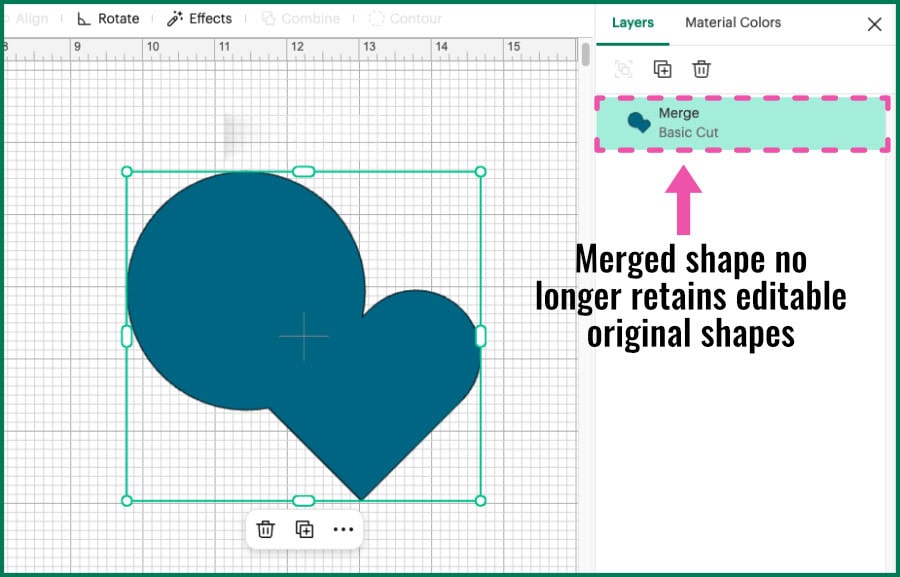
Any of the 4 Combine tools can be undone or made permanent. Select the Combine group and open the Combine menu to select either Undo or Merge Layers.
Merge Layers makes the new compound shape permanent and creates a single-layer object. The original contributing shapes will no longer be seen in a group in the Layers Panel.
The Unite Tool: the builder
Unite is the most obvious of all the Combine tools, since it simply creates a unified shape out of whatever objects you have selected. You can use Unite to create a single unified layer of text or multiple objects, even if those objects don’t touch.
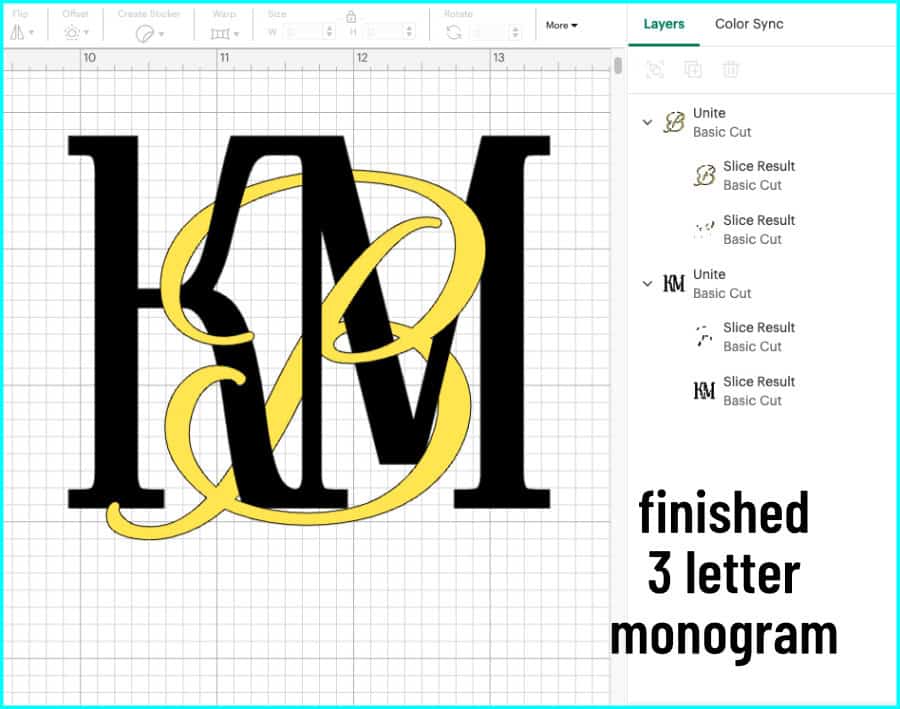
My favorite use for Unite is when I’m creating intertwined text. This is an example of a monogram that I cut using Slice, modified using Contour, then put back together using Unite.

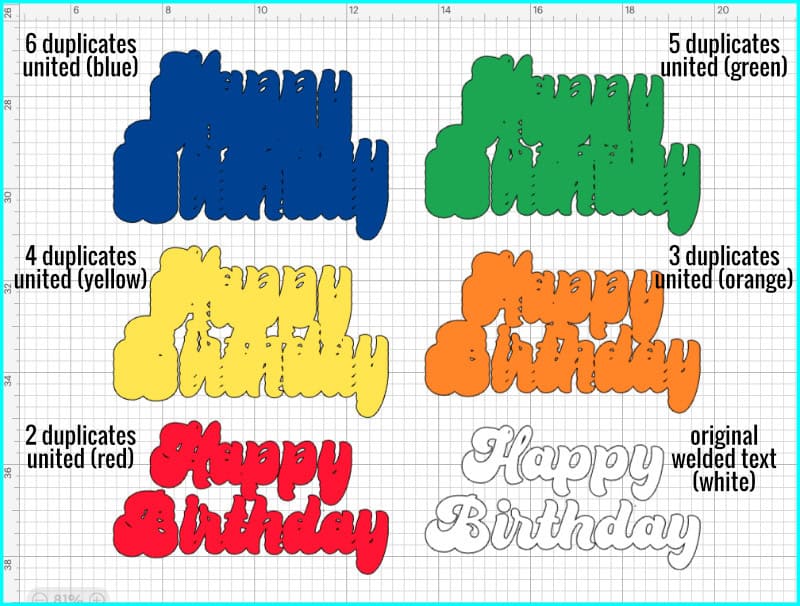
This rainbow stacked cake topper was not created using offsets. It was created using 5 Unite groups with different numbers of duplicates of the top text:

Subtract: remove one object from another
The Subtract tool subtracts the top shape(s) from the bottom shape. This creates a single new shape. Like all the other tools in this group, the action can be undone and the original shapes remain editable.
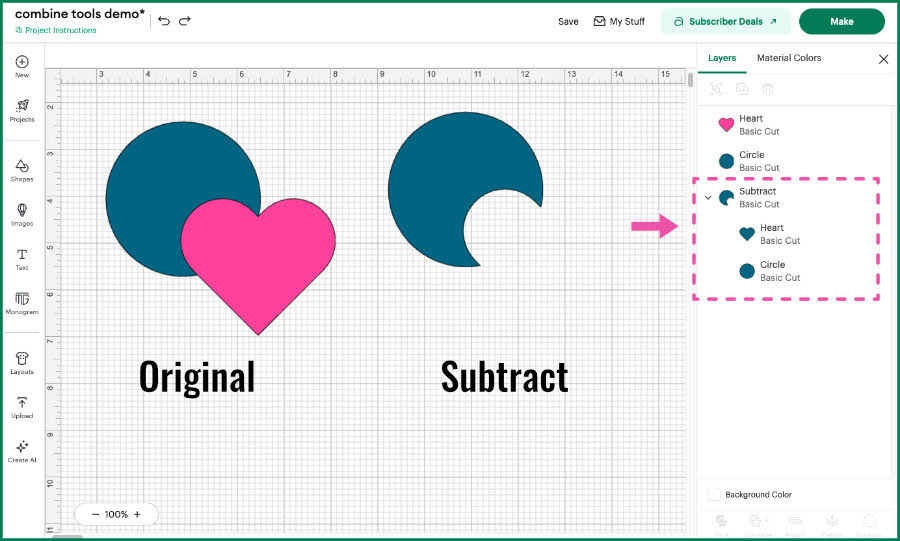
Subtract is a good way to split images, create knockout designs, combine and create new images. I have a few examples for you.
This split letter monogram was made by subtracting a rectangle from the W then uniting 2 bars along the open edges. So simple to make an elegant monogram!


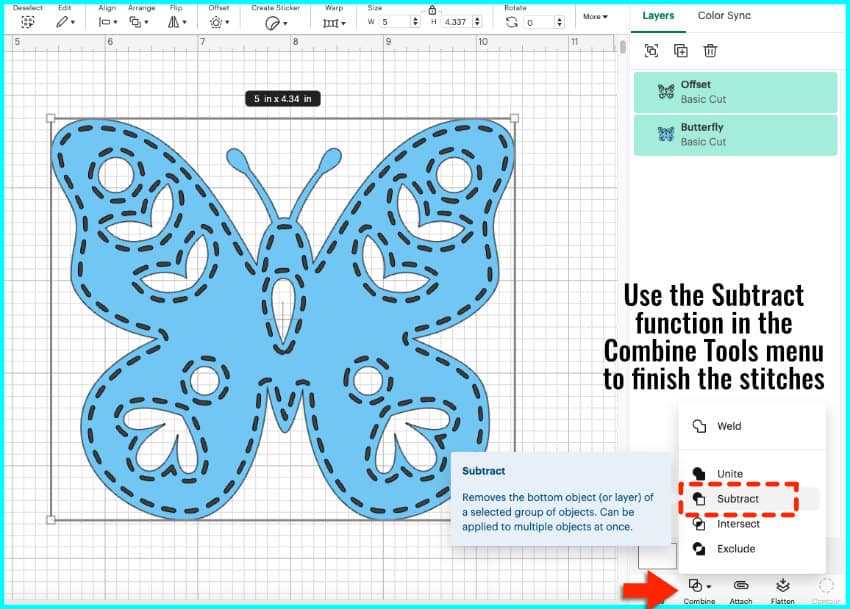
You can also use Subtract to simply remove an element from a design, knocking it out of a shape.
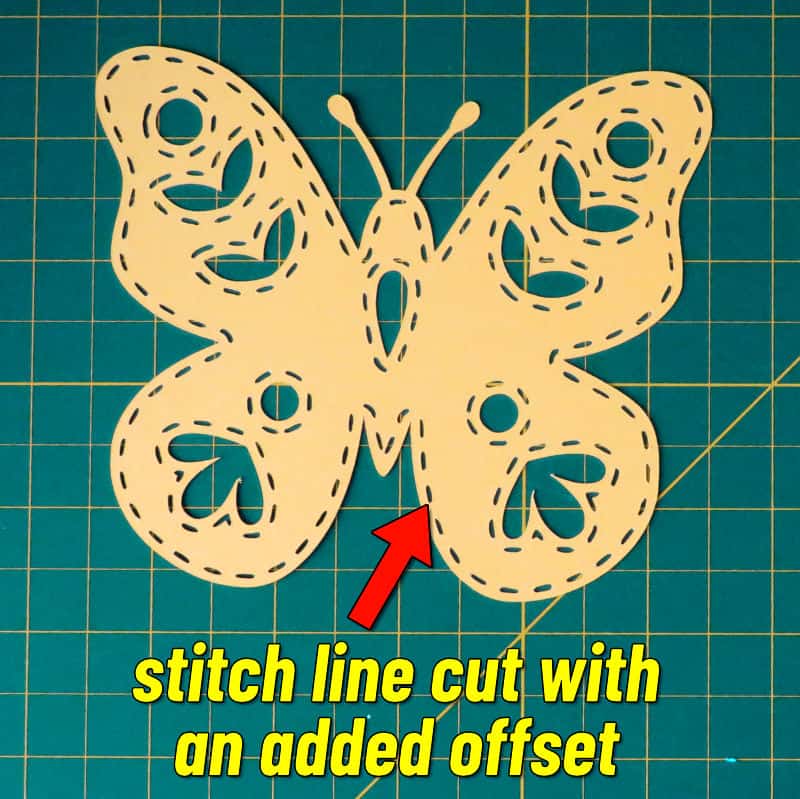
An example of this is the faux stitch effect technique. A screenshot of score lines is turned into an SVG and then Subtract is used to remove the dashed line from a shape to create a stitched look:
Intersect: keep the overlap
When 2 or more shapes overlap, Intersect creates a new shape out of only the overlapping portions. Intersect is the only one of the Combine tools that absolutely requires shapes to overlap in order to use it.
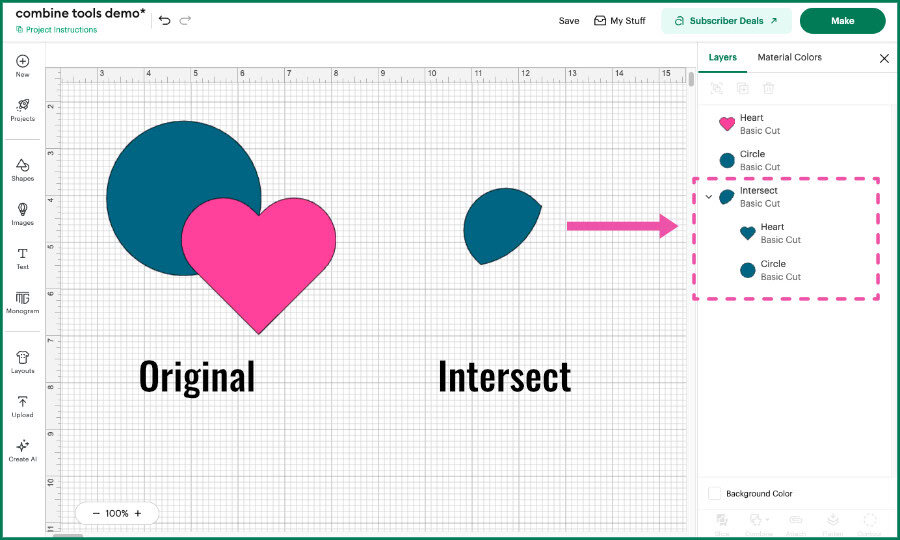
On its own, Intersect is not a particularly exciting tool. You can use Intersect to cut a shape or text out of a pattern, create a shaped outline for an image, or crop a compound shape.
Note that Intersect will not work with uploaded PNG files or other bitmap images. But it does work with patterns from the pattern library.
Perhaps more interesting is using Intersect along with Exclude to create a filled-in part of an Excluded image.
Exclude: remove the overlap
Exclude is, in my opinion, the most underrated of all the Combine tools.
If you apply Exclude to a group of objects, any place they overlap will become transparent. Anything outside of the overlap will be filled. This is the most complex of the Combine tools, and the coolest.
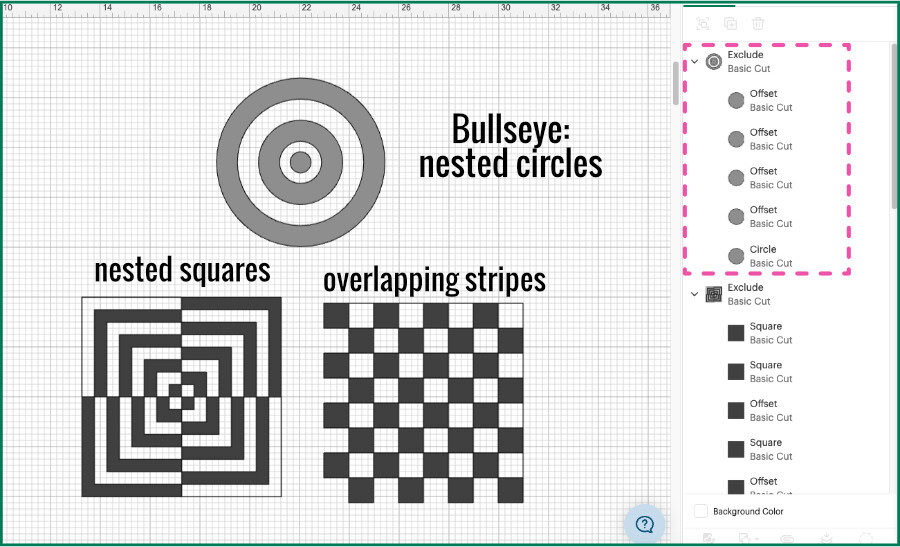
Exclude can be used to create optical illusion-style patterns, checkerboards, bullseyes, and a tons of other very stylish geometric or abstract art. On the more conventional side of things, you can use it to create a popular style of image where groups of objects like stars, birds, or butterflies exist within and outside of a shape.
Slice: a unique and versatile tool
Slice is a legacy shape creation tool, but unlike Weld, its function can’t entirely be replaced by the newer Combine tools.
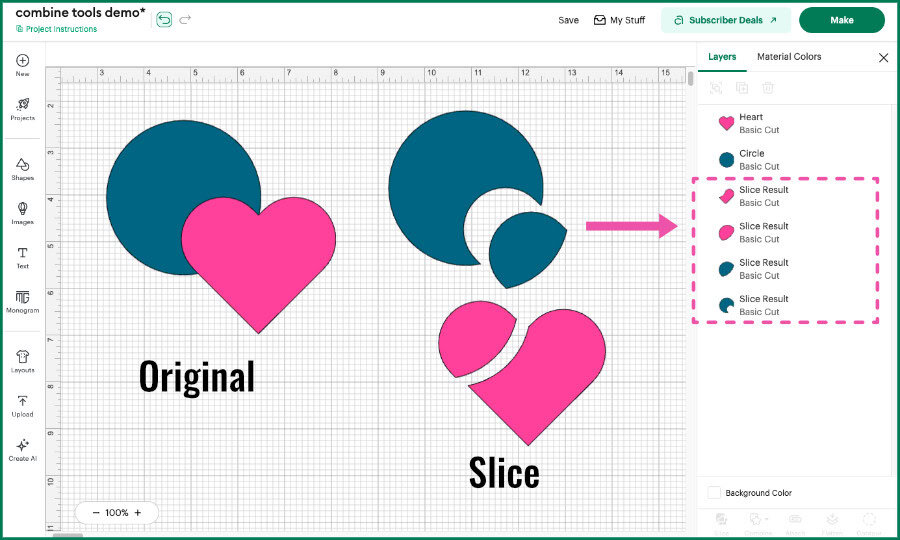
It cuts 2 overlapping shapes along the lines where they intersect, creating new shapes.
Slice differs from the Combine tools in a few key ways:
- you can only use Slice with 2 overlapping objects
- all of the pieces created by slicing are retained as new layers
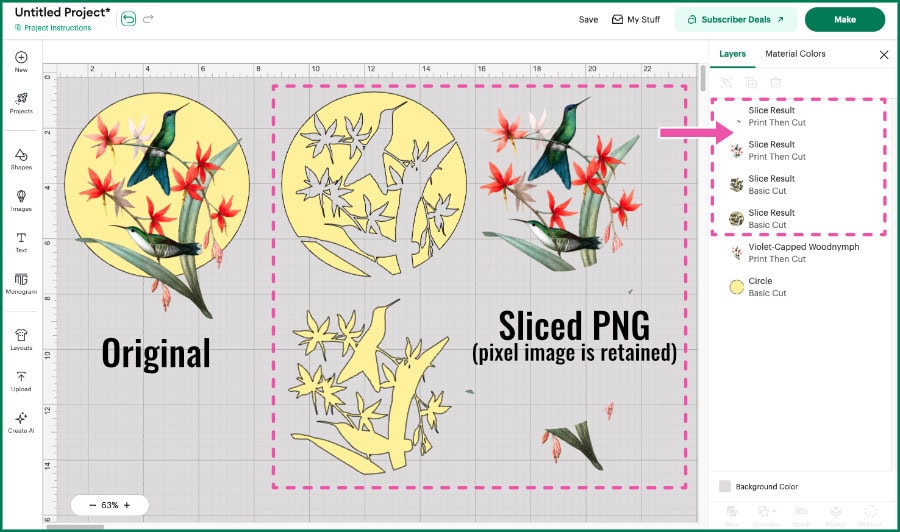
- Slice can be used with bitmap images for Print Then Cut as long as the image hasn’t been Flattened
- Sliced layers can be modified with the Contour tool, whereas Combine tool compound shapes cannot (unless they’ve been merged)
When you use Slice to cut a bitmap image, it is actually slicing the vector cut path generated as an outline of the image during the Upload process. Slice and Weld can both be used with uploaded images, but only Slice retains the actual bitmap image information.
Slice vs using Subtract
While Subtract removes parts of a shape, Slice splits the shapes along the overlapping edges. This allows you to keep various portions of each layer to create unique designs. In the Intertwined monogram example used above, 2 layers of text were sliced and selectively Contoured to keep different portions of the top and bottom layers.
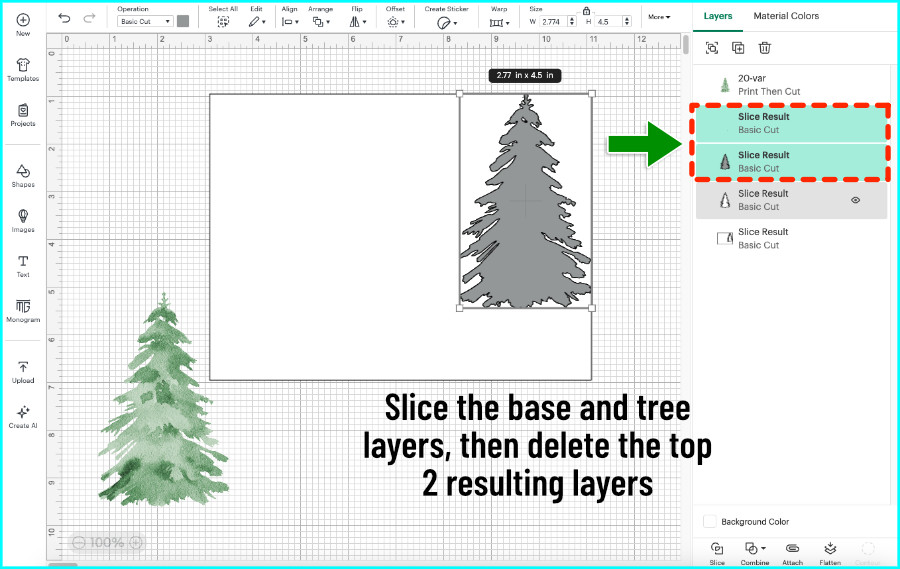
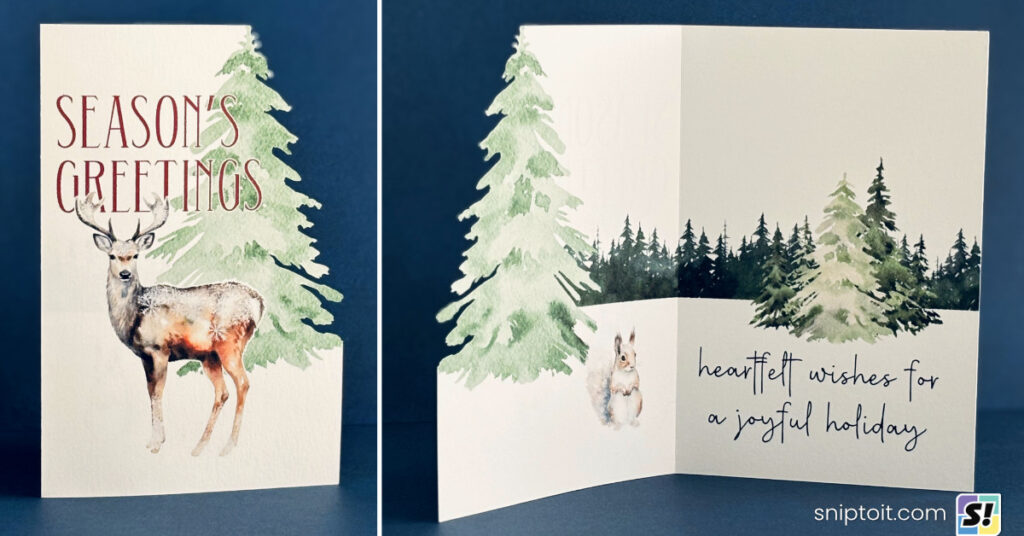
Another cool way to use the Slice tool is creating side edge cards. When I made this double sided print then cut Christmas card, I sliced an evergreen tree shape from a rectangular card base, contoured out the original straight edge, then United the remaining pieces to create the card base. (Flatten was later used to complete the design once all of the bitmap images were arranged on the base.)
Other ways we’ve used Slice include making eclipse cards, foiled kintsugi cards and filling text with a photo. There are really countless ways to use the Slice tool.
Next steps in your journey…
Now that you’ve gained a deeper understanding of the Combine tools, see unique way they can be used in conjunction with their best friends Offset and Contour:
Stop Ignoring this Design Space Hidden Gem! 6 Smart Ways to Use the Contour Tool
From Simple to Stunning: 11+ Ways to Use the Offset Tool for Next-Level Crafting (Updated!)
If you want more tips and tutorials, make sure you sign up for our newsletter to get the latest delivered to your inbox!